
Have you ever interacted with an AI-powered chatbot like ChatGPT to ask questions, obtain explanations, or seek help with code? It is undeniably impressive with its vast capabilities in generating human-like text across various topics. However, it does have limitations when it comes to domain-specific requests or staying up-to-date about recent events. This is because the knowledge of the Large Language Models (LLMs) that power these chatbots is confined to their training data.
This is where custom AI-powered chatbots shine. These chatbots can offer assistance in numerous scenarios since they can be tailored to your specific tasks or industries. By leveraging specialized knowledge and real-time data, they can provide accurate and relevant responses, making them highly effective tools not just for businesses, and customer support, but also for you!
In this blog post, we’ll build a custom AI-powered chatbot to help job seekers find the best fitting job based on their searches. All along, we’ll use the KNIME AI Extension to craft the chatbot in three steps:
- Create a vector store with a custom knowledge base
- We will learn to expand and update the knowledge of the underlying LLM by assimilating user-curated and domain-specific information. This process, known as Retrieval Augmented Generation (RAG), leverages a special type of database called vector store.
- Equip an agent with custom tools and function
- We will rely on a conversational retrieval agent equipped with the model’s conversational capabilities and its new augmented knowledge to craft a custom chatbot that is able to smartly match job seekers’ searches with job offers.
- Design a friendly UI for interaction
- We will create a user-friendly DataApp for seamless interactions with the chatbot. The component will leverage KNIME's Widgets nodes and interactive view features for enhanced aesthetics and layout.
Let’s get started!
Download the folder that contains the workflow to create a job finder chatbot from KNIME Community Hub.
1. Create a vector store with a custom knowledge base
The goal of this first step is to expand the knowledge base of the LLM. We'll do this by using retrieval augmented generation (RAG). In this way, we can take advantage of the user-curated and domain-specific knowledge base to obtain custom responses for job seekers.
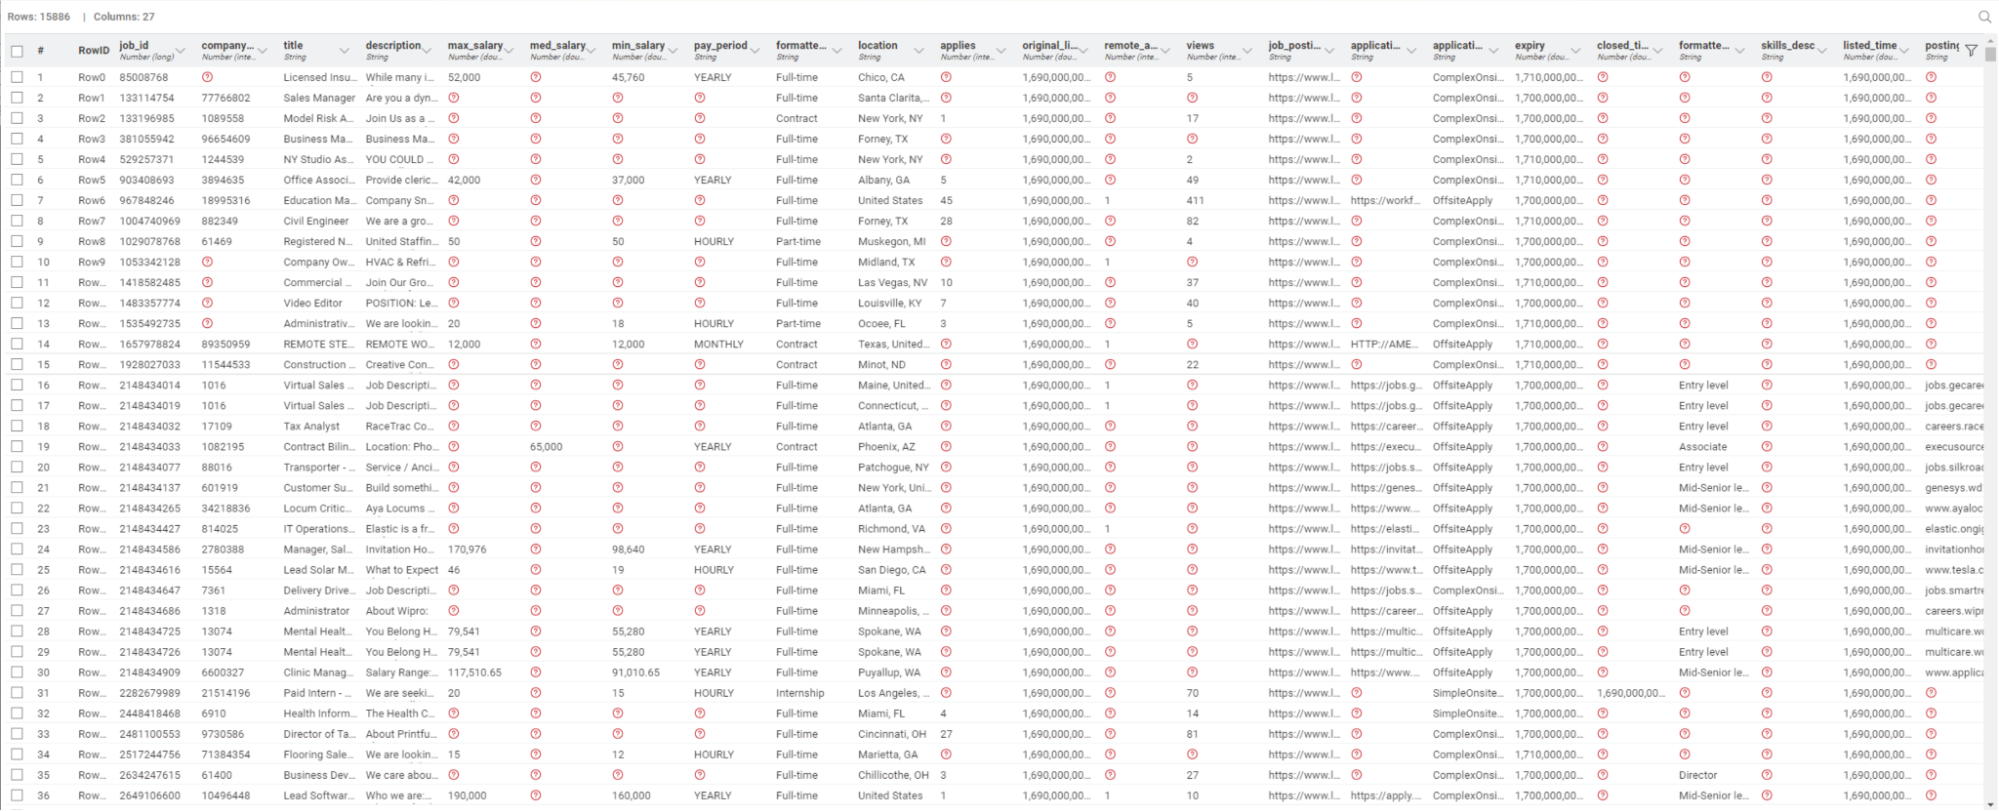
Import dataset of job offers
We start by importing a dataset containing job offers posted originally on LinkedIn. This dataset is the domain-specific knowledge base we’ll use to feed into the model. It includes multiple columns (e.g., job title, location, etc.) but our primary interest is the column containing the job description.
Get embeddings of job descriptions
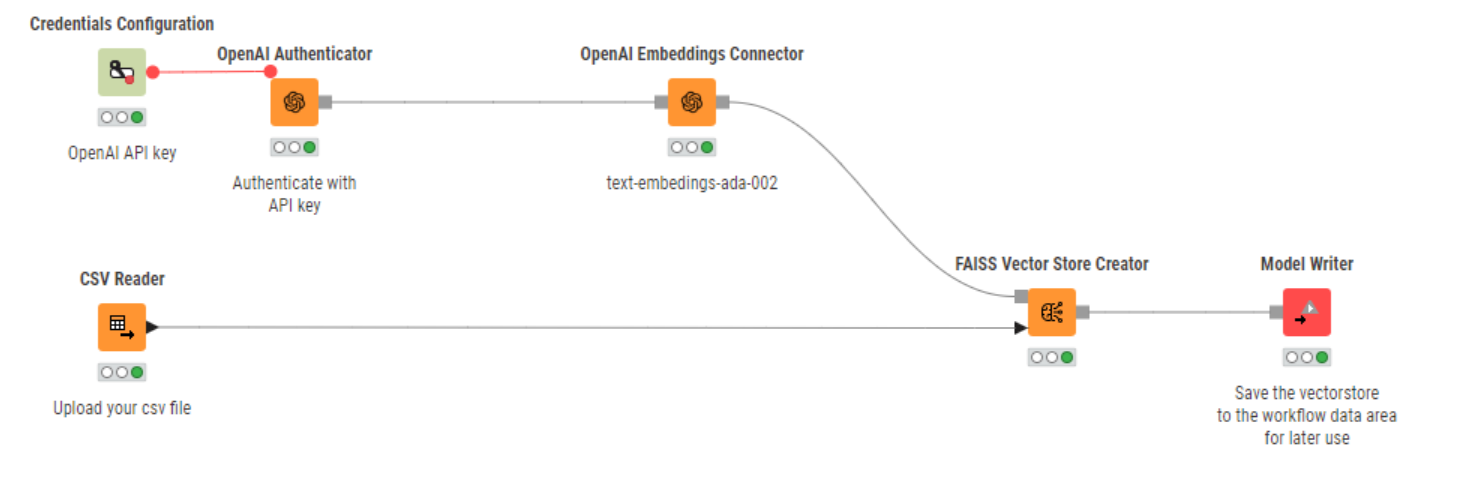
We rely on the nodes of the KNIME AI Extension to obtain embeddings of the job descriptions. We will then store the embeddings in a dedicated database for efficient management and retrieval.
To do that, we employ the OpenAI Authenticator node to authenticate to the service and the OpenAI Embeddings Connector node to access an embedding model of our choice (in this case, “text-embedding-ada-002”).
These nodes connect to closed-source models that can be utilized through an automated process with an API key. This provides a flexible pay-as-you-go framework. However, it's worth noting that we can replicate the creation of embeddings also using open-source alternatives.
For example, we could connect to open-source local models through the GPT4All Engeddings Connector node, or to open-source API-based models using the HF Hub Embeddings Connector node.
Create a vector store database and store embeddings
Put simply, a vector store is a database where we can store numeric representations of words, phrases, images, or audio files within a continuous, high-dimensional space. Vector stores serve as specialized storage of these high-dimensional vectors and allow us to swiftly perform semantic similarity searches across objects, ensuring fast and accurate retrieval of stored information.
We’ll create our vector store for the job descriptions with the FAISS Vector Store Creator node. This node also allows us to include metadata, such as the job title and location.
Next, we save the vector database locally with the Model Writer node so that we can swiftly re-use it in the next steps.
Testing the vector store: does it retrieve what we need?
It's good practice to now test whether the vector store is working as expected. That is, whether it is able to retrieve pertinent documents for a given input prompt. If the retrieval process is successful, we’ll feed the vector stores to the LLMs to provide ad-hoc responses to job seekers in the next steps.
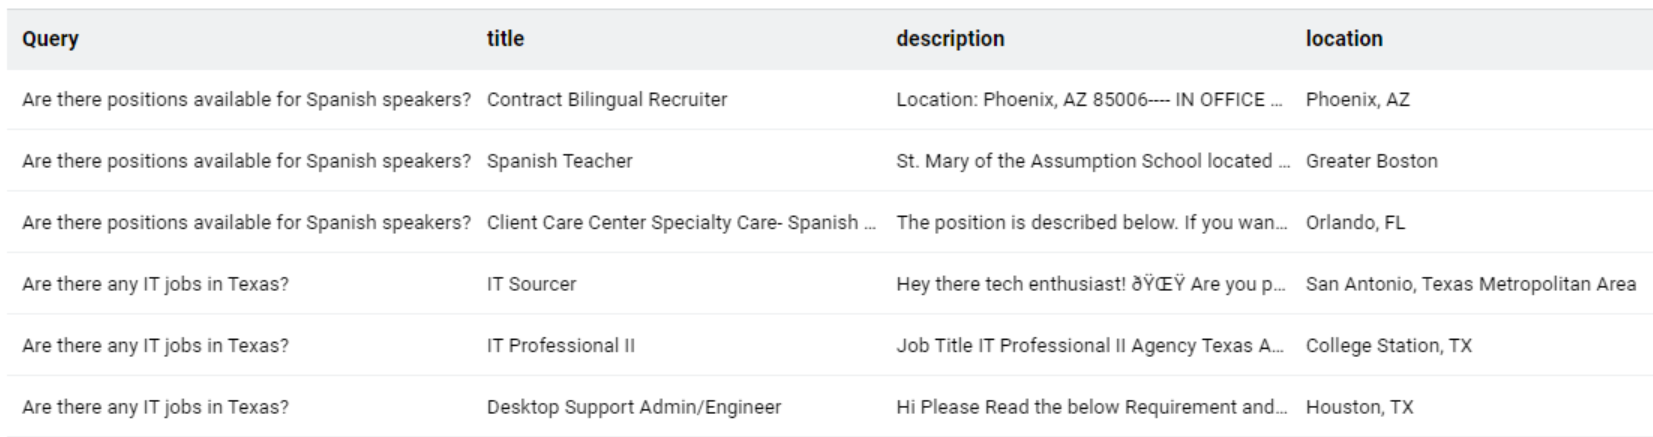
For this simple test, we can import the newly created vector store with the Model Reader node and feed it into the Vector Store Retriever node. In its lower input port, the node requires the input of a few prompts. For example, we could ask: “Are there positions available for Spanish speakers in your store?" and "Are there any IT jobs in Texas?". The Vector Store Retriever node will scan a manifold of vectors to retrieve the most similar ones based on the principle of similarity between the embeddings of the prompts and those of the job descriptions.
In the figure below, we can see the output table of the node. It contains the prompts or queries, the job titles of the retrieved positions, their descriptions, and the corresponding locations.
Since the job offers are relevant to our prompts – let’s move to the next step!
Tip. What could we do if the retrieved job offers weren’t relevant to the prompts? 1) We could try to improve the prompts by including keywords, providing more context, or formulating our requests more clearly. 2) We could use a different embedding model and/or vector store. 3) We could expand the knowledge base with additional documents.
2. Equip an Agent with Custom Tools and Function
In this step, we'll enable our chatbot to provide smart and context-relevant human-like responses. To do that, we’ll rely on the creation of a conversational retrieval agent.
In a nutshell, conversational retrieval agents are AI-powered systems designed to engage in natural language conversations with users to retrieve specific information or perform tasks. To understand user queries and provide relevant responses, these agents leverage the conversational capabilities of LLMs as well as a suite of user-curated and specialized tools (usually one or more vector stores). Depending on the user's prompt, agents can discern which tools, if any, to utilize to deliver the most compelling response. Additionally, they can be directed to execute specific functions or behave in a prescribed manner.
In this step, we’ll identify a suitable chat model, blend the model and its augment knowledge created in Step 1, and feed the agent with them. We’ll also instruct the agent on the desired behavior (or function) and specify under which circumstances it should/shouldn’t use the knowledge base. Lastly, we will prompt the agent to get responses.
Select a chat LLM
There are many different chat LLMs you can choose from, i.e. models that have been optimized to understand and generate natural language or code in conversational tasks. For example, OpenAI’s ChatGPT, Mistral AI’s Mistral-7B, or Meta’s Llama-2-Chat.
Depending on the specific use case, one chat LLM might be more suitable than another. Relevant factors usually include: model performance and processing speed, need for larger context windows, costs (open vs. closed-source), concerns about data privacy (local vs API-based models), and proper maintenance and documentation.
For our specific use case, we chose OpenAI’s ChatGPT (more specifically, the “gpt-3.5-turbo” model) because we don’t have data privacy concerns, the model has a good performance, is easy to access and can be consumed at an affordable price. However, if the price is a show-sopper, there are many open-source LLM alternatives, available either locally or API-based models.
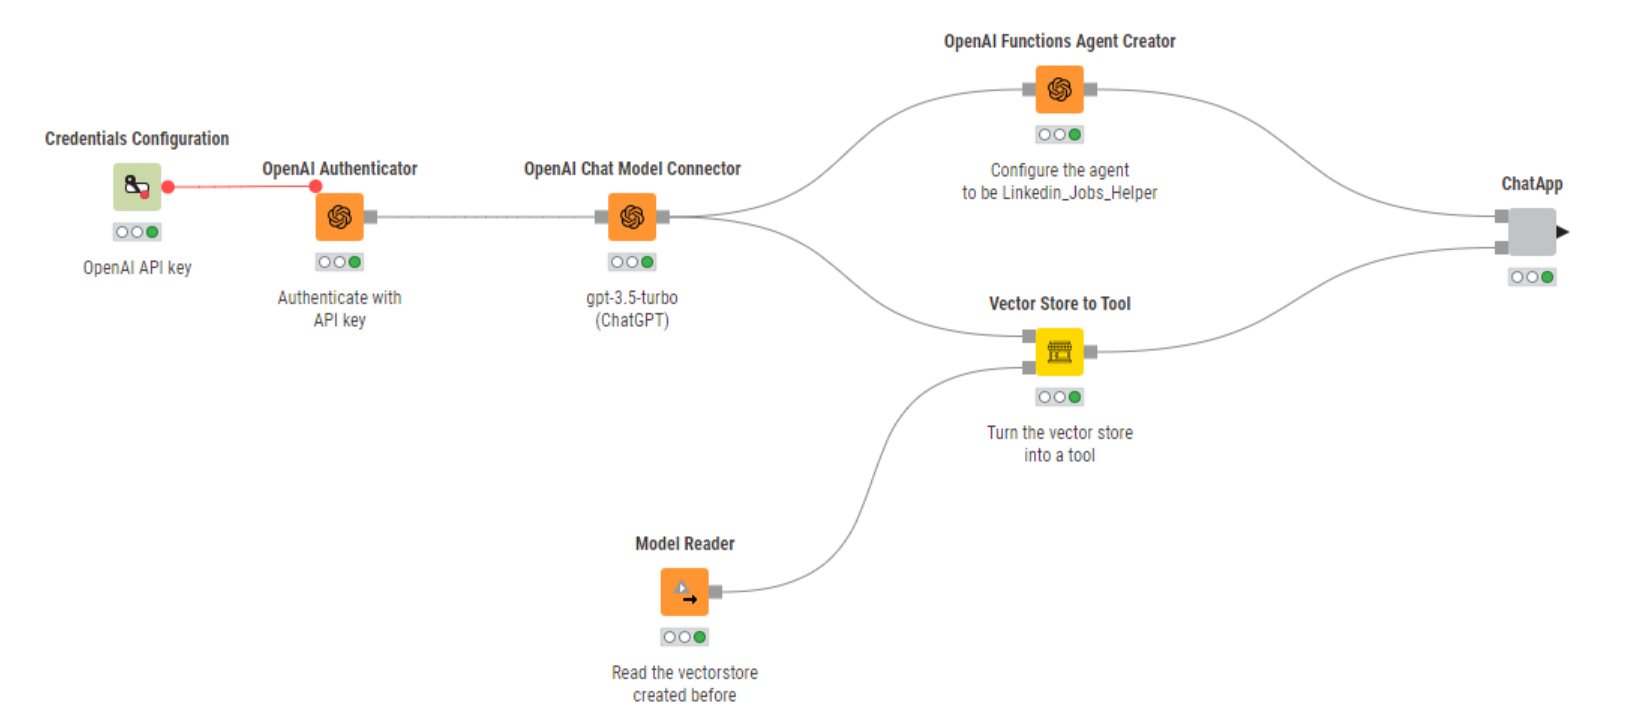
We authenticate to OpenAI’s service with the OpenAI Authenticator node and select the “gpt-3.5-turbo” chat model using the OpenAI Chat Model Connector node.
Blend the chat LLM and the vector store
After settling on a chat model, we can now start assembling our smart chatbot. To do that, we need to bring together different resources, such as the chat model itself and the knowledge base.
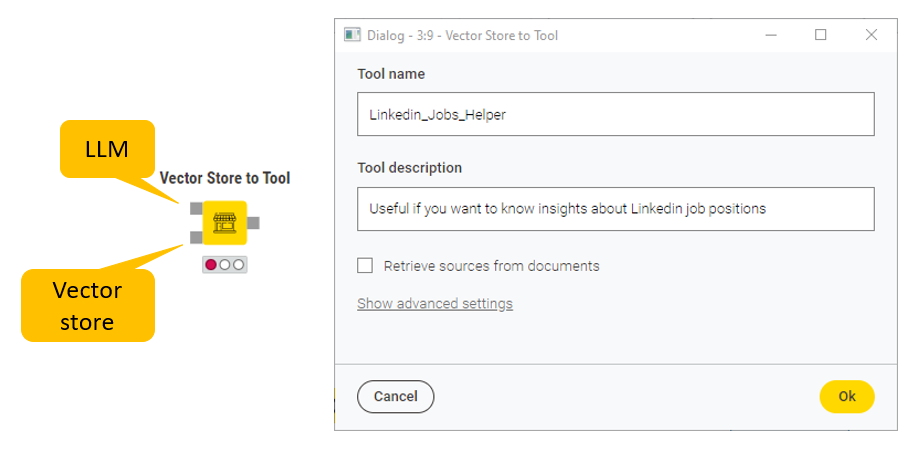
We start off by importing the vector store using the Model Reader node. Next, we feed the LLM and the vector store into the Vector Store to Tool node. This node acts as a resource blender by equipping the downstream agent with an LLM to generate human-like responses, and the vector store containing job descriptions.
Furthermore, it grants us the capability to assign a name to our tool and provide a description. These features are especially useful to provide specific details to the downstream agent as to which knowledge base it should use in case several are available.
Define the agent’s behavior
Before we can configure our agent, we also want to define how it should answer questions. That is, we need to specify the function or role the agent should take. That could be anything from "Answer like a data scientist" or "Use simple words to explain to a 5-year-old".
In this example, we want our final chatbot to be a helpful career assistant and provide job seekers with full, fluent-sounding responses (as opposed to short bullet point-style answers). To do that, we can use the OpenAI Functions Agent Creator node, which acts as a sort of “behind-the-scenes” prompt engineer of the agent’s behavior.
In the node configuration, under the “System message” field, we type the following text: "You are Linkedin_Jobs_Helper, a useful AI assistant able to answer questions about jobs and careers. Elaborate the response to make it sound fluent". This message sets the stage for the behavior and capabilities of the chatbot, giving it context and purpose.
Prompt the agent
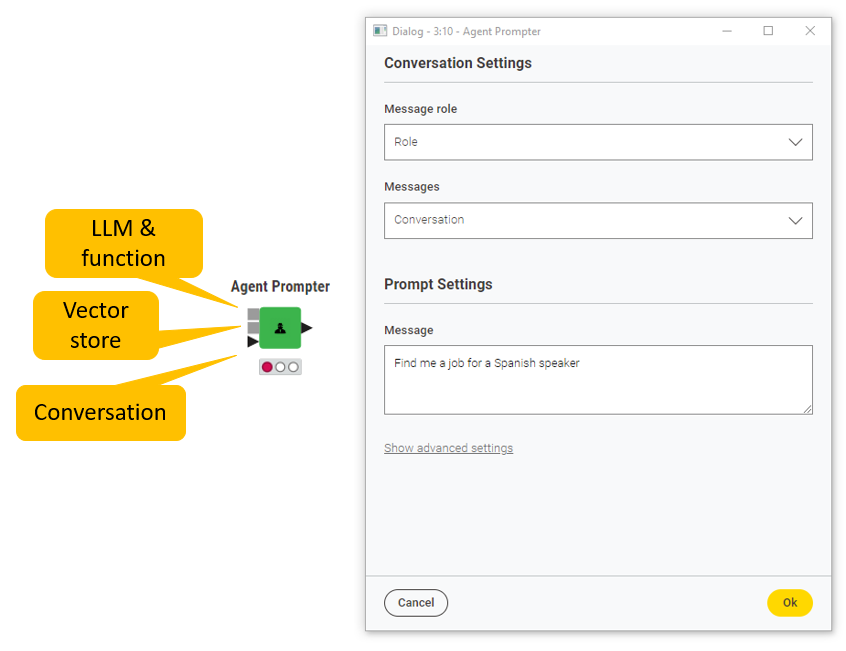
We are now all set to create a conversational retrieval agent and equip it with the resources it needs: an LLM and a function, a tool (i.e., a vector store), and a table where we can store our conversation.
The KNIME AI Extension allows the creation of agents with the Agent Prompter node. With this node, we can prompt the underlying LLMs, and receive user-relevant and domain-specific responses. This node also allows user-agent interactions to happen iteratively and be stored in a conversation history, where we can define the role of the speakers (e.g., “human” vs. “AI”). That’s exactly what we expect from a chatbot!
3. Design a friendly UI for interaction
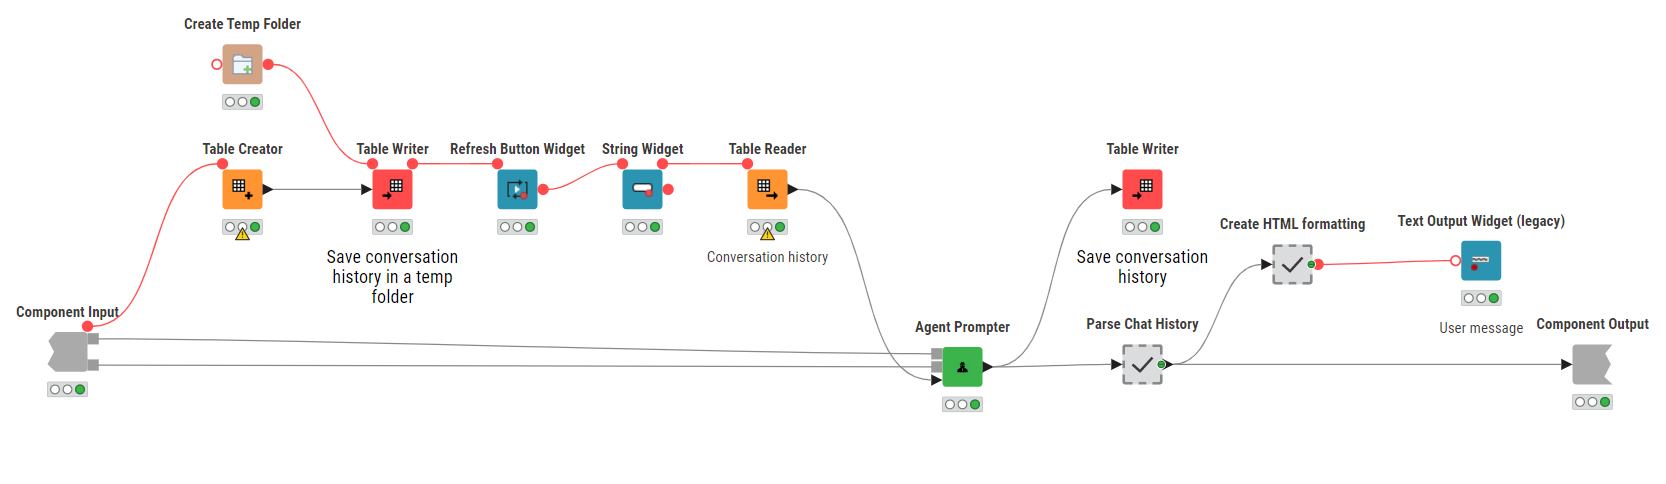
In the last step, we want to build a data app with a user-friendly interface and interact with the chatbot. For that, we can wrap the Agent Prompter node in a component and capitalize on two KNIME features: Widgets nodes, and components’ interactive view to enhance the aesthetics and layout of interactive elements effortlessly.
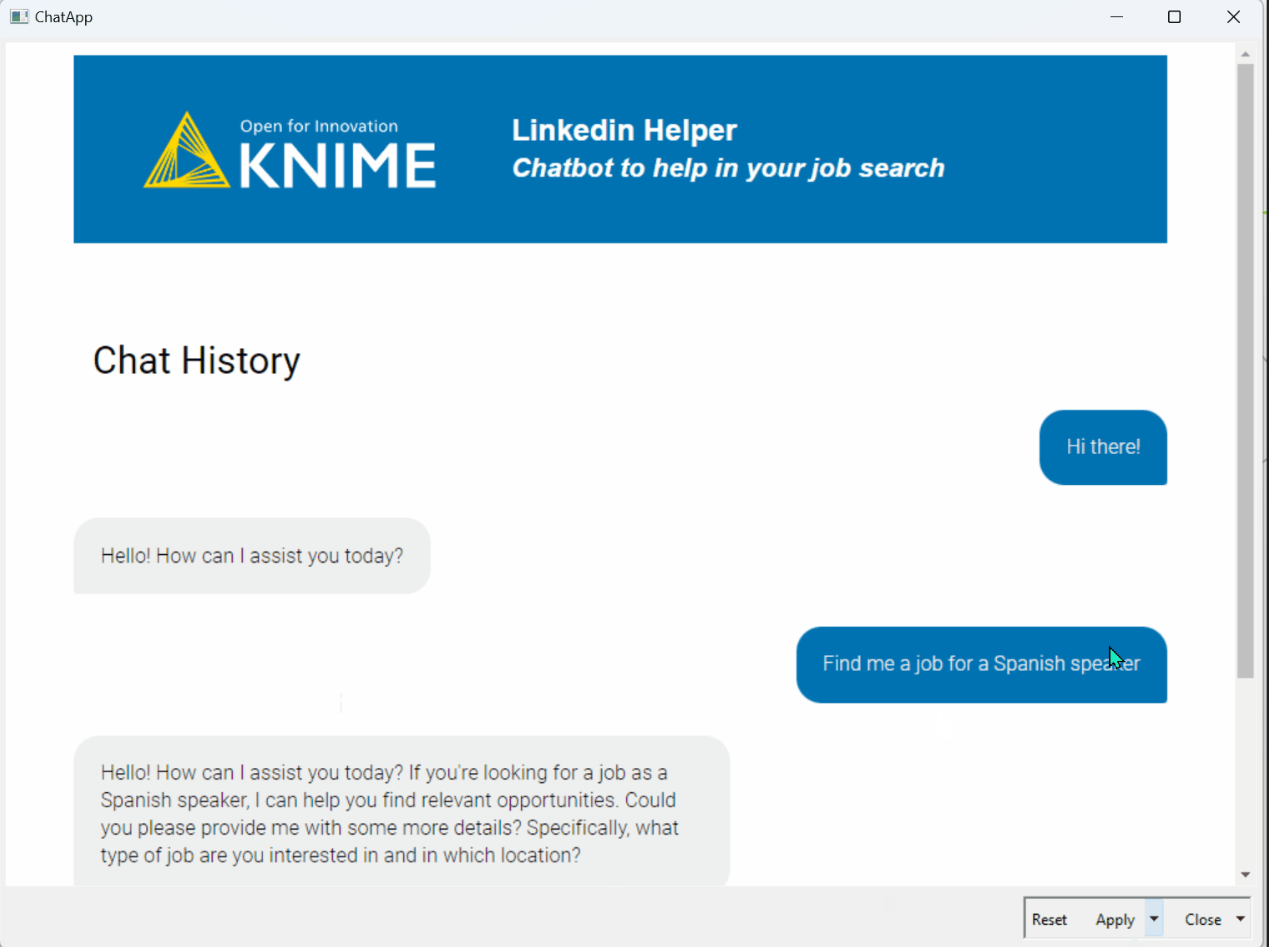
We start by creating an empty table with the Table Creator node and storing it in a temporary folder. This empty table will later be filled with the interactions between the user and the chatbot. The String Widget node collects the new user prompt and passes it on to the Agent Prompter node via a flow variable. For example: “Find me a job for a Spanish speaker”.
With the Refresh Button Widget node, at each interaction we can re-execute downstream nodes and trigger two events: prompting the Agent Prompter node to respond to the new user message, and reading previous messages as a conversation history with the Table Reader node.
Finally, we parse the output of the Agent Prompter and display it with the Text Output Widget (legacy) node as conversation bubbles in HTML format with custom CSS styling.
Finito!
In the animation below, we show how the conversation between a job-seeker and the chatbot would look like.
Build your own chatbot with KNIME
In this blog post, we built a personalized chatbot aimed to help job seekers find the best opportunities for their inquiries. We started by creating a vector store database using a user-curated knowledge base. Then, we brought together the conversational capabilities of LLMs and the vector store database to equip an agent with the resources it needed to act as a helpful job-finder chatbot. Lastly, we wrapped the agent in a component and designed a friendly and interactive UI that facilitates the interaction between the user and the chatbot.
Try the workflow LinkedIn chatbot yourself, adapt it to your use case, and unlock the potential of codeless AI-powered chatbots in your applications!