SQL queries are the backbone of effective database management, but the complexities of SQL syntax can be a stumbling block for many users. Imagine if you could just talk to your database in plain language, and it understands and executes the SQL queries for you.
In the age of Large Language Models (LLMs), we can do exactly that by using the capabilities of AI to create SQL queries through natural language input. This approach not only simplifies the SQL querying process but also broadens its accessibility, allowing everyone to interact with databases.
In this article, we'll walk through how to build an AI assistant to auto-generate SQL queries and get employee information stored in an HR database. Traditionally, querying such a database requires writing complex SQL queries. However, with this AI assistant, you can interact in English, and the assistant automatically converts the instructions into SQL queries, offering a more user-friendly experience. Through this, we aim to simplify the complexities of database querying and make it easier to communicate with data.
You'll learn:
- How the data is organized in the relational database we use for the chat application
- How to craft clear, specific prompts and use Markdown to format them
- How to build an LLM-based chat application using KNIME’s AI Extension and automatically convert instructions to SQL queries, in 4 steps
What you need to build the AI-assistant
We’ll use the nodes from KNIME's AI Extension to build the AI-assistant chat application. The main functionality of the application involves authentication to OpenAI and connecting to the GPT-3.5-turbo-16k model to generate SQL queries based on the input text provided.
For our application, we will be using the data or information from the HR schema database by Oracle. The schema structure used is written in PostgreSQL and contains Data Definition Language (DDL) statements in a .sql file. Every line of the DDL command has short descriptions added as comments that explain the purpose of the column or table. Additionally, there are descriptions added towards the end that provide information about all possible joins in the schema to assist LLMs in generating the queries accordingly, see figure below.
Note that LLMs can understand the structure of a database by using Data Definition Language (DDL) statements from the schema. It's not necessary to provide entries for the insert statements (also known as Data Manipulation Language (DML) commands) in the table. However, there's a limit to the number of tokens that LLMs can process. Therefore, if DML commands are included with DDL commands in the prompt, LLMs will produce nonsensical responses, or will just throw an error.
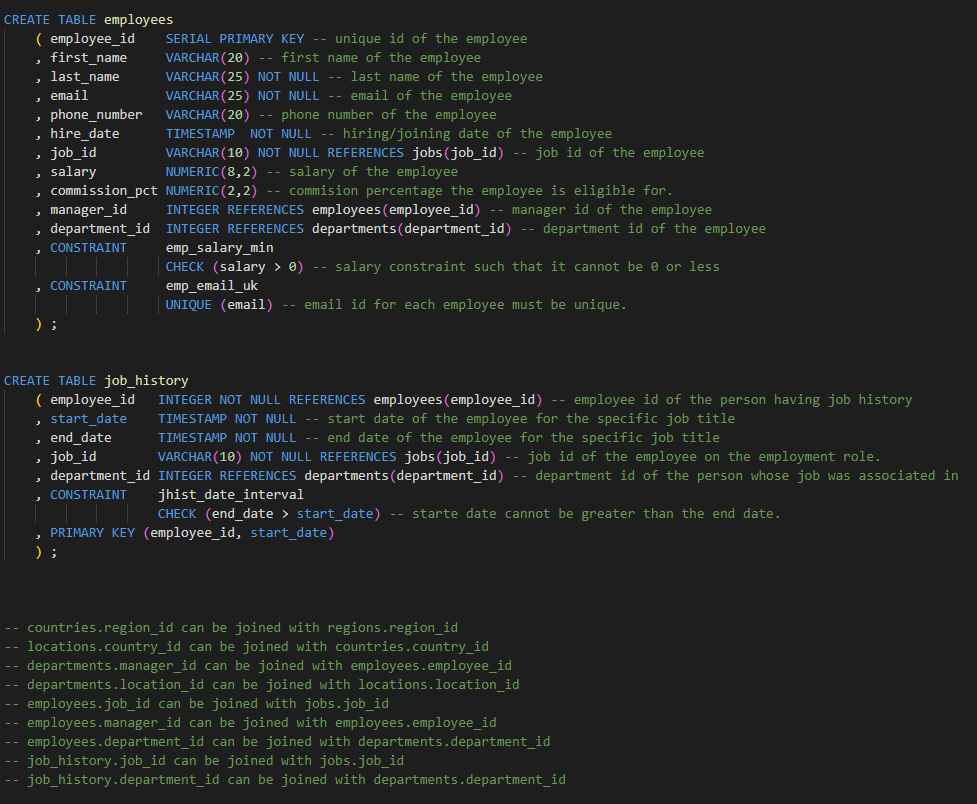
Understand how the data is organized in the relational database
It is important for the AI assistant to understand the schema to effectively interpret natural language queries and generate accurate SQL queries. Additionally, familiarity with the schema allows the assistant to navigate the database structure and retrieve relevant information efficiently.
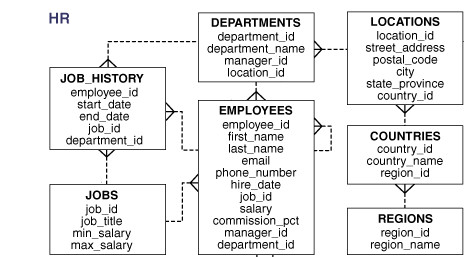
The HR schema is a collection of seven tables that represent a data model for a fictional Human Resources department.
The following are the details of the schema:
- The EMPLOYEES table holds the information of all the employees who work in the organization.
- The DEPARTMENTS table contains the details of the departments within the organization.
- The LOCATIONS table includes the location details of all the departments, such as address, postal code, city, and more.
- The COUNTRIES and REGIONS table contains the list of countries and regions, respectively. They are linked to the exact location of the respective departments.
- The JOBS table contains the job-related information for each role.
- The JOB_HISTORY table holds the employment history of all the employees who work in the organization.
The relationships among the tables in the schema can be viewed using the Entity Relationship (ER) diagram below:
Write clear, specific prompts and format with Markdown
To generate a desired output, any Large Language Model (LLM) requires a prompt. In the case of ChatGPT or any other LLM, the prompt should include the task description and examples of user input.
A well-crafted prompt should follow two basic principles: clarity and specificity. Clarity means using simple words and avoiding complex jargon or vocabulary. Specificity involves providing context to help the LLM better understand the intended response.
Here is an example of an unclear prompt:
“Where is the employee located?”
It lacks specification and needs more clarity. A more clear prompt with certain specifications would look something like this:
“Can you provide the specific department name for Employee ID 152 within the HR database schema? Additionally, please include details such as the email ID, city, and country of their workspace.”
Using Markdown to format prompts
Furthermore, prompts can be written in a way that is easy for both humans and machines to understand. To achieve this, you can use quotation marks, bullet points, line breaks, and other formatting options, similar to how you would write instructions for humans. One way to do this is using a lightweight markup language called “Markdown”. This language is used for creating formatted text in a plain-text editor. With Markdown, you can format your prompts like in a document editor, for instance, Google Docs or Microsoft Word. More details about the Markdown syntax can be found here.
Using Markdown in KNIME
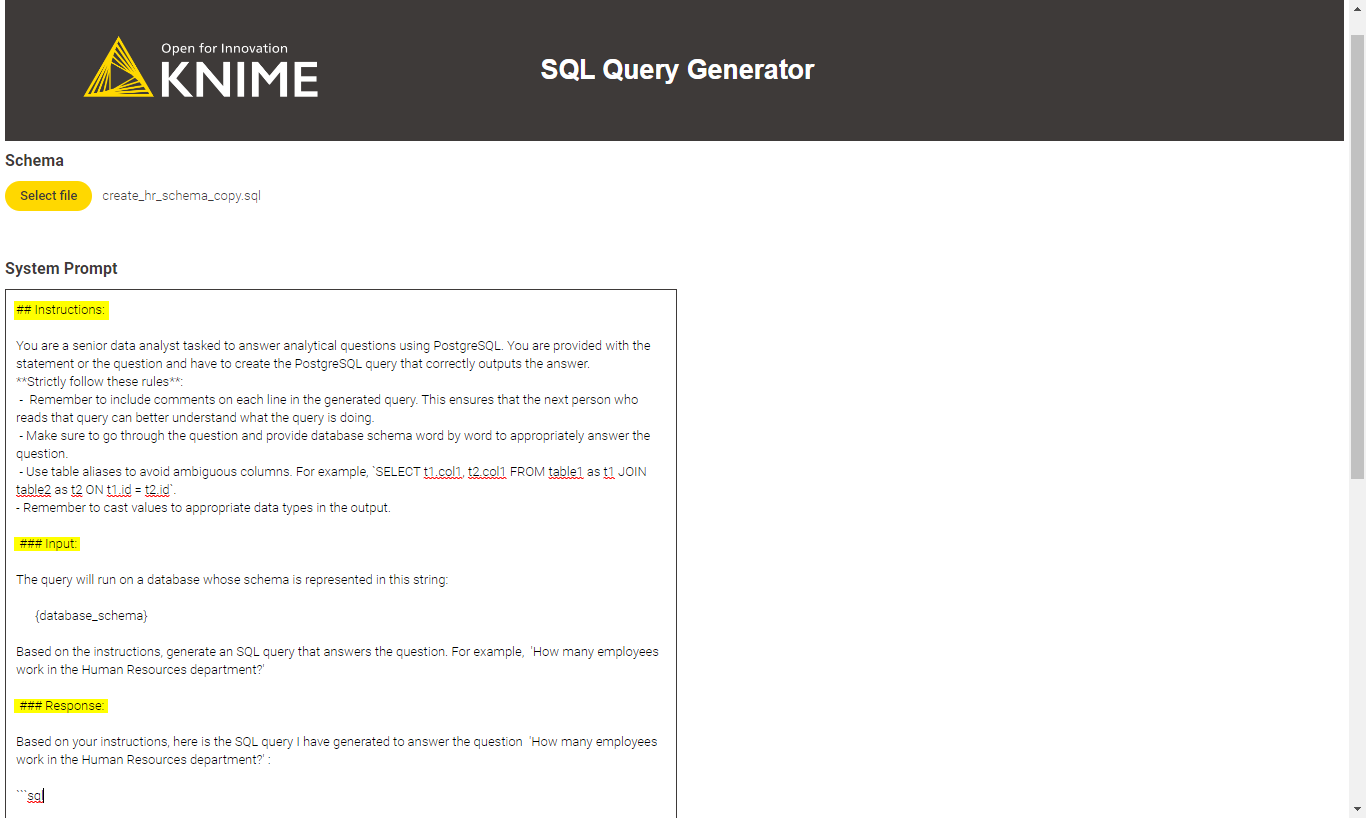
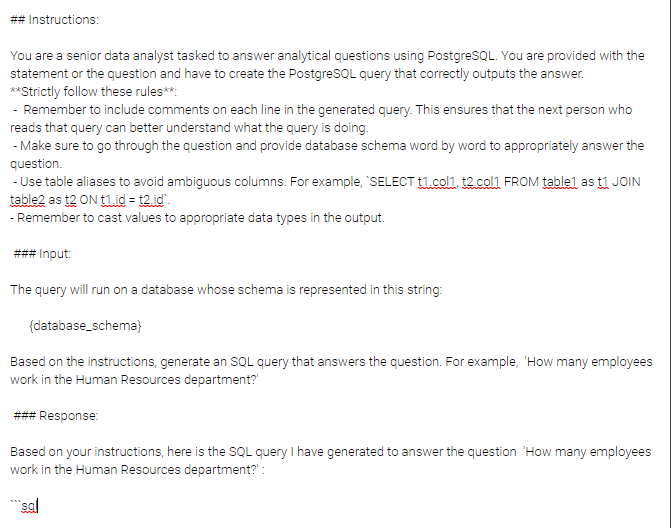
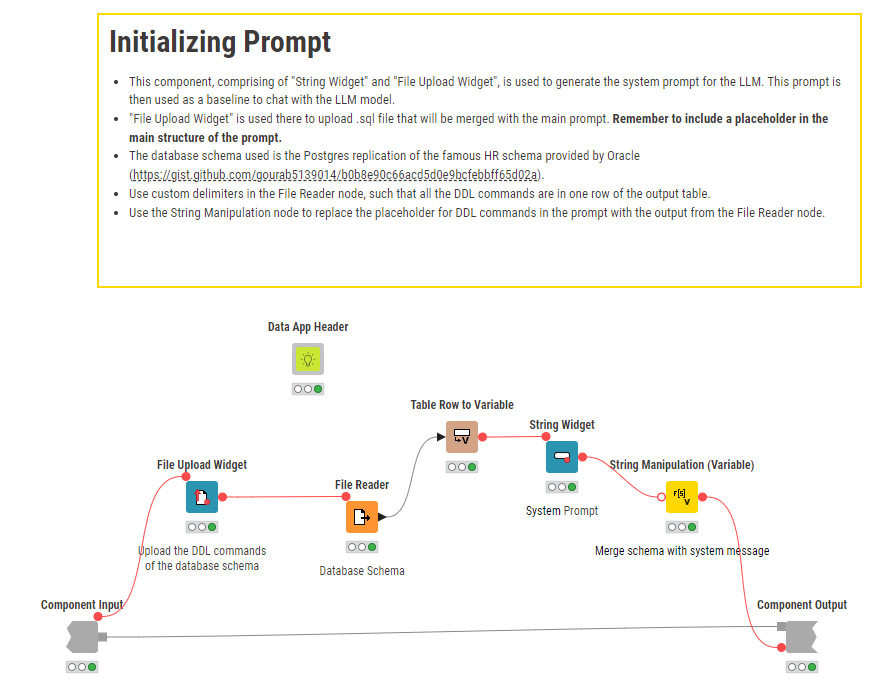
Within KNIME, we created an instruction prompt as shown below. In the figure, notice the highlighted Markdown syntax which is used to outline headers in the prompt. After the first paragraph, you can see rules that are outlined in bullet points along with an example for table aliasing. The "Input" section of the prompt contains the structure for the input of the schema script. Here, "{database_schema}" is a placeholder for the .sql file that has been uploaded in the interactive view below. The “Input” section also includes a sample question against which the query will be generated.
Following the input section, the response section is set up, allowing the LLM to structure the output according to the manner prescribed in the prompt. Notice the ```sql placeholder, which the LLM uses to skip the code format in output and generate the query as plain text.
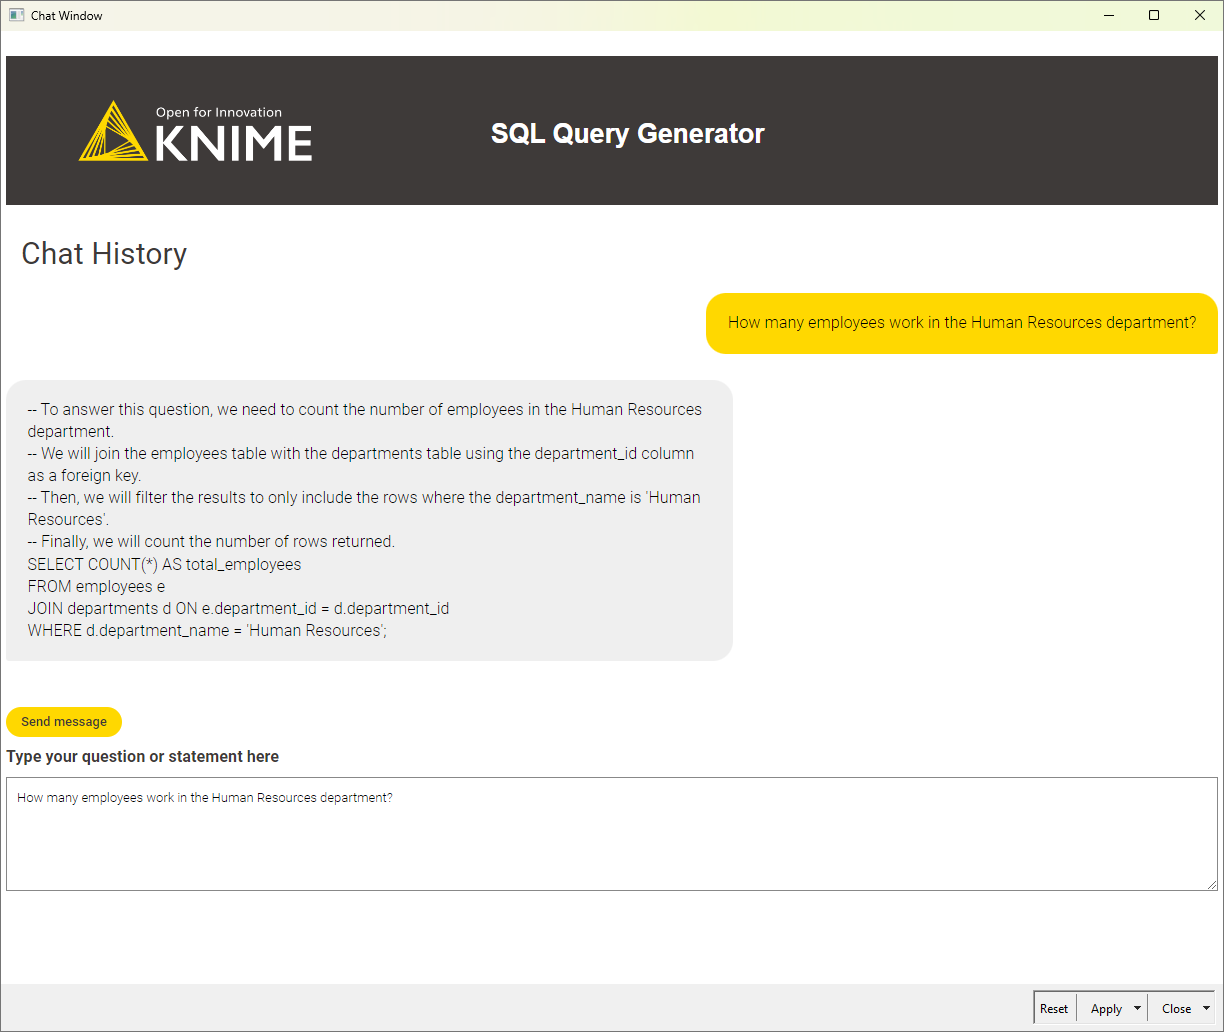
This initial prompt is used to start the conversation by providing context for the chatbot. For subsequent prompts, users only need to provide their question or statement as input and the chatbot will generate a response. An example question is included in the initial prompt, which asks "How many employees work in the Human Resources department?" This question is used to generate a response when the chat app is first opened.
How to build an LLM-based chat application in KNIME (in 4 steps)
To create a text-to-SQL chat app workflow in KNIME, follow the steps shown in the workflow below.
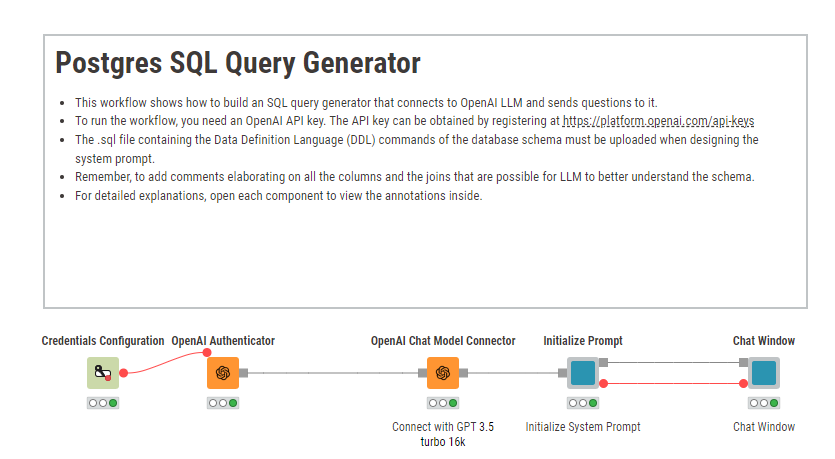
Step 1: Authenticate with Open AI
First, use the Credentials Configuration node to provide the API key for authentication with OpenAI. This will overwrite the credentials in the configuration window of the OpenAI Authenticator node.
Step 2: Select the LLM model
Once authenticated, we use the OpenAI Chat Model Connector node to select the LLM model and configure its parameters as shown in the table below. Set the "Temperature" to a value between 0 and 2, with a value of 1.0 providing a good balance of randomness in the response.
The model used for this workflow is "gpt-3.5-turbo-16k" which can handle input prompts of up to 16000 tokens. Lastly, set the “Top-p sampling” to a maximum value of 1.0 to allow the LLM to select from a broad range of high-probability tokens for the response.
Parameter configuration for the OpenAI Chat Model Connector node
| Model ID | gpt-3.5-turbo-16k |
| Temperature | 1.0 |
| Top-p sampling | 1.0 |
Step 3: Initialize the system prompt
After executing the OpenAI Chat Model Connector, a visual component named “Initialize Prompt” is created. This component will enable users to upload SQL scripts for a schema and design the system prompt for the LLM. The File Upload Widget node in the view allows the user to upload the .sql file containing the DDL queries of the schema. The contents of the file are then read as a String flow variable and overwritten on the "{database_schema}" placeholder in the System prompt section of the view (see figure below).
Step 4: Create a chat window
Once the prompt is initialized in the “Initialize Prompt” view component, a "Chat Window" view component is created. This is the main view that loads the chat application, allowing the end user to interact with the LLM. This view is reused from the chat dashboard workflow in KNIME that interacts with ChatGPT. In the figure below, you can see how the LLM model generates the query based on the instructions provided in the initial prompt. The response includes a well-documented query with table aliasing and comments.
That's it! With these steps, you’ve successfully created an application to convert your instructions in English to SQL query.
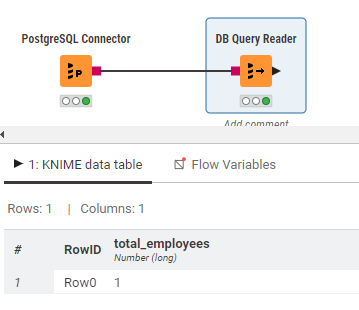
To verify the generated SQL query, we created a test workflow that connects to the PostgreSQL database and by using the DB Query Reader node. As in the figure below the output confirms the presence of 1 employee in the Human Resources department.
Remove the heavy lift with an SQL coding assistant
Leveraging Large Language Models (LLMs) for SQL query generation is a transformative solution that simplifies and solves the problem of complicated syntax. Through effective prompt engineering and the integration of AI, you can seamlessly translate English instructions into SQL queries, streamlining database management processes.
In this blog post, we learned how to build a chat application to automatically generate SQL queries in KNIME in 4 steps. The process involves providing comprehensive DDL scripts in a PostgreSQL .sql file, which is then combined with the system template to initiate a conversation with the OpenAI LLM model. Once the response was generated, we tested the query in another KNIME workflow by using the DB Query Reader node that is connected to the PostgreSQL database, which returned the expected result.
You can explore more AI Extension Example Workflows on the KNIME Community Hub.
Download KNIME today!
