Text classification is the cornerstone of many text processing applications and it is used in many different domains such as market research (opinion mining), human resources (job offer classification), CRM (customer complaints routing), research and science (topic identification, patient medical status classification) or social network monitoring (toxic comments or fake information spotting, real time emergency monitoring).
In recent years, text classification models have achieved impressive results thanks to the advent of highly performant Deep Learning NLP techniques, amongst which the BERT model and consorts have a prominent role.
See a breakdown here of the content of this article:
- Text Classification BERT Node
- Installation
- BERT in short
- Encoder Representations
- Bidirectional Transformers
- Different Flavors
- Dataset Gathering and Processing
- Training and Prediction with the Redfield BERT Nodes
- Choosing the model
- Choosing the input size
- Choosing other hyperparameters
- Interactive Visualization of the Results
- Conclusion
- Future Developments - NLP Extension
- References
1. Text Classification BERT Node
In this article, we will give you a brief overview of BERT and then present the KNIME nodes we have developed at Redfield for performing state-of-the-art text classification using BERT, showing how to:
- Apply the Redfield BERT nodes to the problem of classifying documents into topics using a publicly available annotated dataset
- Demonstrate that we can achieve high accuracy results for non-English (in this specific instance, Portuguese) as well as English documents
- Show how to visualize and interpret the results in an interactive dashboard
Note that the KNIME example workflow used in this article is available on the KNIME Hub here. And in a previous article we referenced another workflow dedicated to sentiment analysis, which you can also find on the KNIME Hub, here.
2. Installation
To use the BERT extension you need to install the TensorFlow 2 extension for KNIME, therefore you need to use KNIME 4.2 version or newer. Go to “KNIME Preferences” and create a Deep Learning environment for Python. Next, you need to install additional packages for this environment. Here is the list of packages compatible with the nodes and their versions:
- bert==2.2.0
- bert-for-tf2==0.14.4
- Keras-Preprocessing==1.1.2
- numpy==1.19.1
- pandas==0.23.4
- pyarrow==0.11.1
- tensorboard==2.2.2
- tensorboard-plugin-wit==1.7.0
- tensorflow==2.2.0
- tensorflow-estimator==2.2.0
- tensorflow-hub==0.8.0
- tokenizers==0.7.0
- tqdm==4.48.0
- transformers==3.0.2
3. BERT in Short
BERT stands for Bidirectional Encoder Representations with Transformers. It is a Deep Neural Network architecture that is built upon the latest advances in Deep Learning in general and DL-based NLP in particular. It was released in 2018 by Google and achieved State-Of-The-Art (SOTA) performance in multiple Natural Language Understanding (NLU) benchmarks.
In this post we do not intend to present the inner workings of BERT. We invite the reader to follow the references section at the end of this post for further reading.
Encoder Representations
BERT is built upon the idea of learning a representation of language, called a language model (aka the Encoder Representation in its acronym), to predict tokens or sequences given a context. So usually when we talk about BERT, we mean the BERT language model.
What is powerful about these pre-trained Deep Learning Language Models is that they provide a representation of how a language works and thus alleviates downstream tasks. For instance, we can train a classifier by adding a final layer to our pretrained language model and fine tune its last layer(s) to this specific task. Thus, we need less annotated data to achieve better results.
The use of a pre-trained language model representation for downstream NLP tasks is called transfer learning. Building a language model is very attractive because all one needs is a large pool of documents and the learning is unsupervised. Most people don’t need to do the pre-training themselves, just like you don’t need to write a book in order to read it.
Bidirectional Transformers
The BERT architecture is articulated around the notion of Transformers, which basically relies on predicting a token by paying attention to every other token in the sequence. This is a powerful concept because it addresses the so-called long-distance dependencies in language, whereby the interpretation of one word may require paying heed to another term way back or forward in the sequence, hence the Bidirectional notion.
Another more prosaic reason why the ‘Transformers’ are attractive is that they allow for more parallelization than pure sequential approaches (like RNN or LSTM), hence reduced training time.
Different Flavors
Whilst it remains possible to train one's own language model if you have access to a large pool of texts, nowadays lots of BERT pretrained language models and variants are provided off-the-shelf and ready to use with different sizes, languages, tokenization approaches, domains or tasks and architectural variations.
You can find repositories of BERT (and other) language models in the TensorFlow Hub or the HuggingFace Pytorch library page.
For example M-BERT, or Multilingual BERT is a model trained on Wikipedia pages in 104 languages using a shared vocabulary and can be used, in the absence of a monolingual model, for fine-tuning on downstream tasks for languages as diverse as Arabic, Czech, Swedish, Portuguese and more.
4. Dataset Gathering and Processing
The DBPedia Topic Classification dataset consists of 342K+ Wikipedia page abstracts. Each abstract is assigned a class from 3 different levels of hierarchical categories with 9, 71 and 219 classes respectively, and the names of the columns for each level are l1, l2 and l3 respectively.
The classes and relation between abstract/concept and classes come from the DBPedia ontology. The DBPedia ontology is an ontology that has been created by extracting structured data from Wikipedia.
In this blog post we are not going to use the l3-case, since the dataset becomes too unbalanced and there are too few instances for each class and we are not able to train a decent classification model.
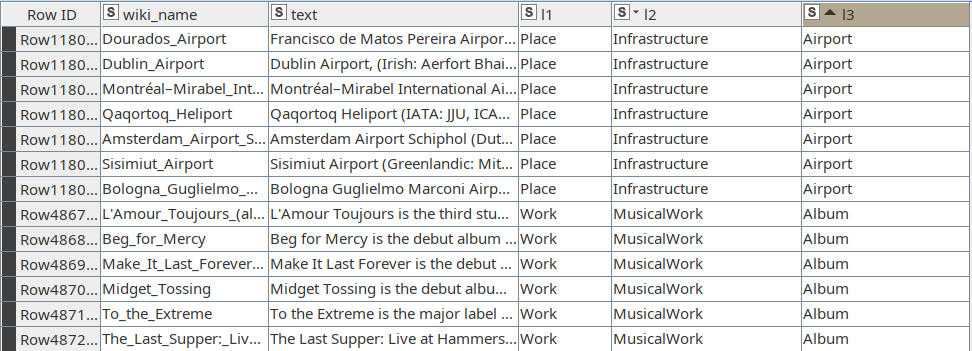
For Portuguese, we query our local DBPedia triplestore given the 342K+ wikipedia names and obtain only 33K abstracts for that language. These abstracts are merged with the English ones in order to get similar datasets for model training and estimation.
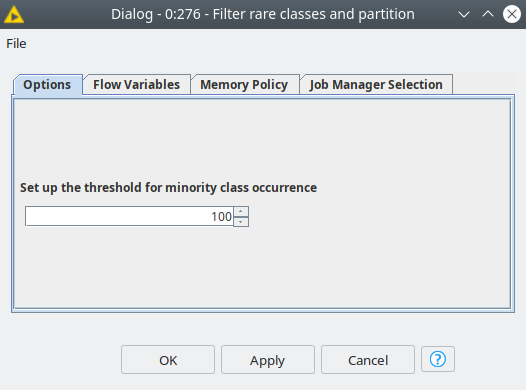
The workflow has a component called "Filter rare classes and partition" that filters the classes that occur in the dataset less times than the user provided threshold value in components' dialog. This allows us to make the dataset more balanced. Also, this component splits the dataset into training, validation and test sets.
5. Training and Prediction with the Redfield BERT Nodes
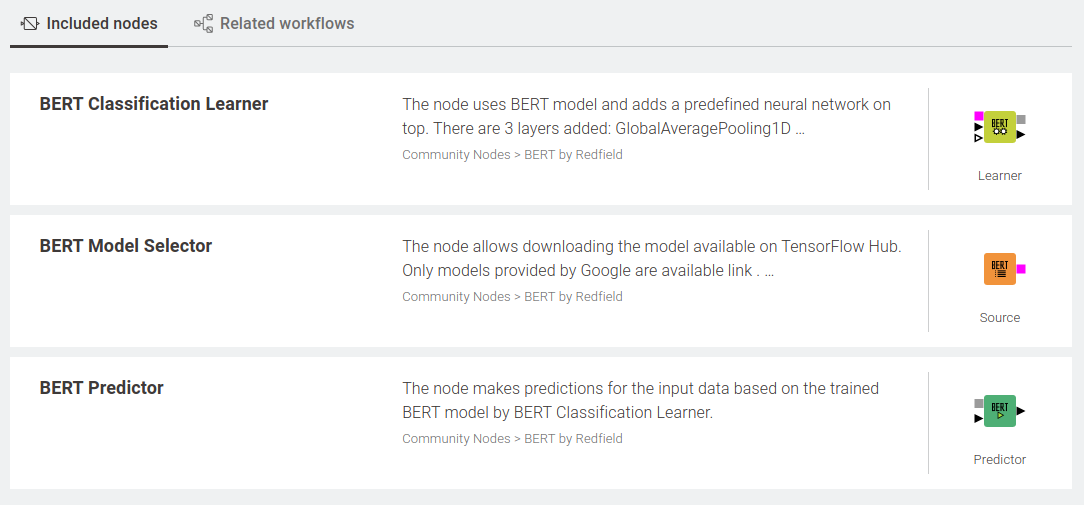
The current version of the BERT extension includes three nodes (as shown in Figure 1):
- BERT Model selector
- BERT Classification Learner
- BERT Predictor
Choosing the model
First of all, the user must select a model with the Model Selector node, and the most simple way to do that is to use one of the models from the TensorFlow hub or Hugging Face repository. In order to make the results for two datasets comparable, we are going to use the models with the same parameters: cased, L=12, H=768, A=12. The parameters notation is the following:
- L — number of transformer blocks;
- H — hidden layers size;
- A — number of attention heads.
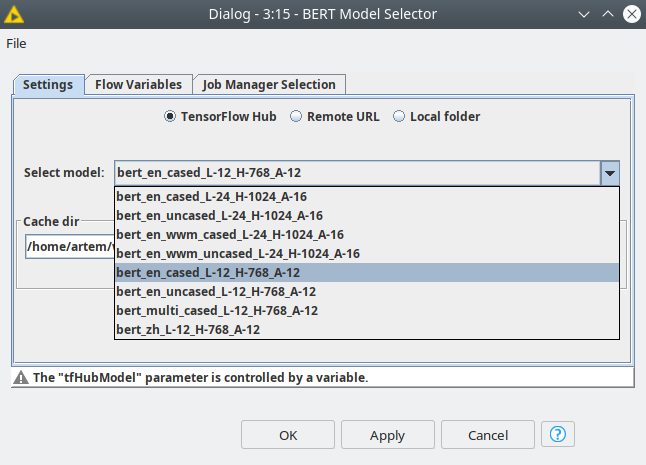
The models we are using in the demo are bert_en_cased_L-12_H-768_A-12 for English and bert_multi_cased_L-12_H-768_A-12 for Portuguese (that’s the M-BERT mentioned before).
Choosing the input size
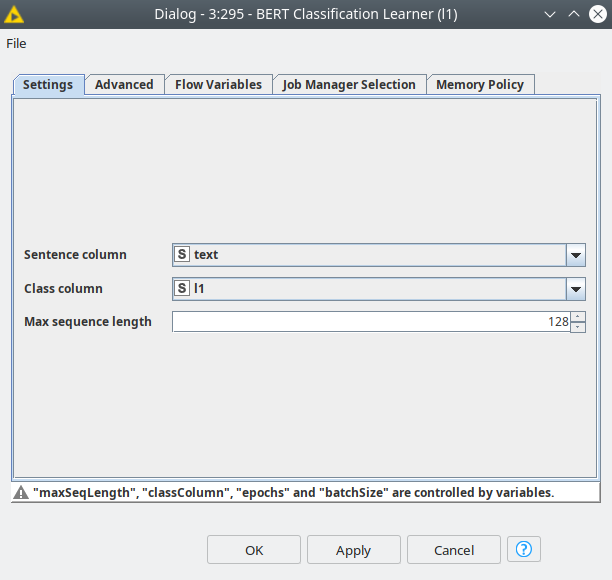
The next step is to set up the parameters for the training. One of the parameters for which we must decide a value is the maximum sequence length, aka the maximum number of tokens (words) to work with. This is typically given a value such as 128, 256, 512.
In order to decide on the best maximum sequence length, we calculate the mean, median, min and max parameters of the texts. These parameters can be calculated with the Text assessment component.

Based on the data obtained (see Table 1) we decided to assign the maximum sequence length to 128 for both languages, since more than a half of the texts will be completely considered by the model (based on median). We should keep this parameter optimum in the sense that the accuracy might be higher with higher values, but it will increase the training time and RAM/VRAM consumption.
Choosing other hyperparameters
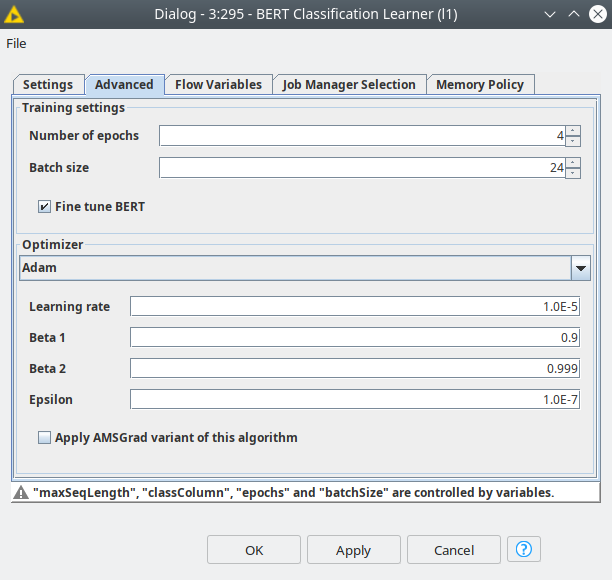
The next parameters are related to the training process — number of epochs, batch size, optimizer and its settings.
The number of epochs should not be big, since the transfer learning concept assumes that the model already has deep knowledge of the language, and we just need to fine tune it. Therefore, we should train for only 1-3 epochs.
The batch size is dependent on 2 factors: available RAM/VRAM and max_sequence_length. This means that this parameter should be set up heuristically. In our case the batch size was 28 samples, we used a GPU with 8 GB of VRAM.
The selection of the optimizer is quite a long discussion, so it is out of scope of this post. For the demo we used Adam optimizer with learning rate=1e-5, the rest parameters were default.
The final setting that we are going to use is to make the "Fine tune BERT" checkbox active. This option allows the BERT neural network weights to become trainable. This option increases the time of training, but it almost always leads to a better predictive outcome.
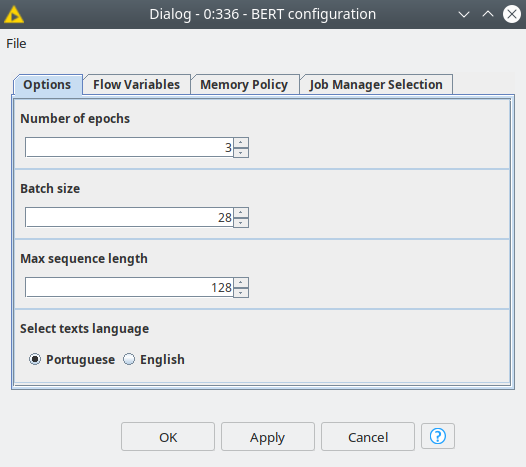
For better user experience we have implemented a component called "BERT configuration" that has a dialog where the user can provide the global parameters of the model and training parameters: number of epochs, batch size and max_sequence_length. Also here the user may pick the dataset (English or Portuguese) for which an appropriate model will be selected automatically. These settings will be applied to both branches for l1 and l2.
6. Interactive visualization of the results
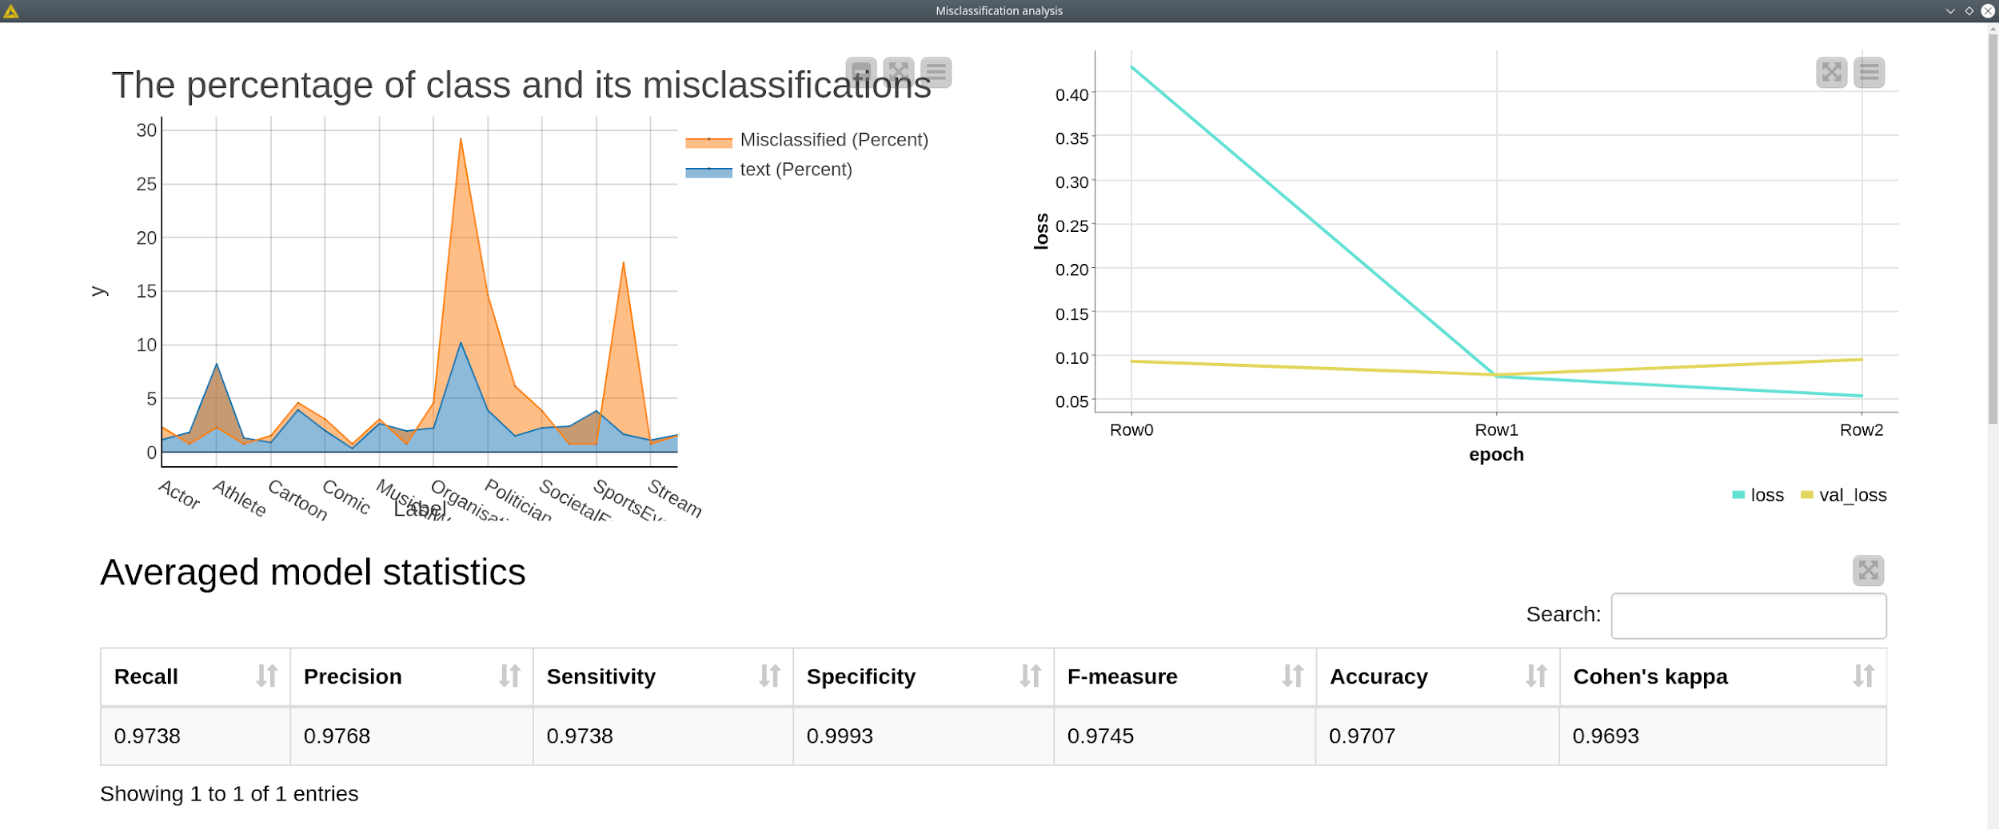
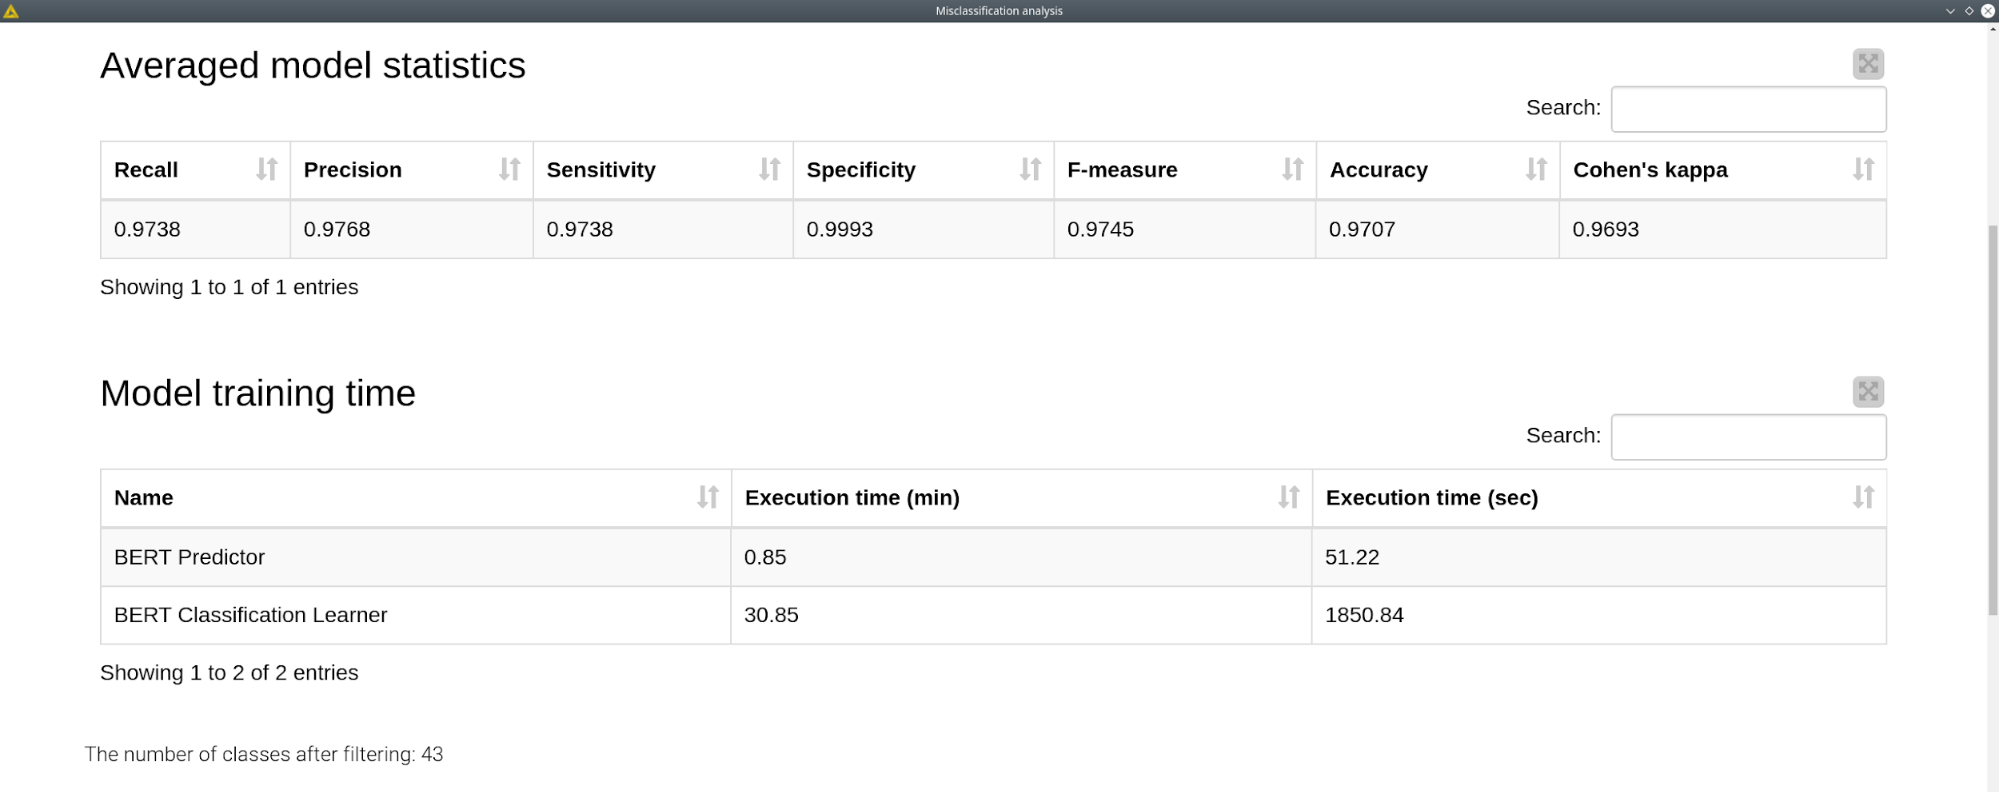
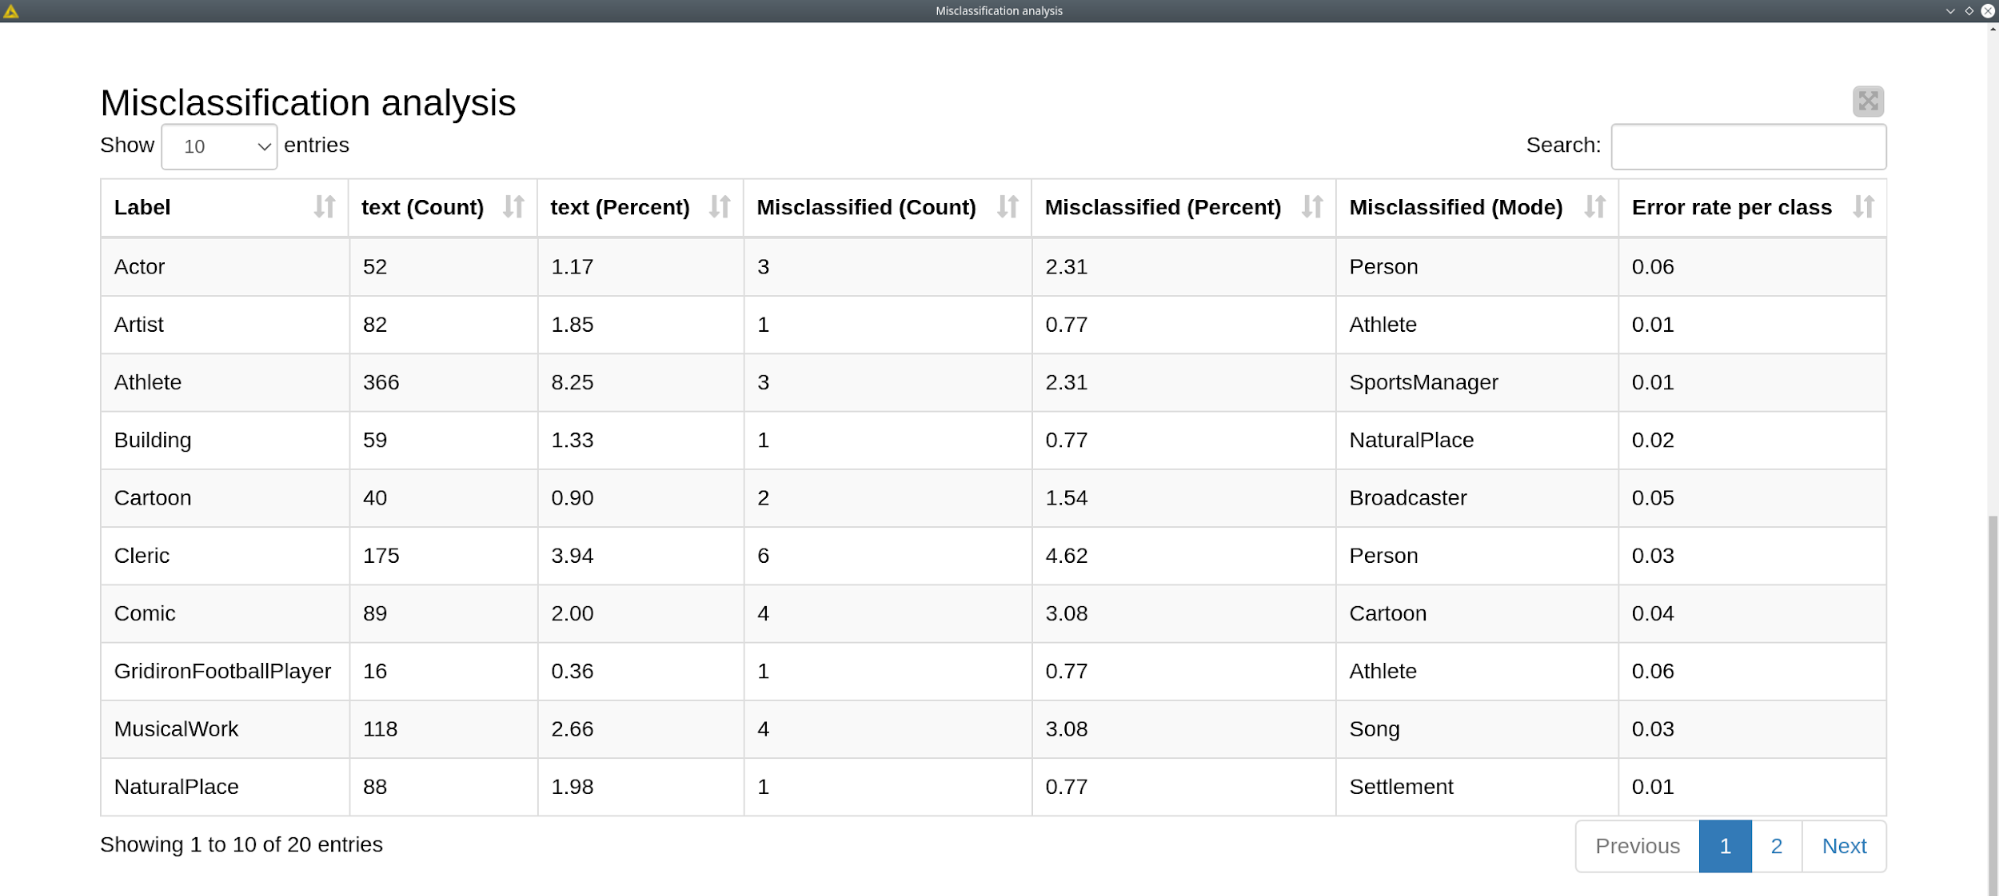

The results of the model training are presented in the dashboard built with "Misclassification analysis". This dashboard includes the percentage of the classes (blue) occurrence and percentage of class misclassification (top left). Top right line plot shows the learning rate for training (green) and validation (yellow) sets. In most of the cases we will find the validation loss slowly increases after the 2nd epoch, so this could be an indicator that we should stop the model training after the 2nd epoch in order to avoid overfitting.
The averaged model statistics table shows the standard metrics for the classification model. The next table shows the execution time for the BERT Classification and Predictor nodes. Since it is highly dependent on the hardware, other users might have completely different execution times. In our case with using GPU it took around 10 minutes per epoch for training, and less than a minute to make predictions for the ~4500 texts.
Misclassification analysis table has the following columns: the total number of class representatives, the percentage of class representatives, number of misclassified records, the percentage of misclassified records, the most frequent wrong erroneous prediction for a class and the error rate.
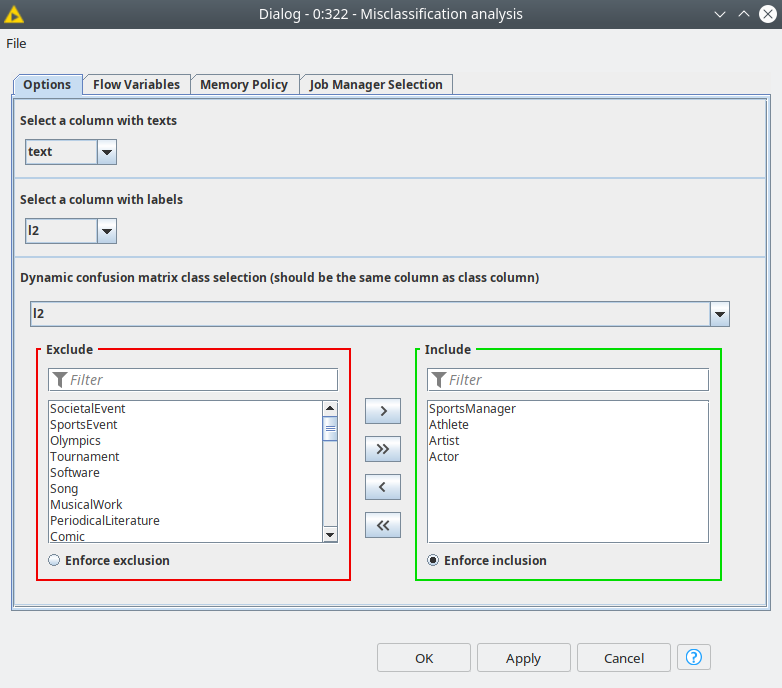
The final table can be configured with a dialog of the component, is the "dynamic" confusion matrix that shows only predictions for selected classes. The reason for this representation is that visualizing l2 labels in one table might be confusing since the number classes may reach 71. This is a convenient way of representing the classes that are prone to misclassification (e.g. Athlete and SportsManager).
7. Conclusion
In this blog post we have shown how to use BERT models in KNIME without any coding. The BERT extension is built on top of the TensorFlow2 integration with KNIME, so the only thing the user has to do is to install several BERT related packages to the TensorFlow2 environment and jump to using BERT models.
The results we obtained (Table 2) based on the data are very impressive even for l2-case where we can get up to 71 classes. At the same time, no complex data preparation was done: the only analysis we did was the length of the texts assessment and filtering out rare classes. It also did not take much time to train models of SOTA quality with a laptop GPU for both English and Portuguese texts.
The results for Portuguese are a little lower than English because we used a multilingual model (which is trained with texts in 104 different languages), while for English we have a dedicated model. Most likely using a dedicated language model would improve the results.
The prediction quality also decreases with the number of classes, which is expected since we get more classes and less instances per class. So in order to increase the quality model for l2 we probably need to increase the size of our dataset.
You can also learn more about comparing the performance of different BERT models in another blog post on our Redfield blog.

8. Future Developments - NLP Extension
We have demonstrated a popular use case for BERT in this blog post — text classification. Currently we are working on a new Redfield NLP extension for KNIME that will include BERT-based solutions such as multi-label classification, abstract-based sentiment analysis, question answering, and document embeddings.
This extension will have classic NLP functions based on Spacy for POS, NER, lemmatization, morphology analysis and so on, which are compatible with the current KNIME text processing algorithms. The Redfield NLP extension will be released in September 2021.
9. References
- Jay Alammar's Blog is a treasure trove of very visual and clear guides. Check out:
- BERT Word Embeddings Tutorial
- Open Sourcing BERT: State-of-the-Art Pre-training for Natural Language Processing
- TensorTensor2 Notebook with code to visualize attention interactively
- NLP's ImageNet moment has arrived
