A Guide to Service Orchestration with KNIME
“I know using the Call Workflow Service nodes can be a little tricky.”
That’s what my colleague wrote when answering this question on the KNIME Forum. They are indeed a bit tricky but once you get the idea they’re powerful!
To help you get started with calling workflows in different scenarios, I created this guide for you. I’ll point you to the nodes and simple example workflows that demonstrate how to exchange data between KNIME workflows and how to provide data from a KNIME workflow to an external tool.
When you call workflows, you execute isolated logics of the same end-to-end process. These called workflows are known as services, and bundling them together into one process is known as service orchestration. The workflow (or an external tool) calling a service is known as the client.
Top 4 Benefits of Service Orchestration
-
Load Applications Faster: Orchestration enables us to load applications faster. For example, if the service was a workflow and required connecting to databases or updating shared components, we would only perform these operations when the service was actually called with the relevant data from the client.
-
Hide Redundant Information: Choose to only provide the output of the service to the client and not all the logic and intermediate results within it.
-
Sequence Tasks in Correct Order/Real-time syncing of data: Via application orchestration we can also make sure that the tasks are sequenced in the correct order. The service reads its input at the moment when it’s called from the client, which enables real-time syncing of data between the service and client.
-
Flexible Application Deployment: Orchestration also makes application development flexible. The same service can be called by multiple, different clients. Furthermore, the clients and services can be different tools, which enables you to align the business requests with the technical infrastructure effectively.
I will now show you how to orchestrate your services with KNIME.
Workflow Orchestration within KNIME
Orchestration with KNIME is based on two types of workflows: Callers and Callees. The Caller is a client that sends/receives data from one or more callee. The Callee is a service that receives data from a caller, executes its task on that data, and sends the result to the client
You can create callers and callees with KNIME in different ways. For example:
-
Implement the process completely in KNIME
-
The caller and callee are both workflows
-
-
Expose the workflow to an external/internal client as a REST service
-
The caller is an external client OR a workflow
-
The callee is a workflow
-
-
Have the workflow call a result from an external service via REST
-
The caller is a workflow
-
The callee is an external service
-
In this guide, I’ll focus on the first two cases. I’ll start with the case where the process is implemented completely in KNIME. After that, I’ll show how to turn the callee workflow into a REST service and how to call the REST service from a workflow. Along the way, I will point to example workflows that you can find in my KNIME Community Hub space.
Create Caller & Callee Workflows within KNIME
Use the following nodes to create a workflow service:
Furthermore, you’ll need the Call Workflow Service node to call the workflow service.
Create the Callee Workflow within KNIME
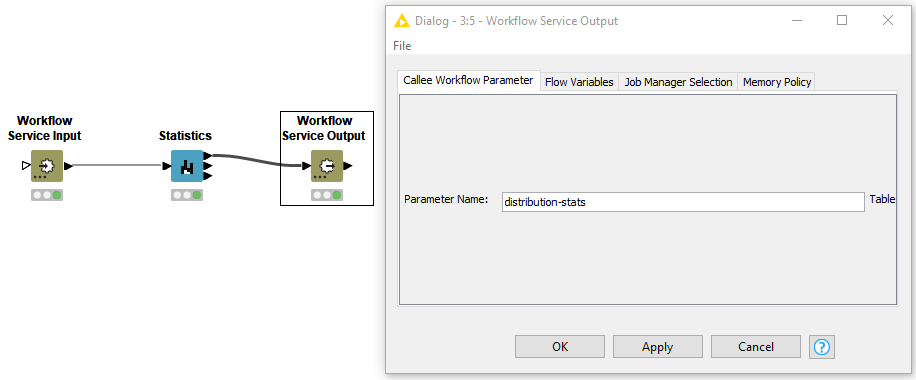
I’ll now build a simple workflow service that provides the distribution statistics of its input column. For that, I need the the Statistics node and the Workflow Service Input and Output nodes, as shown below:

By default the Workflow Service Input and Output nodes have data table input ports. However, you can change them to any other type according to the nodes between them. The only configuration of the Workflow Service Input and Output nodes is the name of the parameter retrieved from and passed to the caller (Figure 1).
Create the Caller Workflow within KNIME
The workflow calling the workflow service above accesses and filters a numeric column for which the workflow service returns the distribution statistics.
The caller workflow (Figure 2 below) contains the CSV Reader node to read the data and the Column Filter node to select the column for which the distribution statistics are calculated. After that, we need the Call Workflow Service node.

In Figure 2 you can also see the output of the Call Workflow Service node with three columns of type double and one column of type SVG image. In general, when calling workflow services, you can pass and receive data in any port/data type supported in KNIME Analytics Platform.
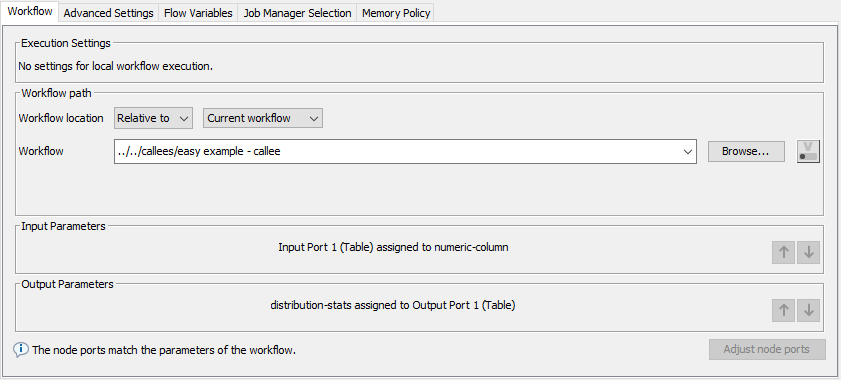
The configuration of the Call Workflow Service node is shown below:

The Workflow path section defines the path (local/remote) to the callee workflow. Below that, you can assign the input/output ports of the node to the input/output parameters of the callee workflow. In the bottom right corner, you can click the “Adjust node ports” button to adjust the ports of the Call Workflow Service node automatically according to the configured callee workflow.
So far, data was exchanged between two workflows only. In the next section, I show how to exchange data between workflows and external tools, too.
Orchestration with KNIME and External Tools: REST Services
To expose a callee workflow as a REST service, it needs to contain a Container Input and/or Container Output node. The exact node depends on the expected input and output formats of the REST service. For example, Container Input (JSON) node takes in a custom JSON value, Container Input (Row) a JSON value in a predefined format, and Container Input (Variable) a flow variable value. All workflows containing Container Input/Output nodes are RESTful when deployed to KNIME Server/Business Hub.
The caller workflow communicates with the workflow’s REST API. You can check the input and output expected from an external client using, for example, Postman API Platform. Or, if you want to access the workflow’s REST API from a KNIME workflow, too, you can use the Call Workflow nodes. The Call Workflow (Row Based) node accesses and provides a JSON column and works with most of the Container Input/Output nodes. The Call Workflow (Table Based) node accesses and provides a data table and works with the Container Input/Output (Table), Container Input (Variable), and Container Input (Credentials) nodes only.
The table below summarizes the nodes for creating and calling KNIME workflows as REST services and combining them appropriately.
Caller Node |
RESTful |
Input/Output Node |
Purpose |
|---|---|---|---|
|
Call Workflow Service |
NO |
|
Workflow calling a workflow |
|
Call Workflow (Row Based) |
YES |
|
Workflow exposed to an external application and optionally another workflow |
|
Call Workflow (Table Based) |
YES |
|
Workflow exposed to an external application and optionally another workflow |
Table 1. Summary of the workflow invocation nodes
The table shows how to combine the Caller and Input/Output nodes introduced in this blog post and describes their purpose. There are also Input/Output nodes that take in a file or raw HTTP and are only used in REST services exposed to external tools. For a more comprehensive list of the workflow invocation nodes and their usage, check the KNIME Workflow Invocation Guide.
Turn Callee Workflow into a REST Service
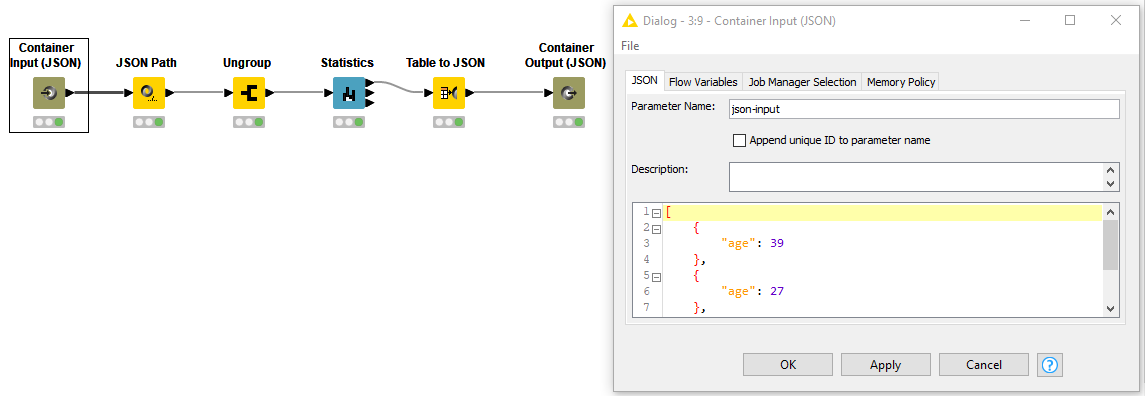
The callee workflow (Figure 4 below) contains the Statistics node, the Container Input (JSON), and Container Output (JSON) nodes. In addition, it contains the JSON path, Ungroup, and Table to JSON nodes to format the input column from and to a JSON value.

This workflow, once uploaded to KNIME Server, could now return the distribution statistics to any client calling it via REST. Figure 4 also shows the configuration of the Container Input (JSON) node. There you can define the parameter name and the default JSON value, which is used when the workflow is executed without input.
If you want to call the workflow from a KNIME workflow, too, I show you how to do that in the section below.
Call Workflow as a REST Service
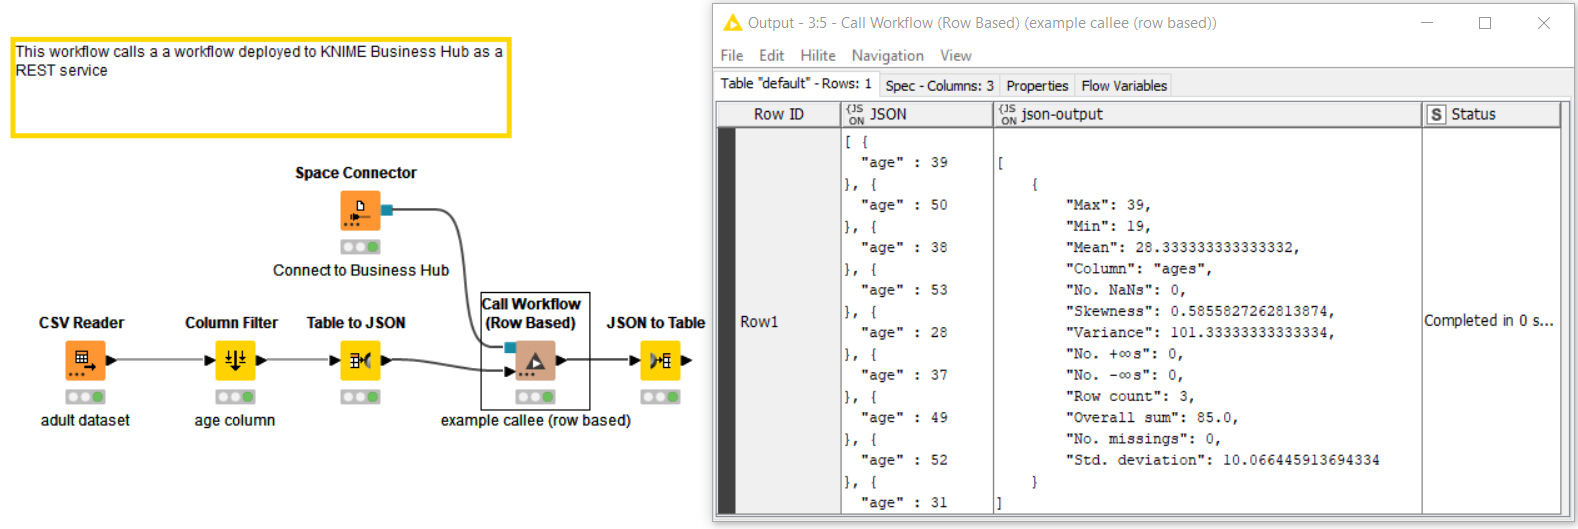
The workflow (Figure 5) calling the REST service contains the CSV Reader and Column Filter nodes to access and filter the data, similar to the call workflow service example workflow shown in Figure 2. In addition, it converts the table column into JSON and back with the Table to JSON and JSON to Table nodes. And most importantly, it calls the distribution statistics via REST with the Space Connector and Call Workflow (Row Based) nodes.

In Figure 5, you can also see the input and output in JSON columns. Because the REST service is a workflow deployed to KNIME Business Hub, the Call Workflow (Row Based) node needs to access that connection provided by the Space Connector node.
Now Try More Advanced Workflow Orchestration
In this blog post, I have introduced the concept of orchestration and listed its benefits. I guided you through the workflow invocation nodes in KNIME Analytics Platform and shown how to create and call workflows and REST services. I have explained what types of inputs and outputs you can provide to which caller and input/output nodes and summarized which nodes you can combine in applications.
I hope I have helped you overcome the “tricky beginning” and you can now move on to orchestrating your real applications. If you want to try out a more complicated example of orchestration, this exercise on the KNIME Hub guides you through that. The exercise is a part of the L3-WP Productionizing Data Apps course.
