Note: We have added more comprehensive instructions that will be continually updated. Check out the latest Python documentation here.
The Python Environment
We recommend using the Anaconda Python distribution from Continuum Analytics. There are many reasons to like Anaconda, but the important things here are that it can be installed without administrator rights, supports all three major operating systems, and provides all of the packages needed for working with KNIME “out of the box”.
Get started by installing Anaconda from the link above. You’ll need to choose which version of Python you prefer (we recommend that you use Python 3 if possible) but this just affects your default Python environment; you can create environments with other Python versions without doing a new install. For example, if I install Anaconda3 I can still create Python 2 environments.
Once you’ve got Anaconda installed, open a shell (linux), terminal (Mac), or command prompt (Windows) and create a new Python environment for use inside of KNIME:
If there are additional packages you’d like to install, go ahead and add them to the end of that command line. If you’d like to install Python 2.7 instead of 3.5, just change the version number in the command.
In order to use this new Python environment from inside of KNIME, you need to create a script (shell script on linux and the Mac, bat file on Windows) to launch it.
If you are using linux or the Mac, here’s an example shell script for the Python environment defined above:
You will need to edit that to replace PATH_WHERE_YOU_INSTALLED_ANACONDA with wherever you installed Anaconda. I named this script py35.sh, made it executable (“chmod gou+x py35.sh”), and put it in my home directory.
If you are using Windows, here’s a sample bat file:
You will need to edit that to replace C:\tools\Anaconda3 with wherever you installed Anaconda. I named the file py35.bat and put it in my home directory.
You now have everything required to use Python in KNIME. Congrats!
Configuring KNIME
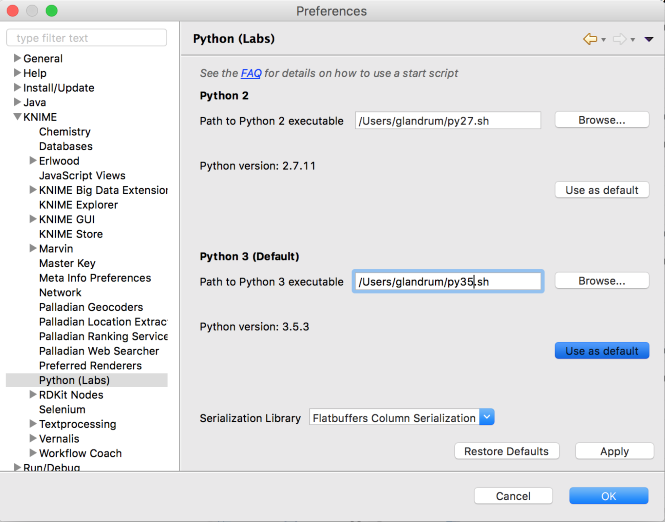
Once you have a working Python environment you need to tell KNIME how to find it. Start by making sure that you have the new Python nodes - KNIME Python Integration - installed in KNIME Analytics Platform. Once you have these installed (and have restarted KNIME, if necessary), configure Python using the Preferences page KNIME → Python:
Figure 1. KNIME Python Preferences page. Here you can set the path to the executable script that launches your Python environment.

On this page you need to provide the path to the script/bat file you created to start Python. If you like, you can have configurations for both Python 2 and Python 3 (as I do above). Just select the one that you would like to have as the default.
If you’ve completed the steps above and after you click “Apply” KNIME shows the correct version number for Python in the dialog, you’re ready to go. Enjoy using the powerful combination of KNIME Analytics Platform and Python!
Note. A note for those using older versions of KNIME or the old Python nodes.
The instructions here for setting up a conda environment for using Python inside of KNIME and creating the shell script/batch file for invoking that environment will also work for older versions of KNIME. In that case you can only use Python 2 and need to be sure to include protobuf as one of the packages in your conda create command.
Wrapping up
This post showed you how to install an Anaconda Python environment that can be used with the KNIME Python integration and then how to configure KNIME Analytics Platform to use that environment. In a future post we’ll show some interesting things that you can do with the combination of KNIME and Python.
