Learn how to grant access and connect to Google BigQuery, as well as upload data back to Google BigQuery from KNIME
To match the increasing number of organizations turning to cloud repositories and services to attain top levels of scalability, security, and performance, KNIME provides connectors to a variety of cloud service providers. We recently published an article about KNIME on AWS, for example. Continuing with our series of articles about cloud connectivity, this blog post is a tutorial introducing you to KNIME on Google BigQuery.
BigQuery is the Google response to the Big Data challenge. It is part of the Google Cloud Console and is used to store and query large datasets using SQL-like syntax. Google BigQuery has gained popularity thanks to the hundreds of publicly available datasets offered by Google. You can also use Google BigQuery to host your own datasets.
Note. While Google BigQuery is a paid service, Google offers 1 TB of queries for free. A paid account is not necessary to follow this guide.
Since many users and companies rely on Google BigQuery to store their data and for their daily data operations, KNIME Analytics Platform includes a set of nodes to deal with Google BigQuery, which is available from version 4.1.
In this tutorial, we want to access the Austin Bike Share Trips dataset. It contains more than 600 k of bike trips during 2013-2019. For every trip it reports the timestamp, the duration, the station of departure and arrival, plus information about the subscriber.
In Google: Grant access to Google BigQuery
- Navigate to the Google Cloud Console and sign in with your Google account (i.e. your gmail account).
- Once you’re in, either select a project or create a new one. Here are instructions to create a new project, if you're not sure how.
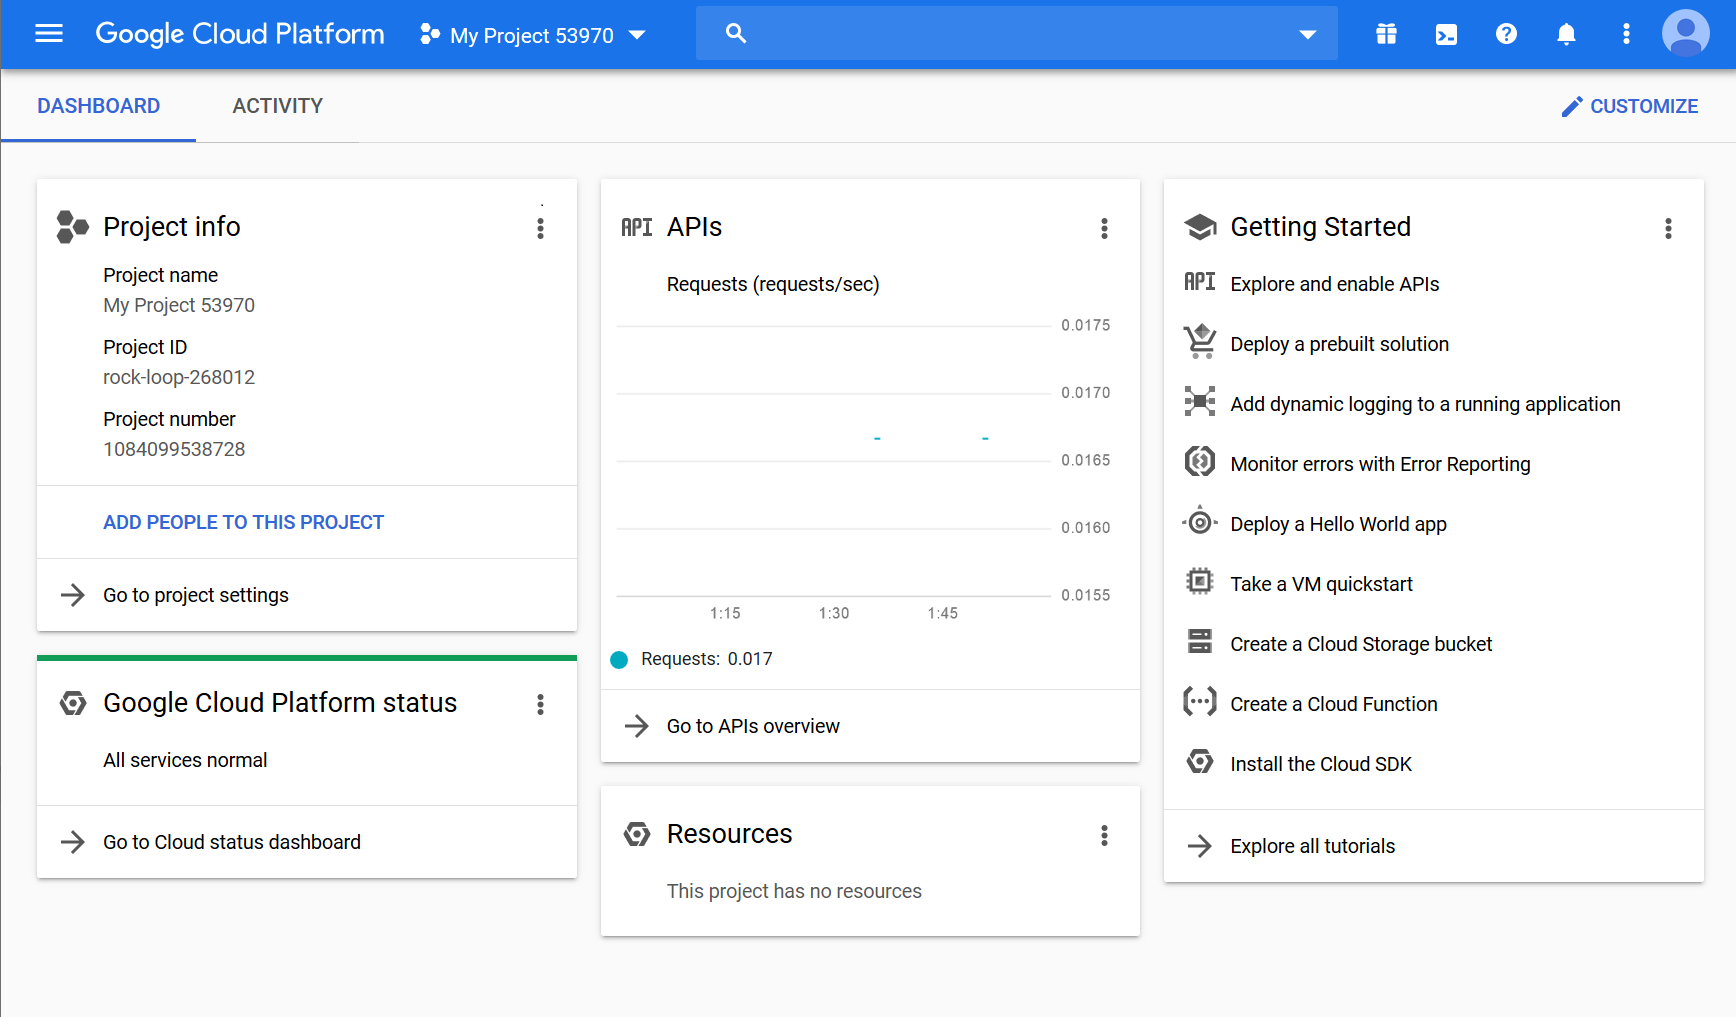
- After you have created a project and/or selected your project, the project dashboard opens (Fig. 1), containing all the related information and statistics.
Now let's access Google BigQuery:
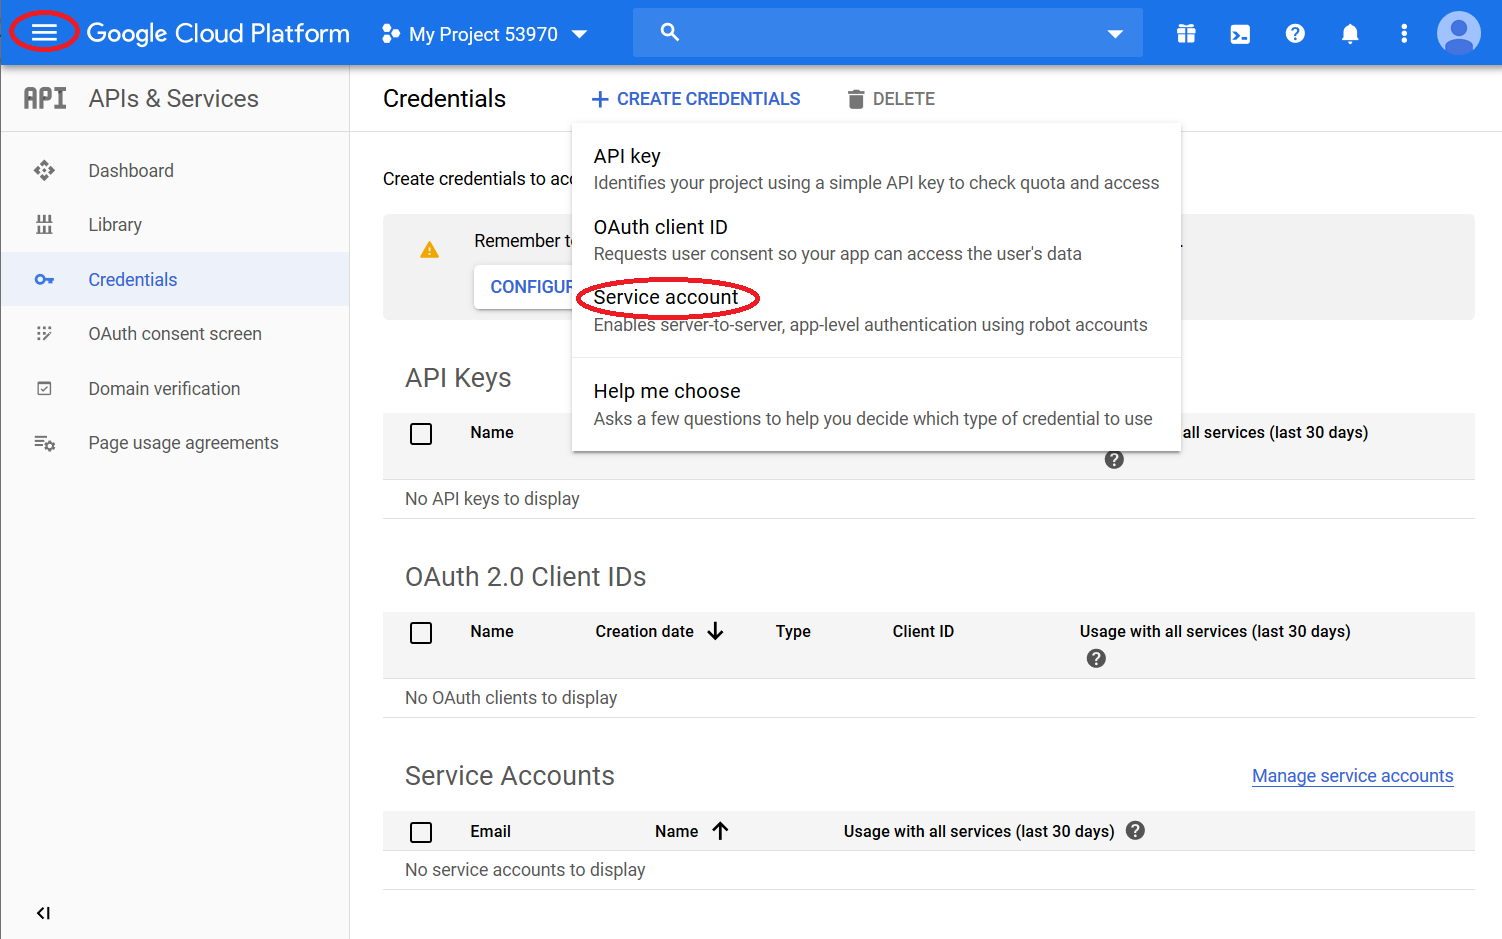
- From the Google Cloud Platform page click the hamburger icon in the upper left corner and select API & Services > Credentials.
- Click the blue menu called +Create credentials and select Service account (Fig. 2)
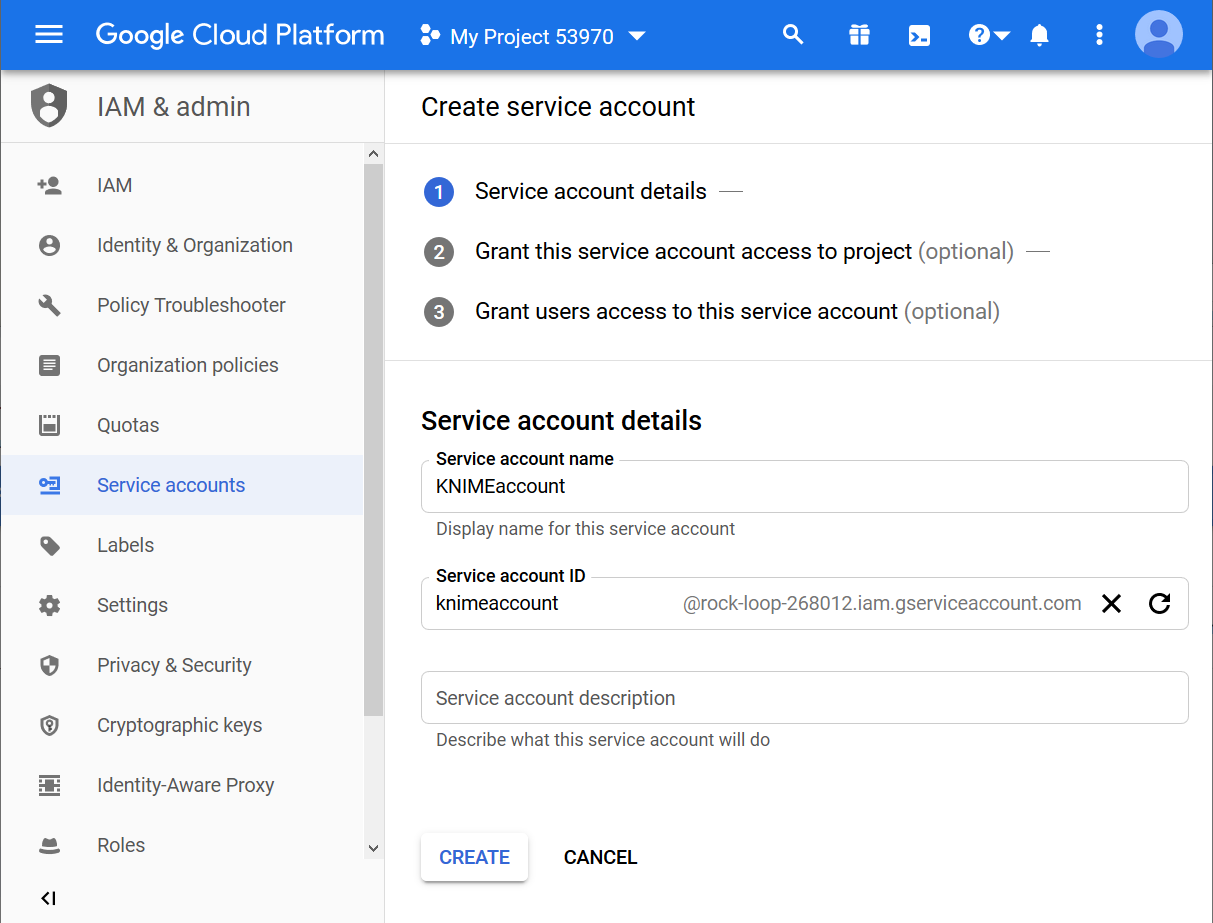
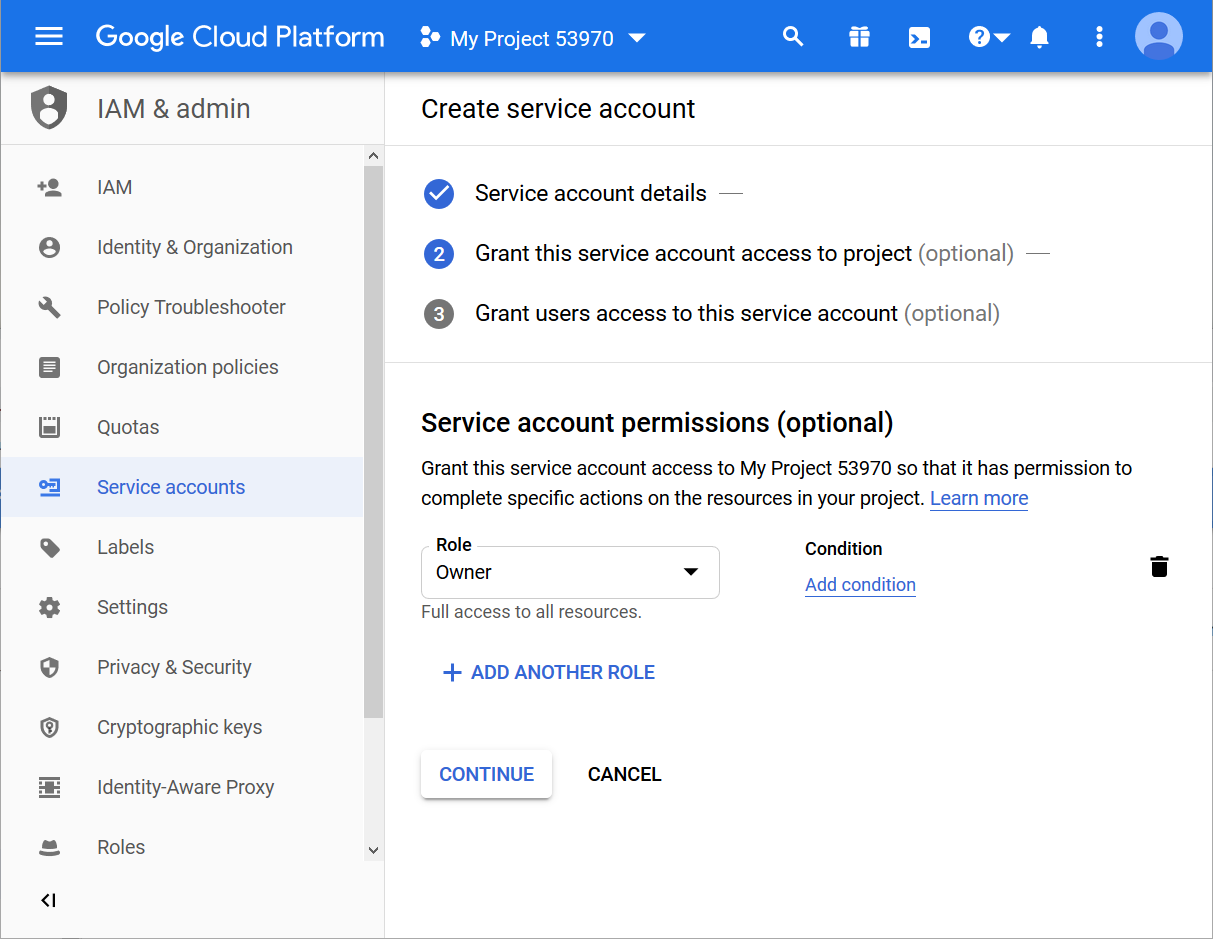
Now let’s create the service account (Fig. 3):
- In the field “Service account name” enter the service account name (of your choice).
- In this example we used the account name KNIMEAccount.
- Google now automatically generates a service account ID from the account name you provide. This service account ID has an email address format. For example in Figure 3 below you can see that the service account ID is: knimeaccount@rock-loop-268012.iam.gserviceaccount.com
- Note. Remember this Service Account ID! You will need it later in your workflow.
- Click Create to proceed to the next step.
- Select a role for the service account. We selected Owner as the role for KNIMEAccount.
- Click Continue to move on to the next step.
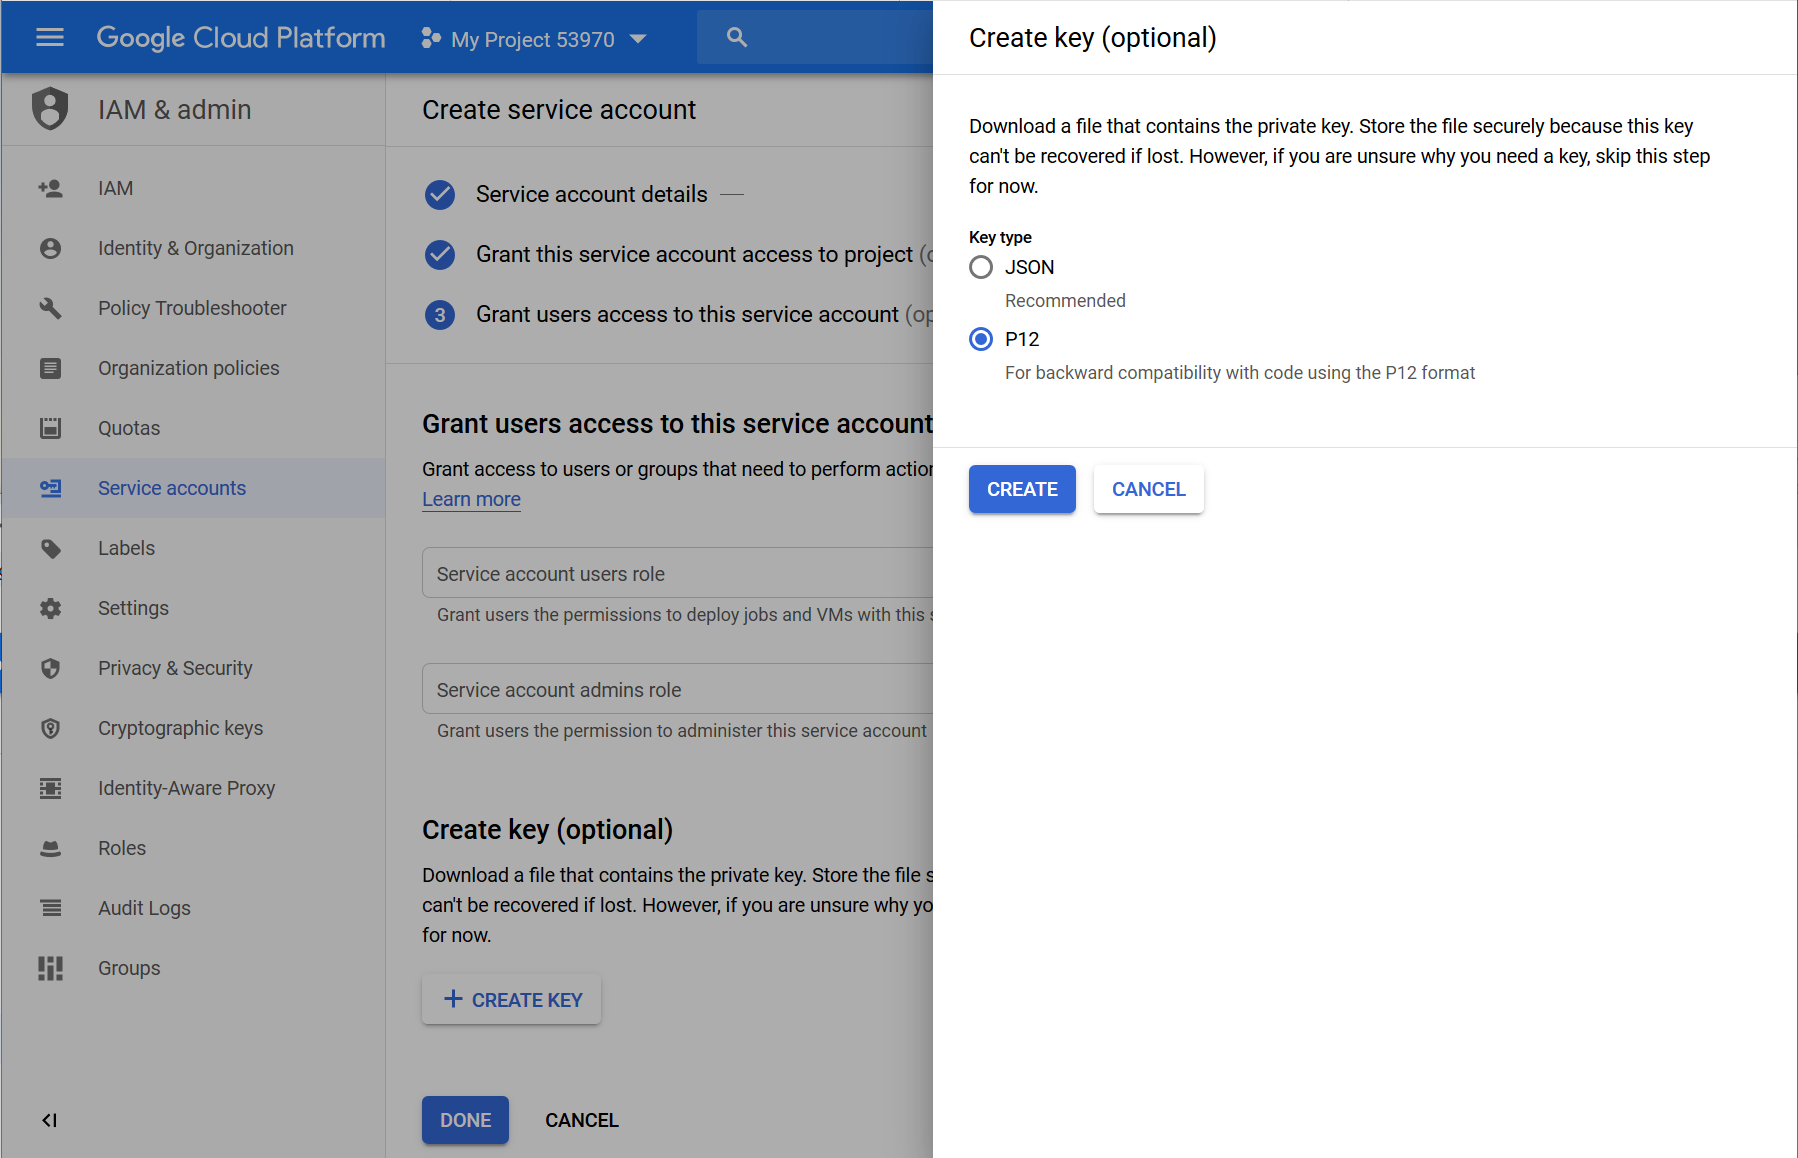
- Scroll down and click the Create key button
- In order to create the credential key, make sure that the radio button is set to P12. Now click Create.
- The P12 file, containing your credentials is now downloaded automatically. Store the P12 file in a secure place on your hard drive.
In KNIME: Connect to Google BigQuery
Uploading and configuring the JDBC Driver
Currently, (KNIME Analytics Platform version 4.1) the JDBC driver for Google BigQuery isn’t one of the default JDBC drivers, so you will have to add it to KNIME.
To add the Google BigQuery JDBC driver to KNIME:
- Download the latest version of the JDBC driver for Google BigQuery, freely provided by Google.
- Unzip the file and save it to a folder on your hard disk. This is your JDBC driver file.
- Add the new driver to the list of database drivers:
- In KNIME Analytics Platform, go to File > Preferences > KNIME > Databases and click Add
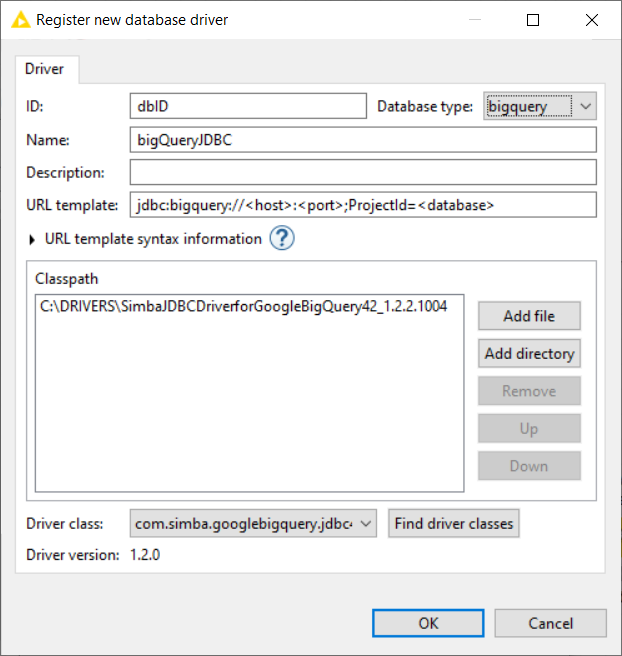
- The “Register new database driver” window opens (Fig. 4).
- Enter a name and an ID for the JDBC driver (for example name = bigQueryJDBC and ID=dbID)
- In the Database type menu select bigquery.
- Complete the URL template form by entering the following string jdbc:bigquery://<host>:<port>;ProjectId=<database>;
- Click Add directory. In the window that opens, select the JDBC driver file (see item 2 of this step list)
- Click Find driver class, and the field with the driver class is populated automatically
- Click OK to close the window
- Now click Apply and close.
Extracting Data from Google BigQuery
We are now going to start building our KNIME workflow to extract data from GoogleBigQuery. In this section we will be looking at the Google Authentication and Austin Bikeshare customer query parts of this workflow:
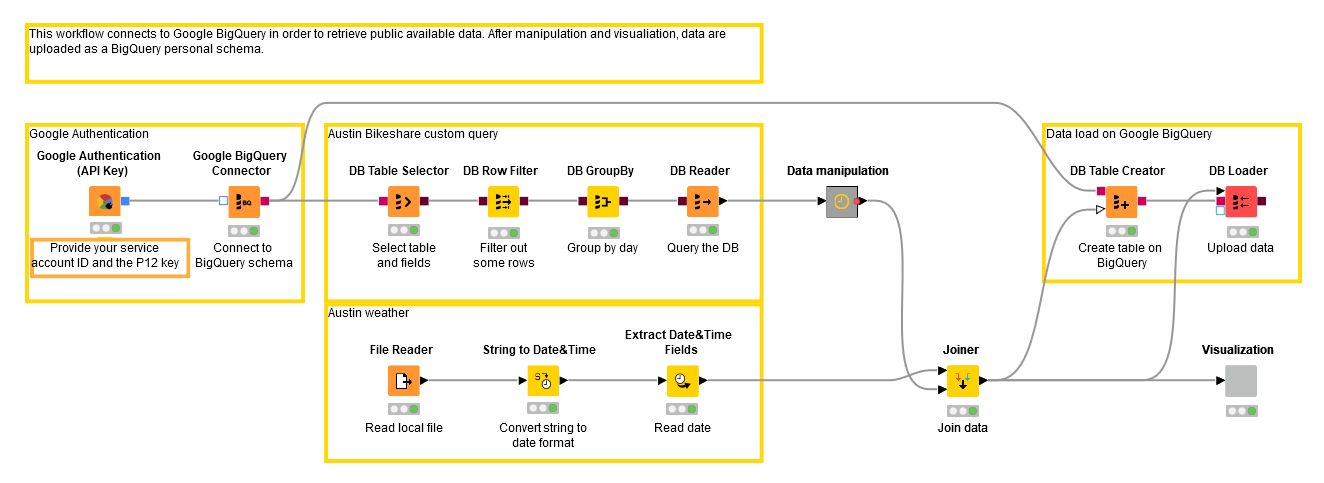
We start by authenticating access to Google: In a new KNIME workflow, insert the Google Authentication (API Key) node.

How to configure the Google Authentication (API Key) node:
The information we have to provide when configuring the node here is:
- The service account ID, in the form of an email address, which was automatically generated when the service account was created; in our example it is:

- And the P12 key file
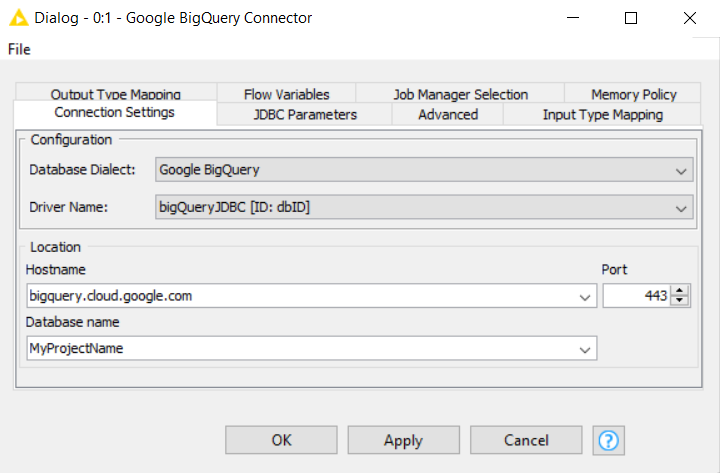
Now that we have been authenticated, we can connect to the database, so add the Google BigQuery Connector node to your workflow.

How to configure the Google BigQuery Connector node:
- Under “Driver Name” select the JDBC driver, i.e. the one we named BigQueryJDBC.
- Provide the hostname, in this case we’ll use bigquery.cloud.google.com, and the database name. As database name here, use the project name you created/selected on the Google Cloud Platform.
- Click OK to confirm these settings and close the window
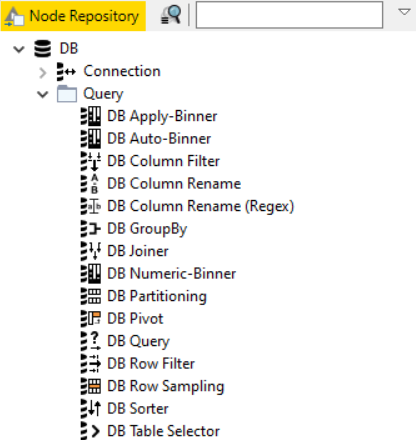
BigQuery has essentially become a remote database. Therefore, we can now use the DB nodes available in KNIME Analytics Platform. In these nodes you can either write SQL statements or fill GUI-driven configuration windows to implement complex SQL queries. The GUI-driven nodes can be found in the DB -> Query folder in the Node Repository.
Now that we are connected to the database, we want to extract a subset of the data according to a custom SQL query.
We are going to access the austin_bikeshare trips database within a specific time period.
Let’s add the DB Table Selector node, just after the BigQuery Connector node.

How to configure the DB Table Selector node:
Open the configuration, click Custom Query and enter the following SQL statement in the field called SQL Statement:
Basically, we are retrieving the entire bikeshare_trips table, stored in the austin_bikeshare schema which is part of the bigquery-public-data project offered by Google. Moreover, we already extracted the day, month and year from the timestamp, according to the Austin timezone. These fields will be useful in the next steps.
Remember: When typing SQL statements directly, make sure you use the specific quotation marks (``) required by BigQuery.
Remember: When typing SQL statements directly, make sure you use the specific quotation marks (``) required by BigQuery.
We can refine our SQL statement by using a few additional GUI-driven DB nodes. In particular, we added a Row Filter to extract only the days in [2013, 2017] year range and a GroupBy node to produce the trip count for each day.
Finally, we append the DB Reader node to import the data locally into the KNIME workflow.
Uploading Data back to Google BigQuery
After performing a number of operations, we would like to store the transformed data back on Google BigQuery within the original Google Cloud project.
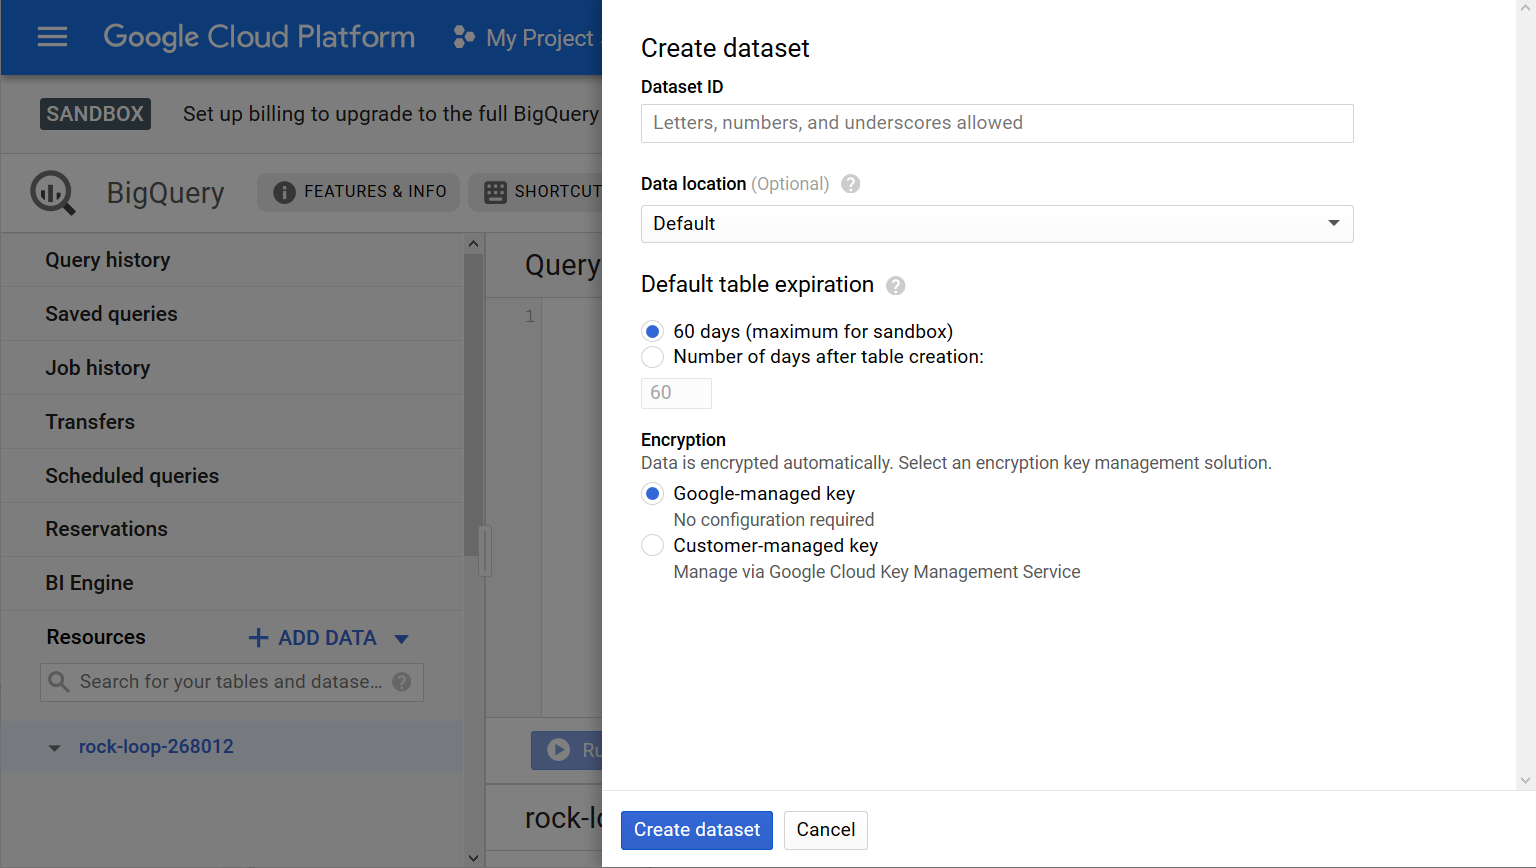
First create a schema where the data will be stored.
- Go back to the Cloud Platform console and open the BigQuery application from the left side of the menu
- On the left, click the project name in the Resources tab.
- On the right, click Create dataset.
- Give a meaningful name to the new schema and click Create dataset. For example, here we called it “mySchema” (Fig. 9)
- Note that, for the free version (called here “sandbox”), the schema can be stored on BigQuery only for a limited period of maximum 60 days.
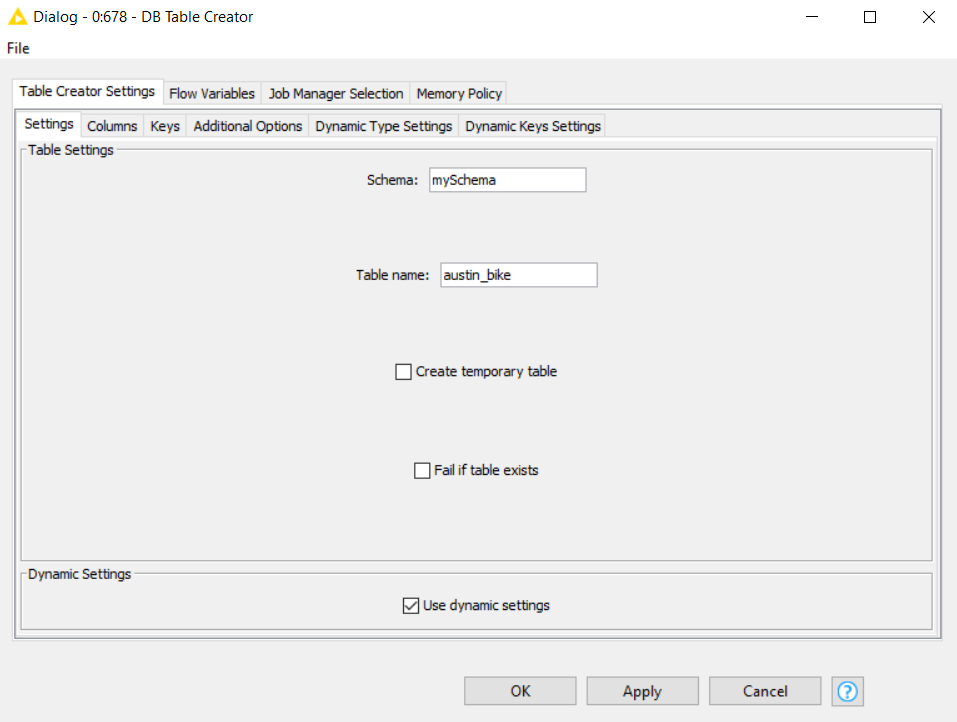
In your KNIME workflow now add the DB Table Creator node to the workflow and Connect it to the Google BigQuery Connector node.

How to configure the DB Table Creator node:
- Insert the name of the previously created schema. As above, we filled in “mySchema”
- Provide the name of the table to create. This node will create the empty table where our data will be placed, according to the selected schema. We provided the name “austin_bike”.
- Note: be careful to delete all the space characters from the column names of the table you are uploading. They would be automatically renamed during table creation and this will lead to conflict, since column names will no longer match.
Add the DB Loader node and connect it to the DB Table Creator and the table whose content you want to load.

How to configure the DB Loader node:
In the configuration window insert the schema and the name of the previously created table. Still, for our example, we filled in “mySchema” as schema name and “austin_bike” as table name.
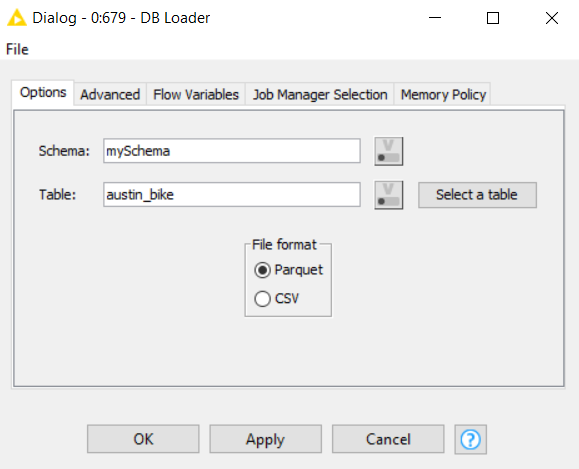
If all the steps are correct, executing this node will copy all the table content into our project schema on Google BigQuery.
