Update: These workflows have been updated (June 2024) to run on KNIME v5.2
Jupyter Notebooks offer an incredible potential to disseminate technical knowledge thanks to its integrated text plus live code interface. This is a great way of understanding how specific tasks in the Computer-Aided Drug Design (CADD) world are performed, but only if you have a basic coding expertise. While users without a programming background can simply execute the code blocks blindly, this rarely provides any useful feedback on how a particular pipeline works. Fortunately, more visual alternatives like KNIME workflows are better suited for this kind of audience.
In this blog post we want to introduce our new collection of tutorials for computer-aided drug design (Sydow and Wichmann et al., 2019). Building on our Notebook-based TeachOpenCADD platform (Sydow et al., 2019), our TeachOpenCADDKNIME pipeline consists of eight interconnected workflows (W1-8), each containing one topic in computer-aided drug design.
Our team put together these tutorials for (a) ourselves as scientists who want to learn about new topics in drug design and how to actually apply them practically to data using Python/KNIME, (b) new students in the group who need a compact but detailed enough introduction to get started with their project, and (c) for the classroom where we can use the material directly or build on top of it.
The pipeline is illustrated using the epidermal growth factor receptor (EGFR), but can easily be applied to other targets of interest. Topics include how to fetch, filter and analyze compound data associated with a query target. The bundled project including all workflows is freely available on KNIME Hub. The Hub also lists the individual workflows for separate downloads if desired. Further details are given in the following sections.
Note: The screenshots shown below are taken from the individual workflows, which resemble the complete workflow but have different input and output sources. Double click the screenshots to see a larger display of the image.
Workflow 1: Acquire compound data from ChEMBL
Information on compound structure, bioactivity, and associated targets are organized in databases such as ChEMBL, PubChem, or DrugBank. Workflow W1 shows how to obtain and preprocess compound data for a query target (default target: EGFR) from the ChEMBL web services.

Workflow 2: Filter datasets by ADME criteria
Not all compounds are suitable starting points for drug development due to undesirable pharmacokinetic properties, which for instance negatively affect a drug's absorption, distribution, metabolism, and excretion (ADME). Therefore, such compounds are often excluded from data sets for virtual screening. Workflow W2 shows how to remove less drug-like molecules from a data set using Lipinski's rule of five.

Workflow 3: Set alerts based on unwanted substructures
Compounds can contain unwanted substructures that may cause mutagenic, reactive, or other unfavorable pharmacokinetic effects or that may lead to non-specific interactions with assays (PAINS). Knowledge on unwanted substructures in a data set can be integrated in cheminformatics pipelines to either perform an additional filtering step before screening or - more often - to set alert flags to compounds being potentially problematic (for manual inspection by medicinal chemists). Workflow W3 shows how to detect and flag such unwanted substructures in a compound collection.

Workflow 4: Screen compounds by compound similarity
In virtual screening (VS), compounds similar to known ligands of a target under investigation often build the starting point for drug development. This approach follows the similar property principle stating that structurally similar compounds are more likely to exhibit similar biological activities. For computational representation and processing, compound properties can be encoded in the form of bit arrays, so-called molecular fingerprints, e.g. MACCS and Morgan fingerprints. Compound similarity can be assessed by measures such as the Tanimoto and Dice similarity. Workflow W4 shows how to use these encodings and comparison measures. VS is here conducted based on a similarity search.

Workflow 5: Group compounds by similarity
Clustering can be used to identify groups of similar compounds, in order to pick a set of diverse compounds from these clusters for e.g. non-redundant experimental testing or to identify common patterns in the data set. Workflow W5 shows how to perform such a clustering based on a hierarchical clustering algorithm.

Workflow 6: Find the maximum common substructure in a collection of compounds
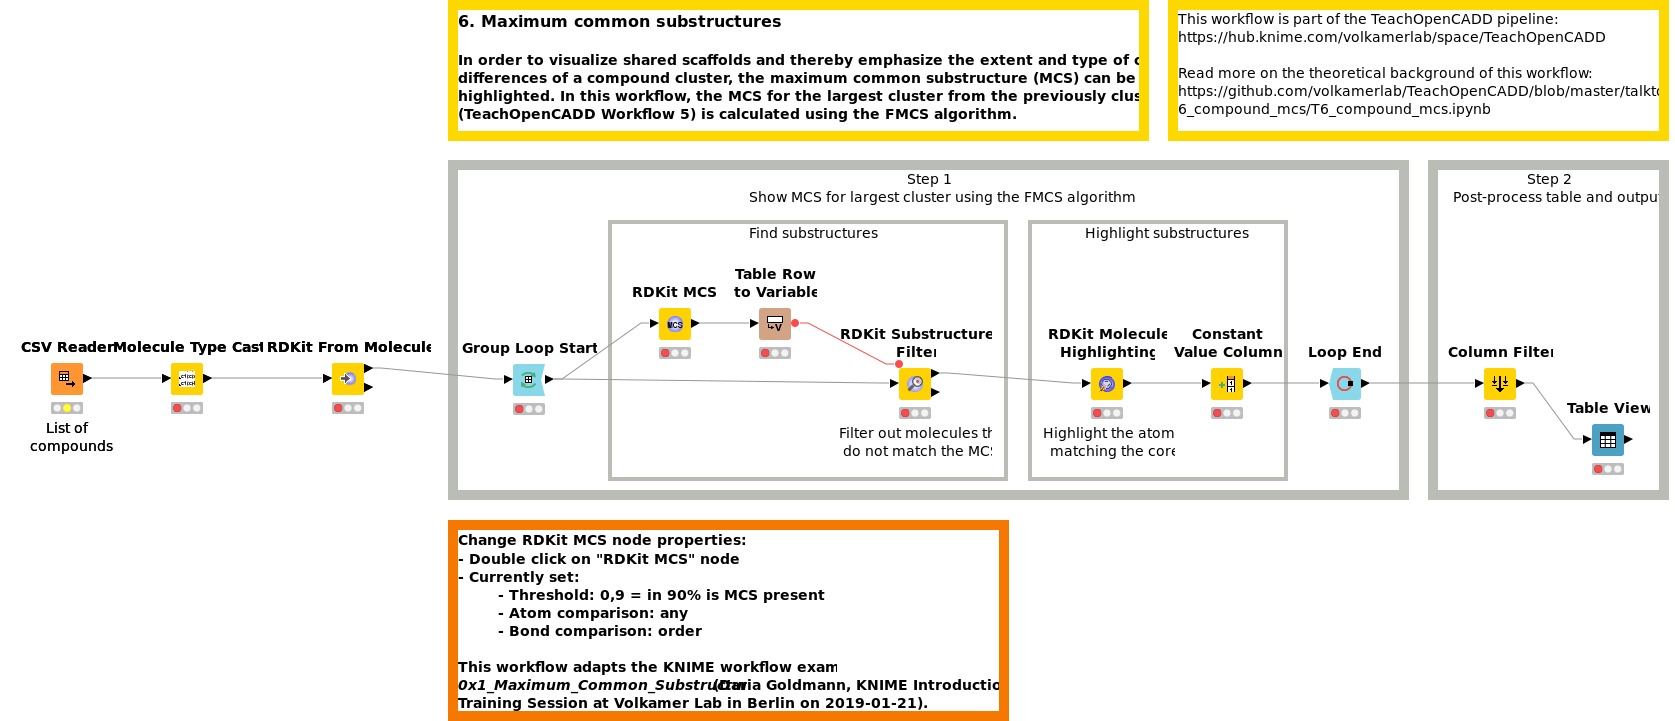
In order to visualize shared scaffolds and thereby emphasize the extent and type of chemical similarities in a compound cluster, the maximum common substructure (MCS) can be calculated and highlighted. In Workflow W6, the MCS for the largest cluster from previously clustered compounds (W5) is calculated using the FMCS algorithm.

Workflow 7: Screen compounds using machine learning methods
With the continuously increasing amount of available data, machine learning (ML) gained momentum in drug discovery and especially in ligand-based virtual screening to predict the activity of novel compounds against a target of interest. In Workflow W7, different ML models (RF, SVM and NN) are trained on the filtered ChEMBL dataset to discriminate between active and inactive compounds with respect to a protein target.

Workflow 8: Acquire structural data from PDB
The PDB database holds 3D structural data and meta information on experimentally resolved proteins. Workflow W8 shows how structural data can be automatically fetched from the PDB and processed.

Requirements
All the workflows have been tested on KNIME v4 and v4.1. In addition to some extensions provided by the KNIME team, TeachOpenCADD also requires:
- RDKit KNIME integration, by NIBR
- Vernalis KNIME nodes, by Vernalis Research.
For a full list of requirements, please check our project on the KNIME Hub.
Update: the workflows have been updated to run on KNIME v5.2
Feedback
If you are using the workflows and you like them, drop us a line at this thread in KNIME forums or in the issues section of the TeachOpenCADD repository.
