The KNIME Server REST API is described from a design perspective in the blog post, Giving the KNIME Server (a) Rest by Thorsten Meinl. This article focuses on functionality.
In the modern IT landscape, it is commonplace to integrate across different applications. REST makes that easy. Here we give you a hands-on guide to getting started with the REST API and show you how to invoke a workflow.
For those unfamiliar, REST has become one the most predominant architectures for obtaining and managing data across applications in the modern IT world. REST protocols are generally stateless, lightweight, robust, and easy to work with. Thus, they are a great choice for KNIME Server’s communication in a modern, data-driven organization. We can use the KNIME Server REST API to allow external applications to invoke workflows, manage the server, or start scoring data.
Popular use cases for KNIME Server REST API include:
- Trigger workflows to perform ETL e.g. move data into a visualization tool like Tableau from a database
- Score a model such as churn prediction
- Move workflows across different environments.
All of these processes can be invoked by applications via the KNIME Server REST API to make communications seamless. We can even use REST services to help manage KNIME Server itself.
This blog will focus on how to generally invoke a workflow. Let’s get started.
Tools to Invoke REST Endpoints
There are several tools you can use to invoke REST endpoints such as: curl, RESTClient, SoapUI, Postman, or KNIME Analytics Platform. Here we’ll be using Postman, because it has the capacity to output REST invocations in different formats including curl, Java, Python, R, and has the capacity to manage collections of APIs.
Navigate the API
KNIME Server provides a Swagger interface for its REST Endpoints, which makes finding and using REST services simple. We can find the KNIME Server REST API interface by navigating the Help section (the question mark) of the KNIME Server WebPortal and clicking the KNIME Server REST API documentation link.
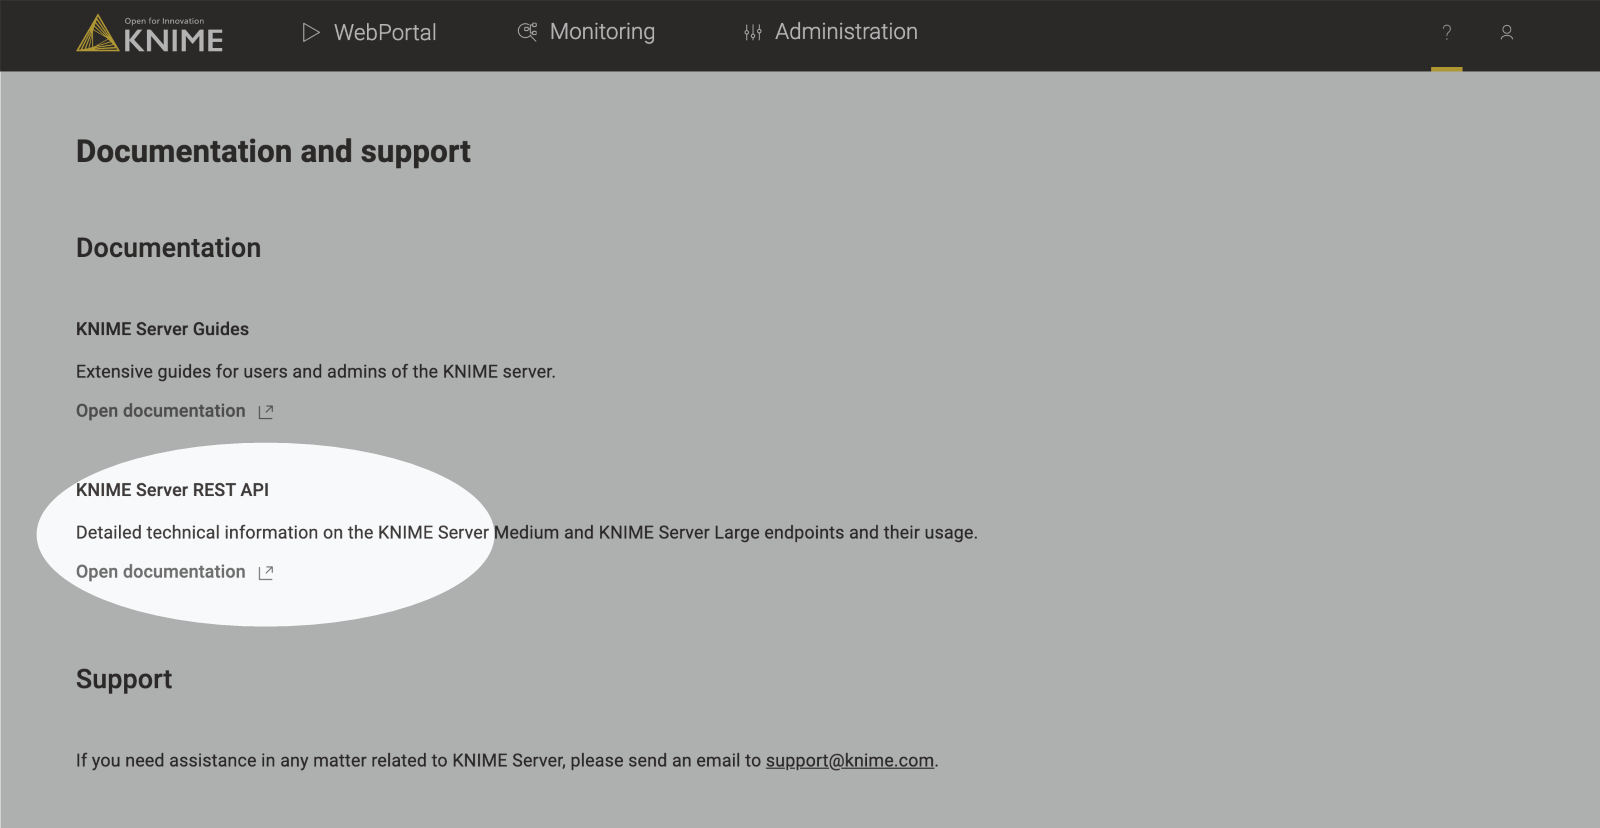
Fig. 1 KNIME Server REST API documentation on KNIME Server WebPortal
Another way to access the documentation is to add the following to the end of your KNIME Server’s URL:
For example, if your KNIME Server is located at
you would find the REST documentation available at
and display it as shown below:
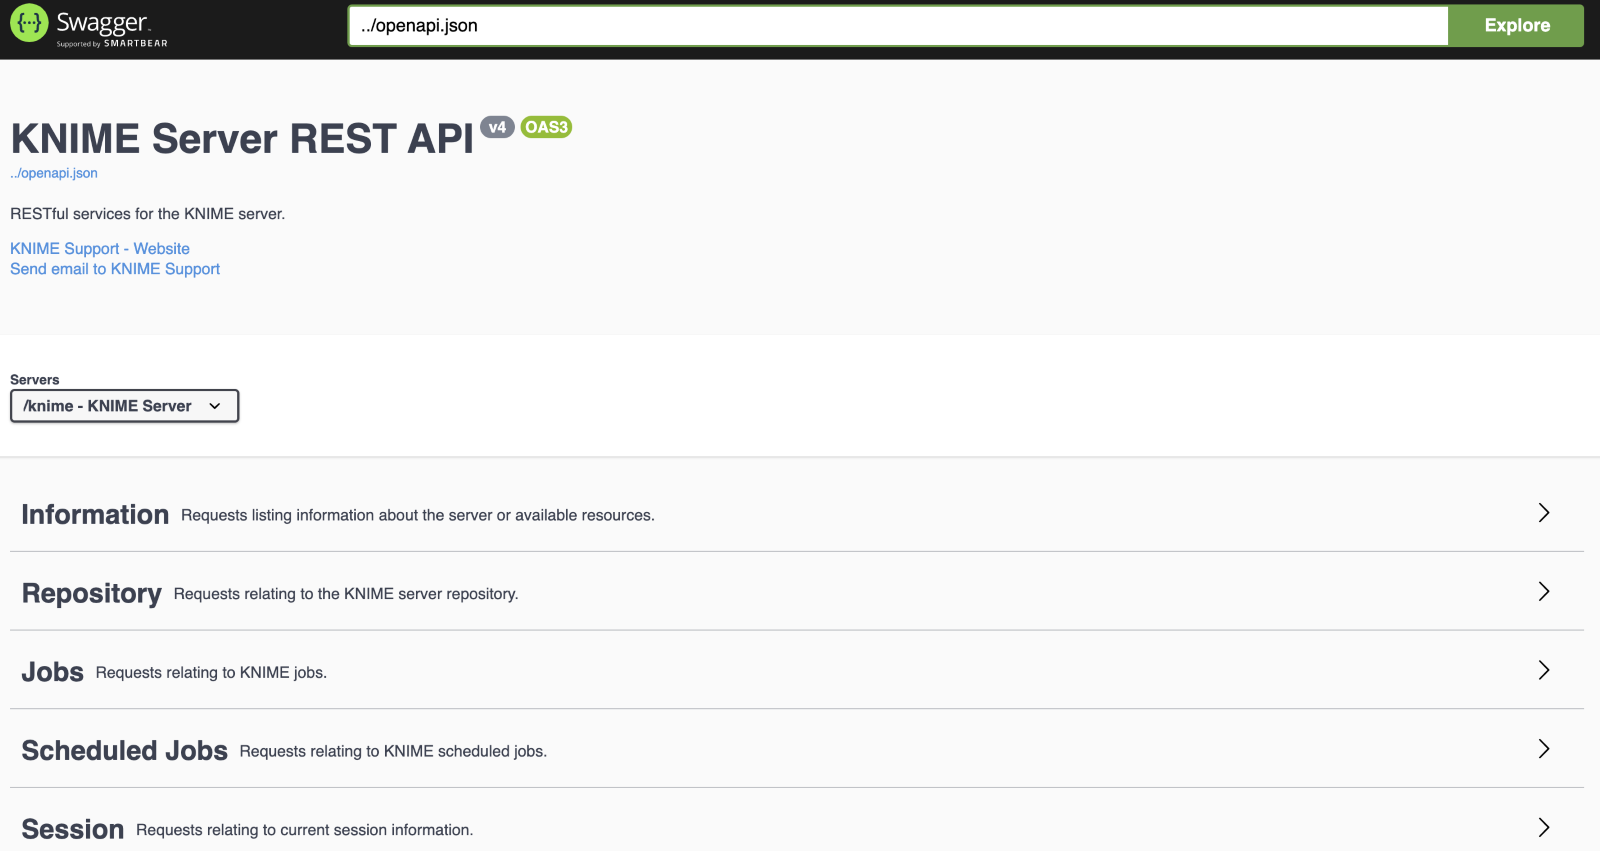
Fig. 2 KNIME Server REST API documentation
From here we can drill down into the sections below and find the available REST endpoints - note that they are color-coded by invocation type (GET, POST, PUT and DELETE). Here, we focus on 'Jobs'.
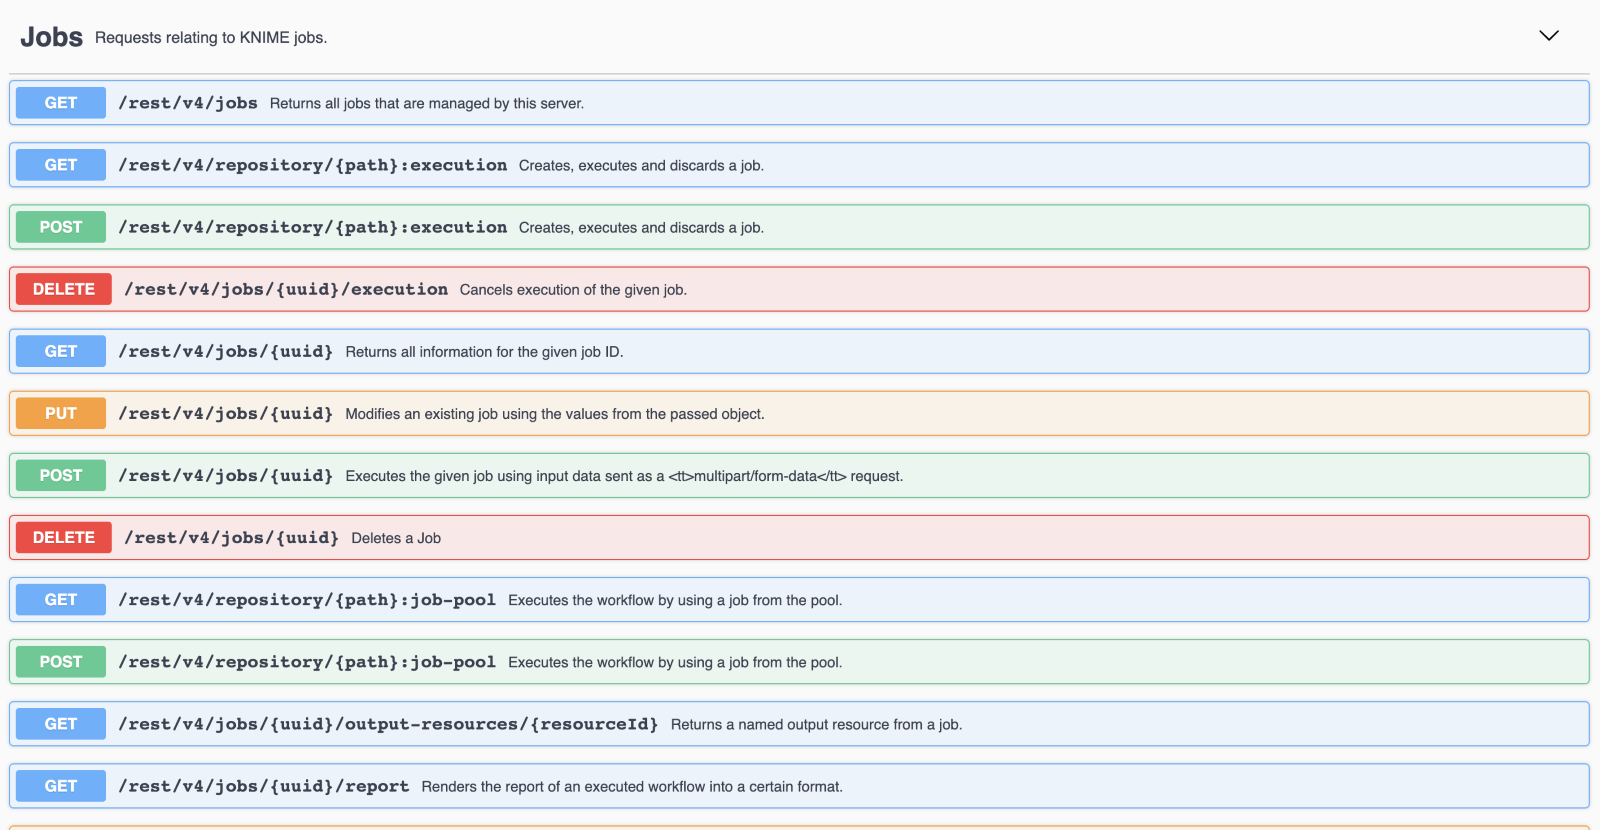
Fig. 3 REST endpoints, color-coded by invocation type
Drill down into the one of the REST endpoints, such as the GET /rest/v4/jobs endpoint to see a description of the endpoints and required/mandatory parameters. The /rest/v4/jobs endpoint has an optional query parameter for ‘user’ which lets us filter the jobs by user.
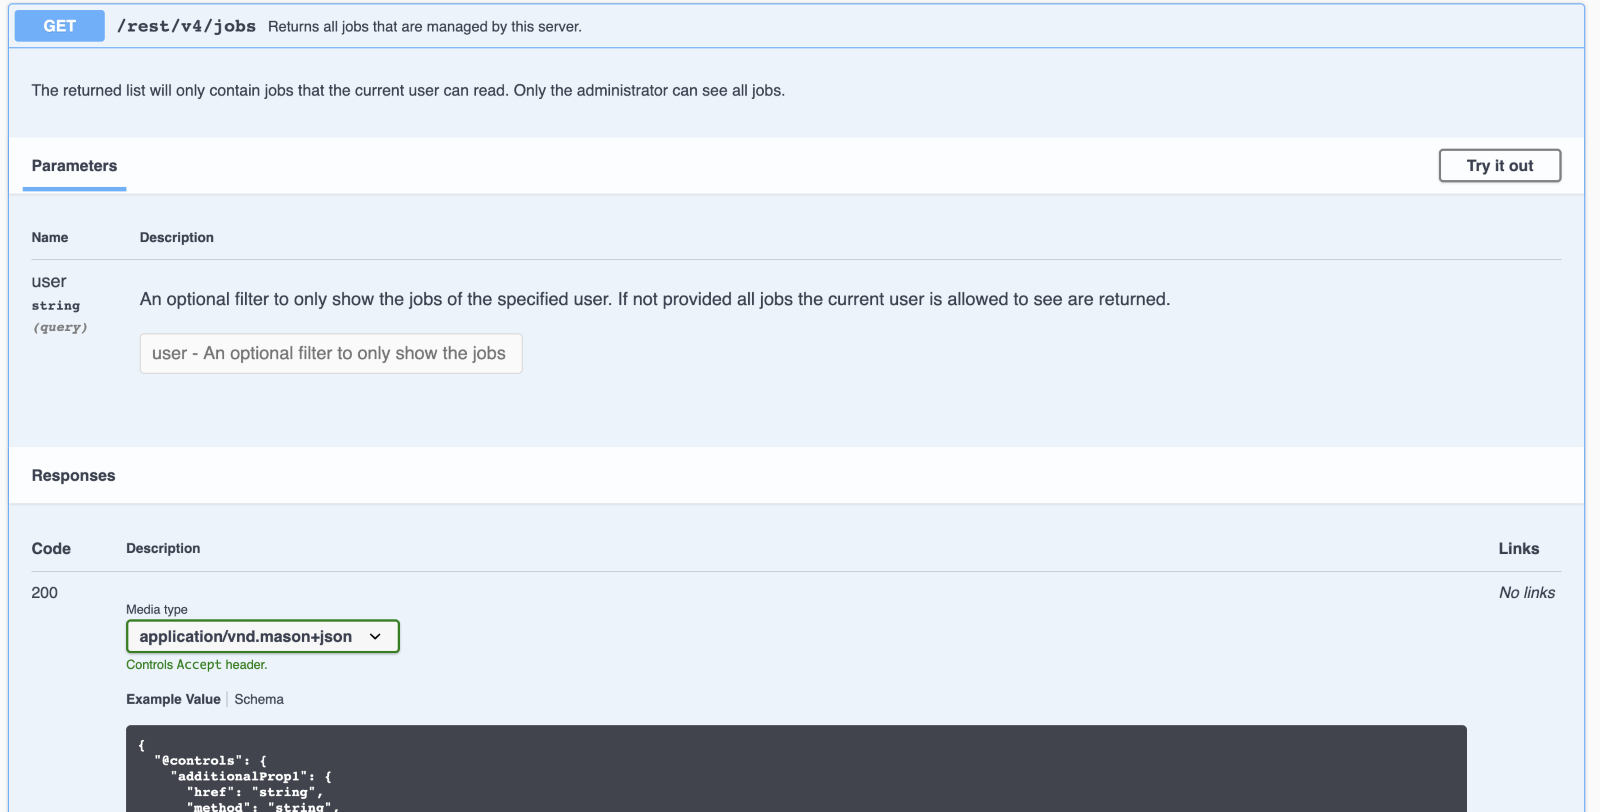
Fig. 4 GET endpoint, with description and required parameters
If we look at one of the POST or PUT calls, at /rest/v4/jobs/{uuid} we can also see an example for the Request body that we would send with the request.
Several of our endpoints in the ‘Jobs’ section contains a ‘{path}’ or ‘{uuid}’ in the request.
The brackets denote that this is a variable we need to find and append to the request.
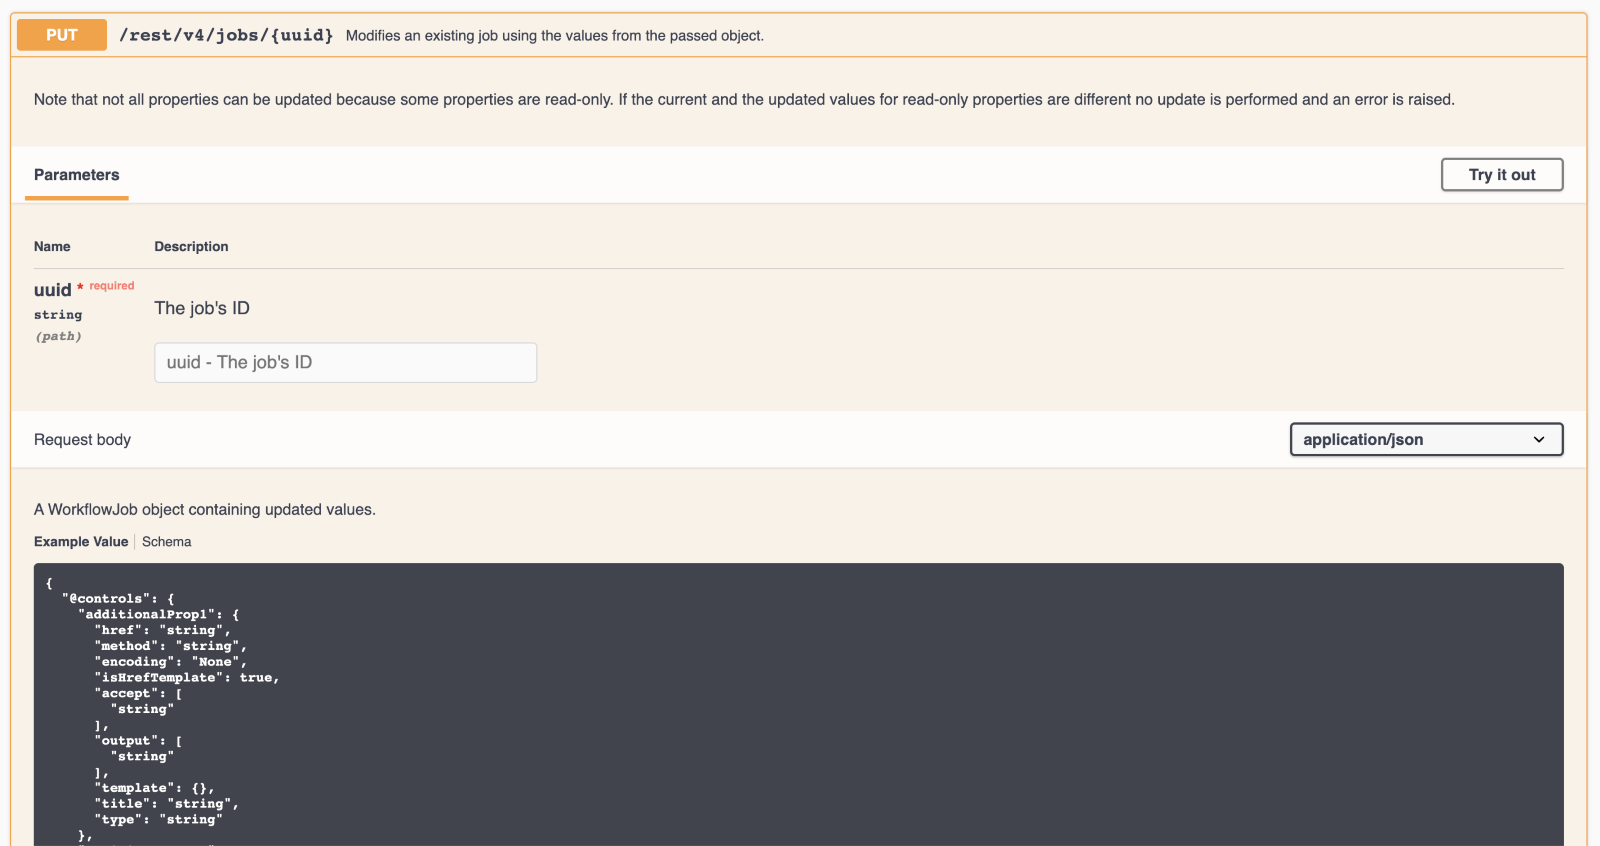
Fig. 5 Example of the Request body to send with request
Many tools, such as Postman allow for creating collections of REST requests to help with managing requests. We can import a template for all of KNIME Server’s REST API endpoints into Postman by navigating to the URL, .../knime/rest/openapi.json, e.g.:
and then copy the JSON from our browser into the ‘Raw text’ section of Postman’s import tool.
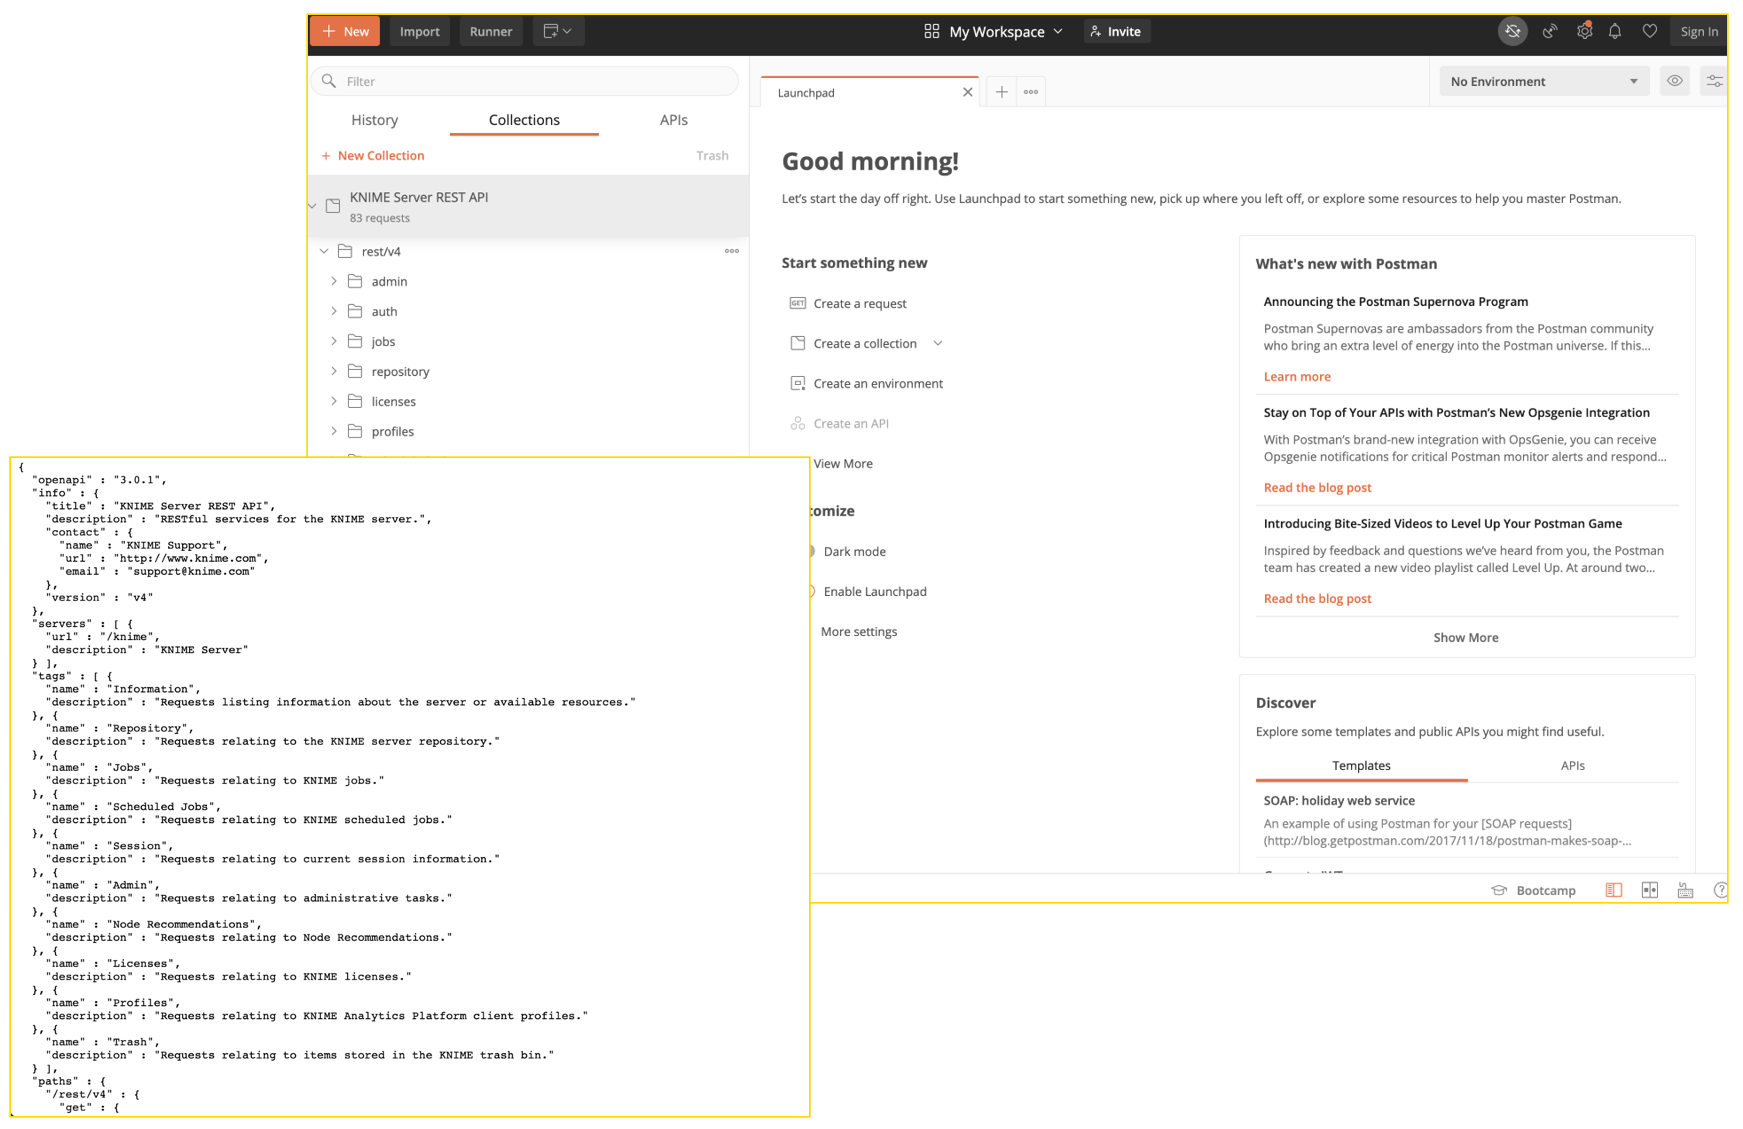
Fig. 6 Copy JSON from browser into ‘Raw text’ section of Postman’s import tool
Invoke a Workflow via REST Requests
There are two ways to invoke a KNIME workflow via REST requests: a single-step method, and a multi-step method. The single-step method uses the ‘execution’ endpoint and instantly creates, runs, and discards a job. The multi-step method, ‘jobs’, loads a job and then requires a separate request to trigger and keep the completed job. In short:
- Single-step method uses ‘execution’ and discards the job
- Multi-step method uses ‘jobs’ and keeps the job so you can re-execute or view from KNIME Analytics Platform and WebPortal
Find the Workflow’s Endpoint
The easiest way to find the endpoints for a specific workflow is by navigating to that workflow in KNIME Analytics Platform, right-clicking it, and selecting “Show API Definition”. This opens a new browser tab for that specific workflow.
We’re using the “Predict Results Using REST API” workflow that comes as an example with the KNIME Server.
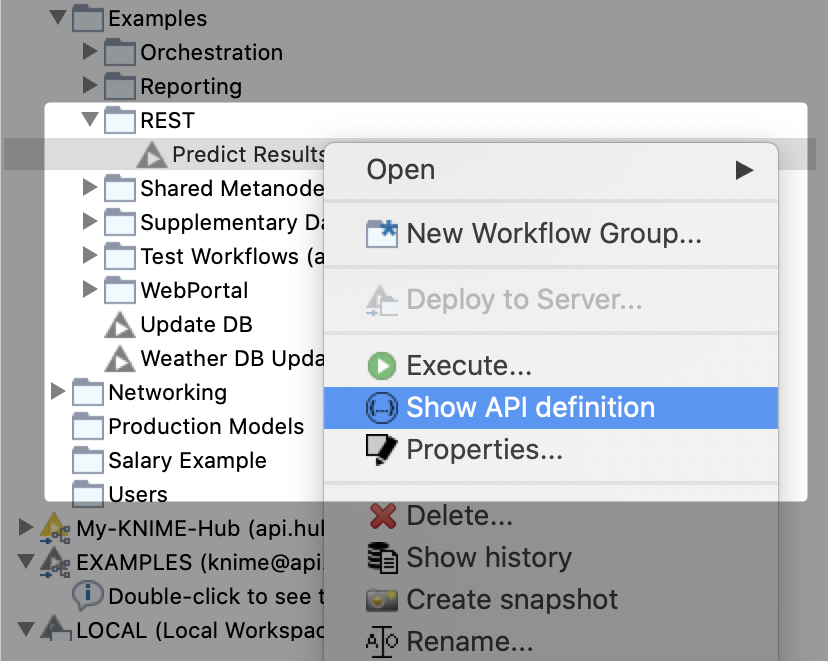
Fig. 7 Find endpoints for workflow by selecting ‘Show API definition” (right click workflow) to open new browser tab for that workflow
Notice that there is a drop down for job-control and execution; both contain their own GET and POST requests.
We’ll use the POST requests here for each of them to provide a more comprehensive overview.
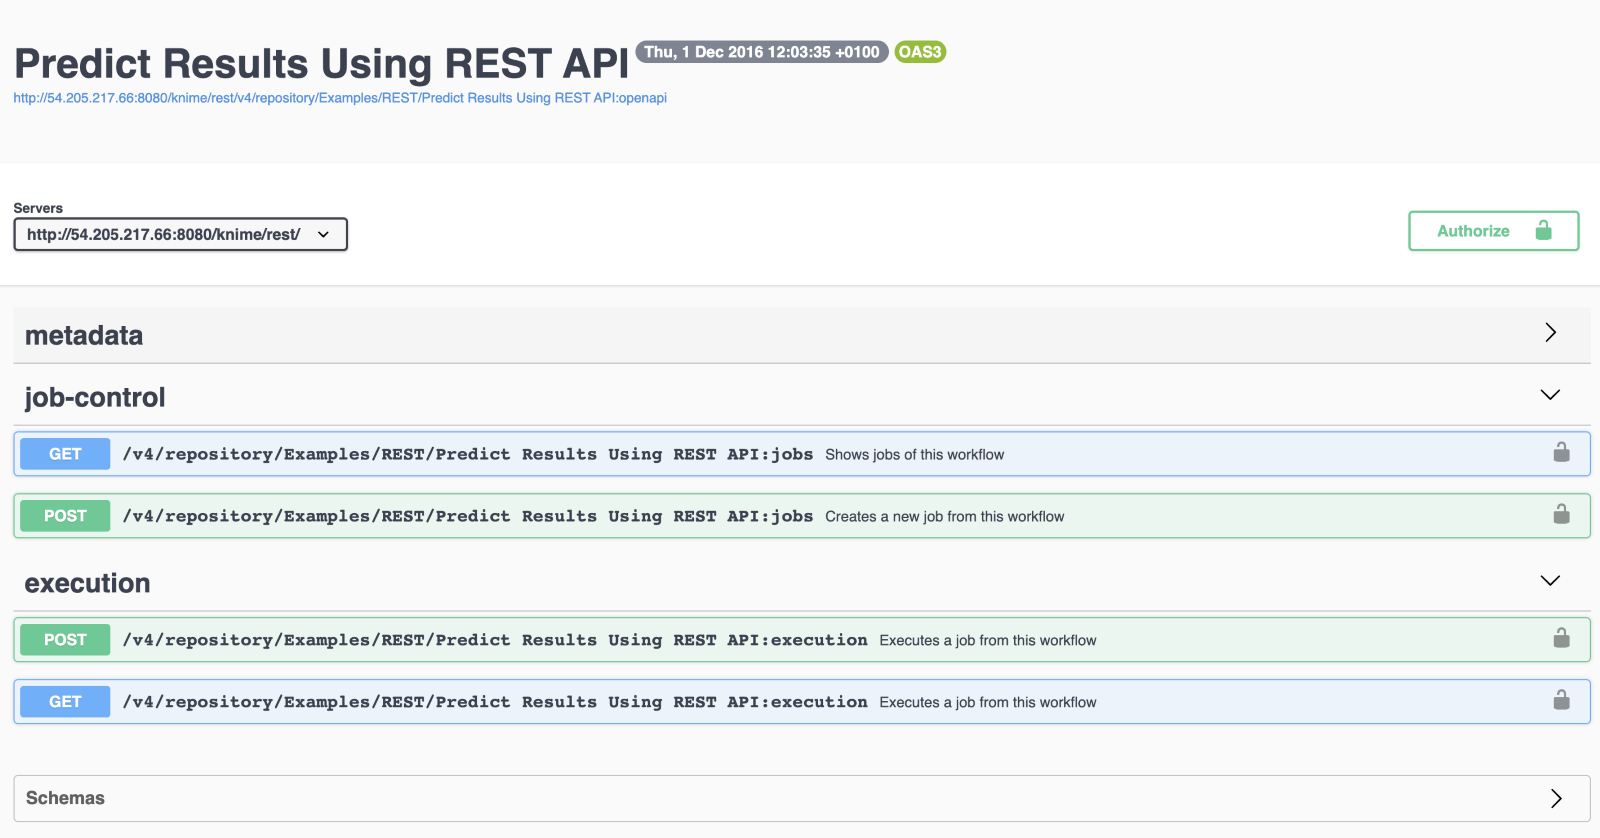
Fig. 8 Drop-down for job-control and execution
Another option, for those of us who don’t have access to KNIME Analytics Platform, would be to work by starting from the endpoints and filling in the {path} to each endpoint. From our main Swagger UI we can find the two endpoints under the ‘Repository’ tab we’ll be using, listed as:
The easiest way to find the {path} is to navigate to the execution screen for the workflow and copy everything beyond the ‘/webportal/space/’. Note that ‘%20’ is just our browser's way of translating the space character.
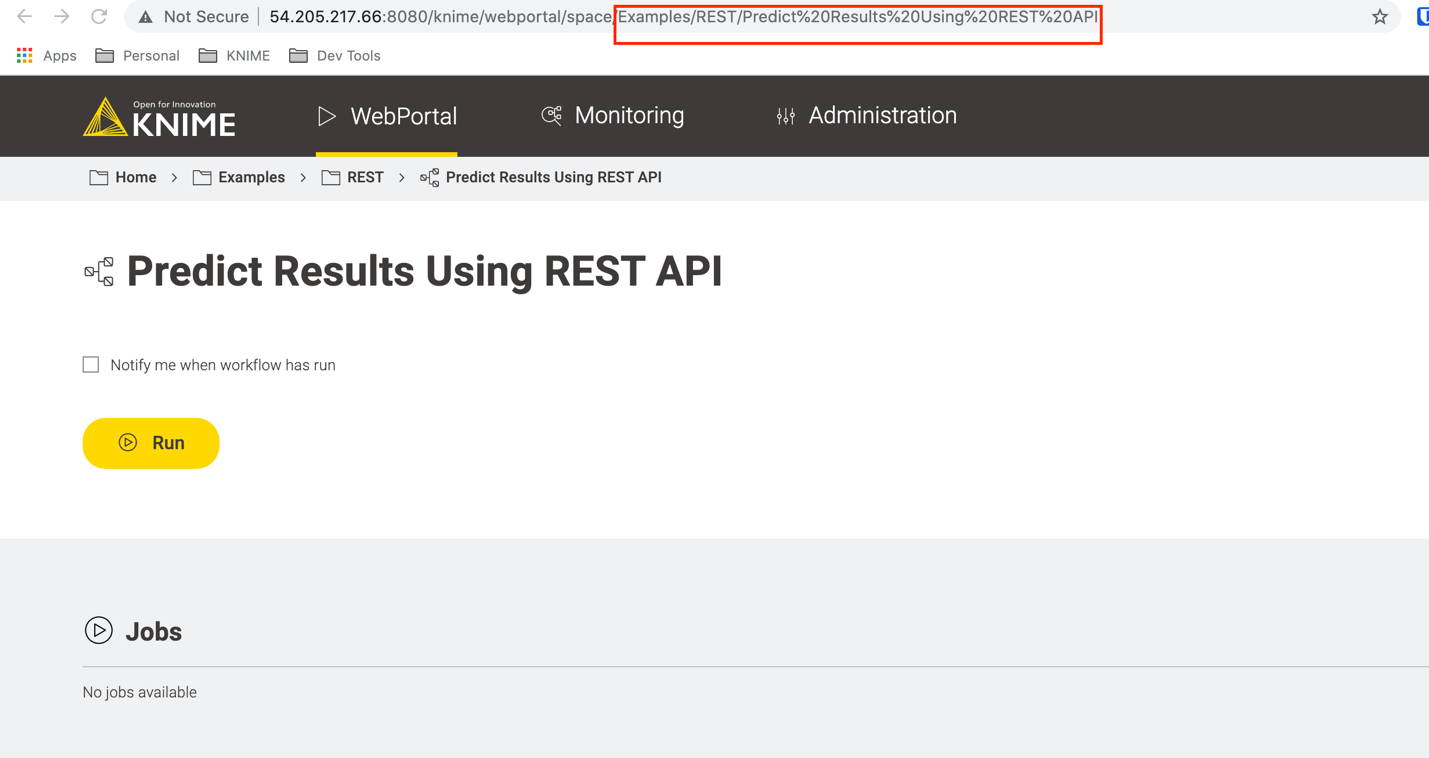
Fig. 9 Find path by navigating to the execution screen for your workflow and copying the section marked in red
For our example the two endpoints we’ll need are the POSTS at:
and
Authentication
There are two ways you can authenticate against KNIME Server REST API endpoints: JWT and basic authentication. Here we will be using basic authentication for simplicity. All you need is your KNIME Server username and password!
Single-Step Execution
Now that we have our REST endpoints, we can start executing the workflows. To execute the workflows in Postman we create a new request and start filling some things out.
Let’s start with our single step execution to discard the job.
We’ll want to make sure that we use POST, paste in the endpoint for ‘execution’, enter our username and password with ‘Basic Auth’, and select JSON for the body type.
The JSON body (which you’ll find an example of in the Swagger UI) is where the input data can be customized for this run. Once we hit send, we get a response that contains how the execution went, plus any output data with the workflow!
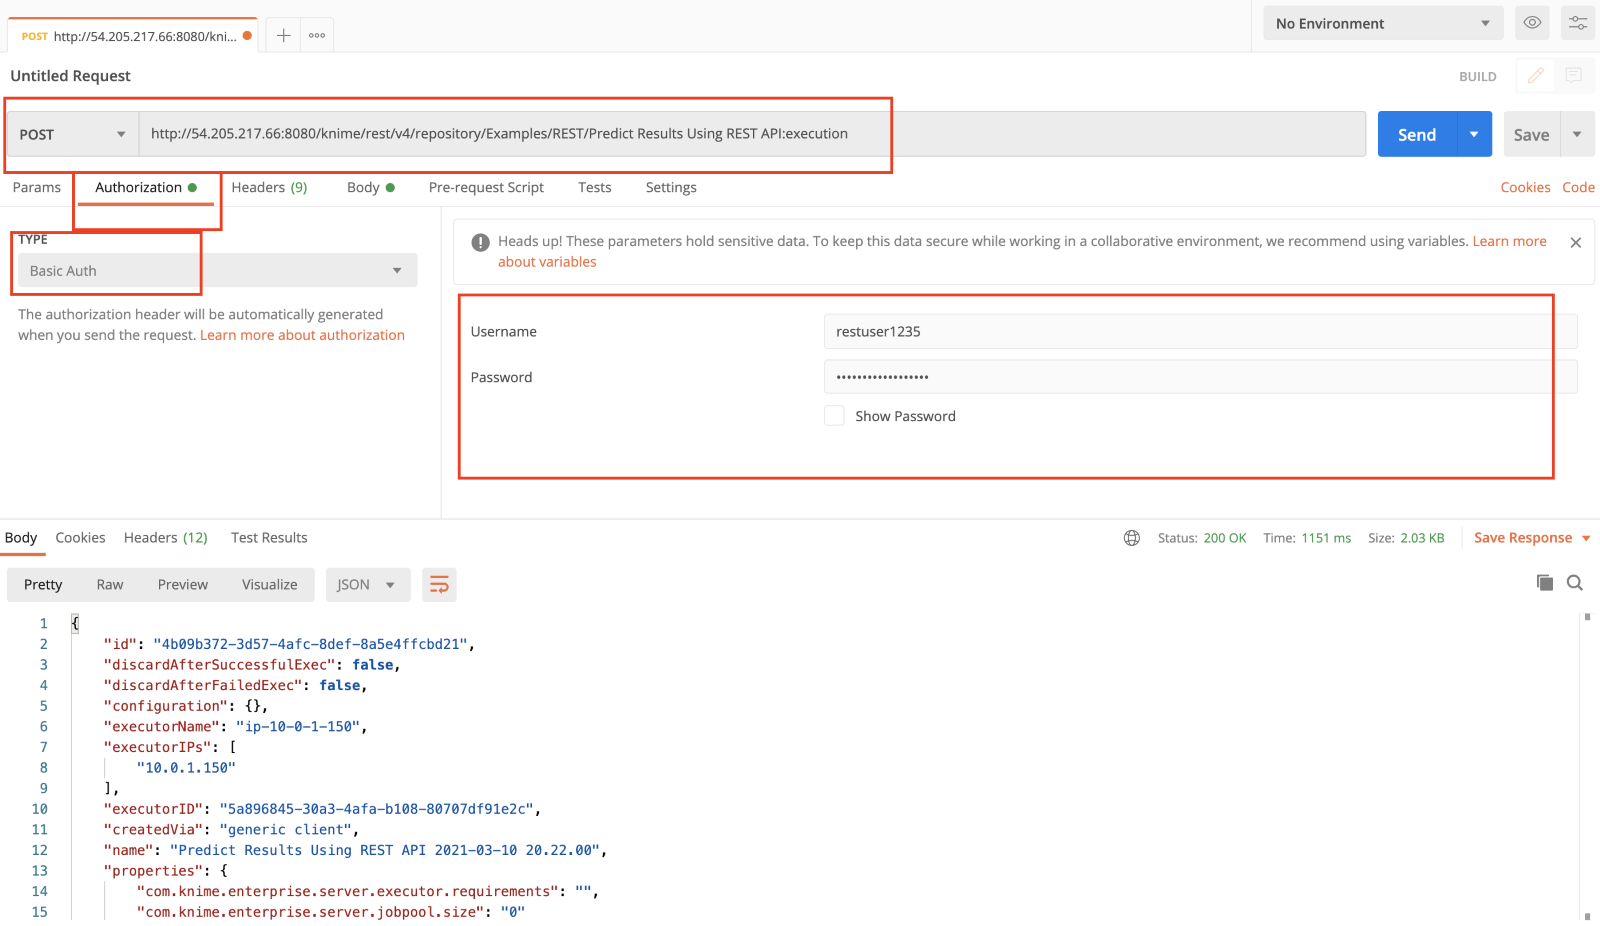
Fig. 10 Enter username and password with Basic Auth and select JSON for body type.
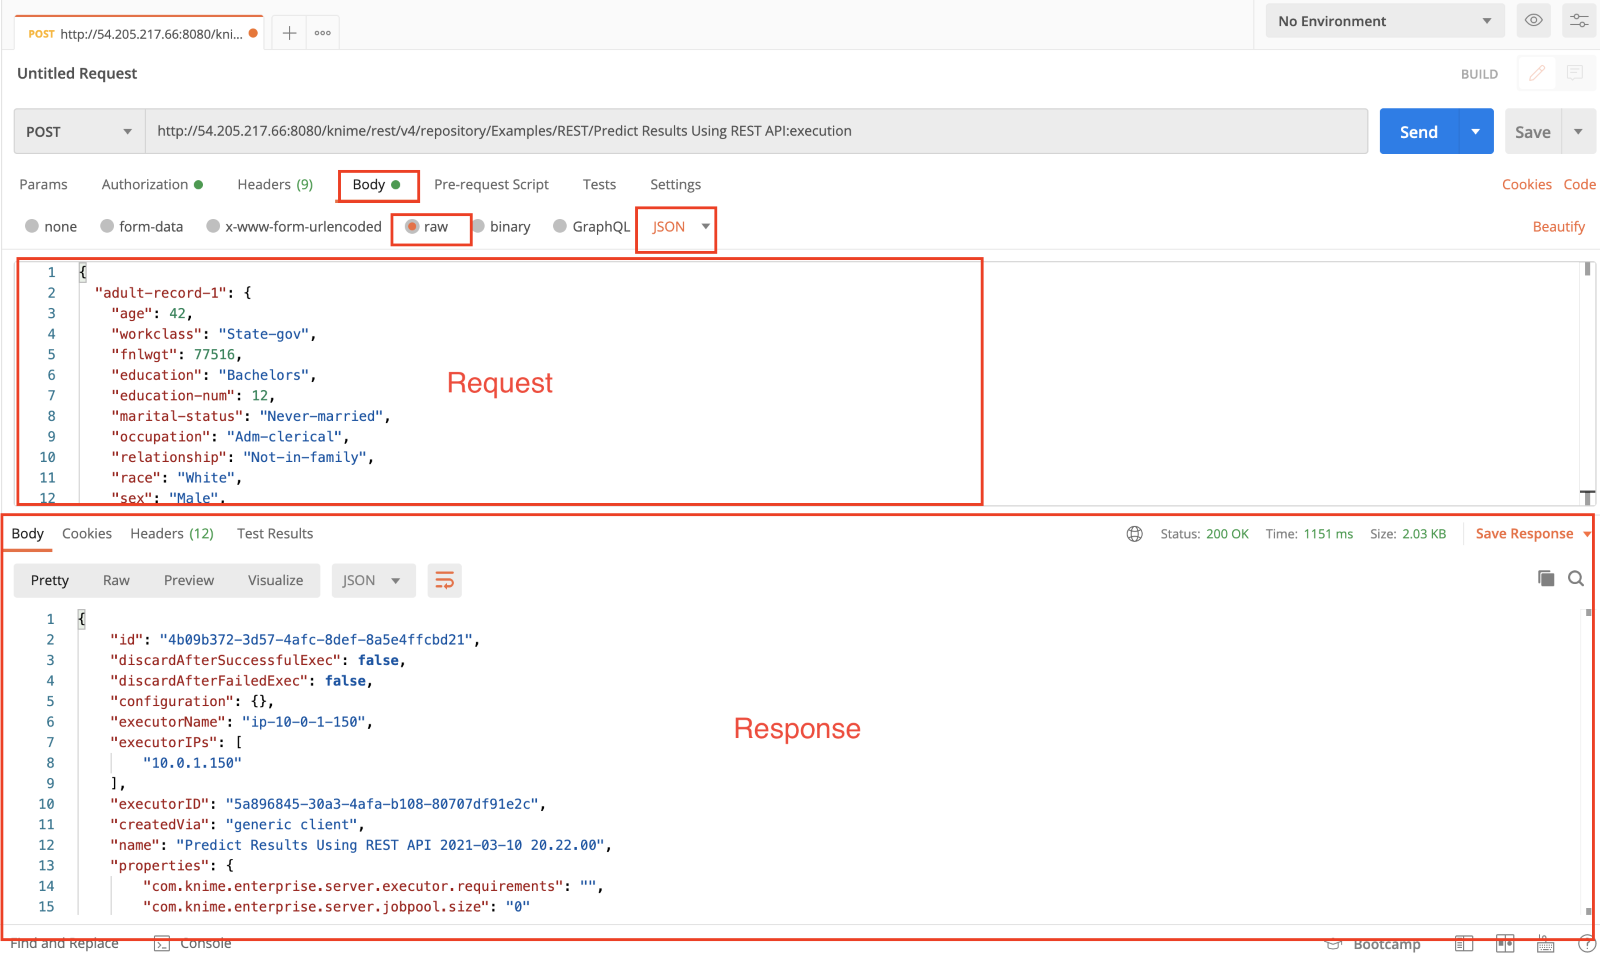
Fig. 11 Here we see our request and the subsequent response
Multi-Step Execution
You might have noticed that with the ‘execution’ endpoint our job is automatically discarded, and we can’t view or open it in the WebPortal or KNIME Analytics Platform. If we want our job to persist we can use the multi-step method, which will load the job and then allow us to execute it at a separate time.
This is particularly useful if we want to load several jobs in preparation of some number of anticipated requests.
Here we can copy in our ‘jobs’ endpoint as a POST, along with our basic authorization, and the somewhat empty request body of:
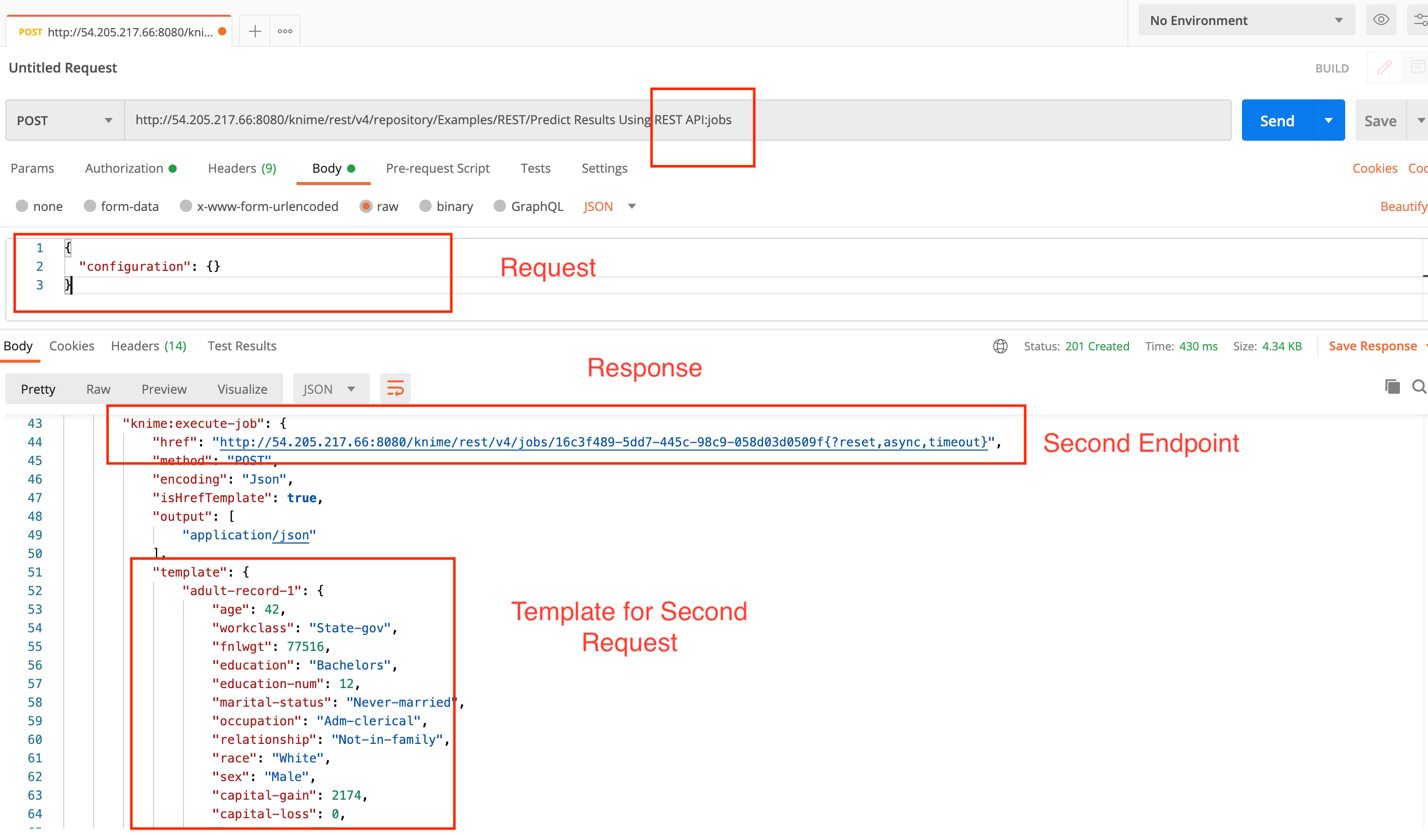
Fig. 12 Copy our ‘jobs’ endpoint as a POST with basic auth, and request body
This time, our workflow didn’t actually execute. It loaded a job with a UUID. To actually execute this job, we need to find the ‘knime:execute-job’ object in the JSON response and grab the link it contains. This link is calling a different ‘job’ API by the UUID of the job we just loaded.
We should take note of the method that this link needs, as well as the template for the request. This link contains any optional parameter at the end, which we’ll remove for now to give us a new POST endpoint that we can call to execute the job as so.
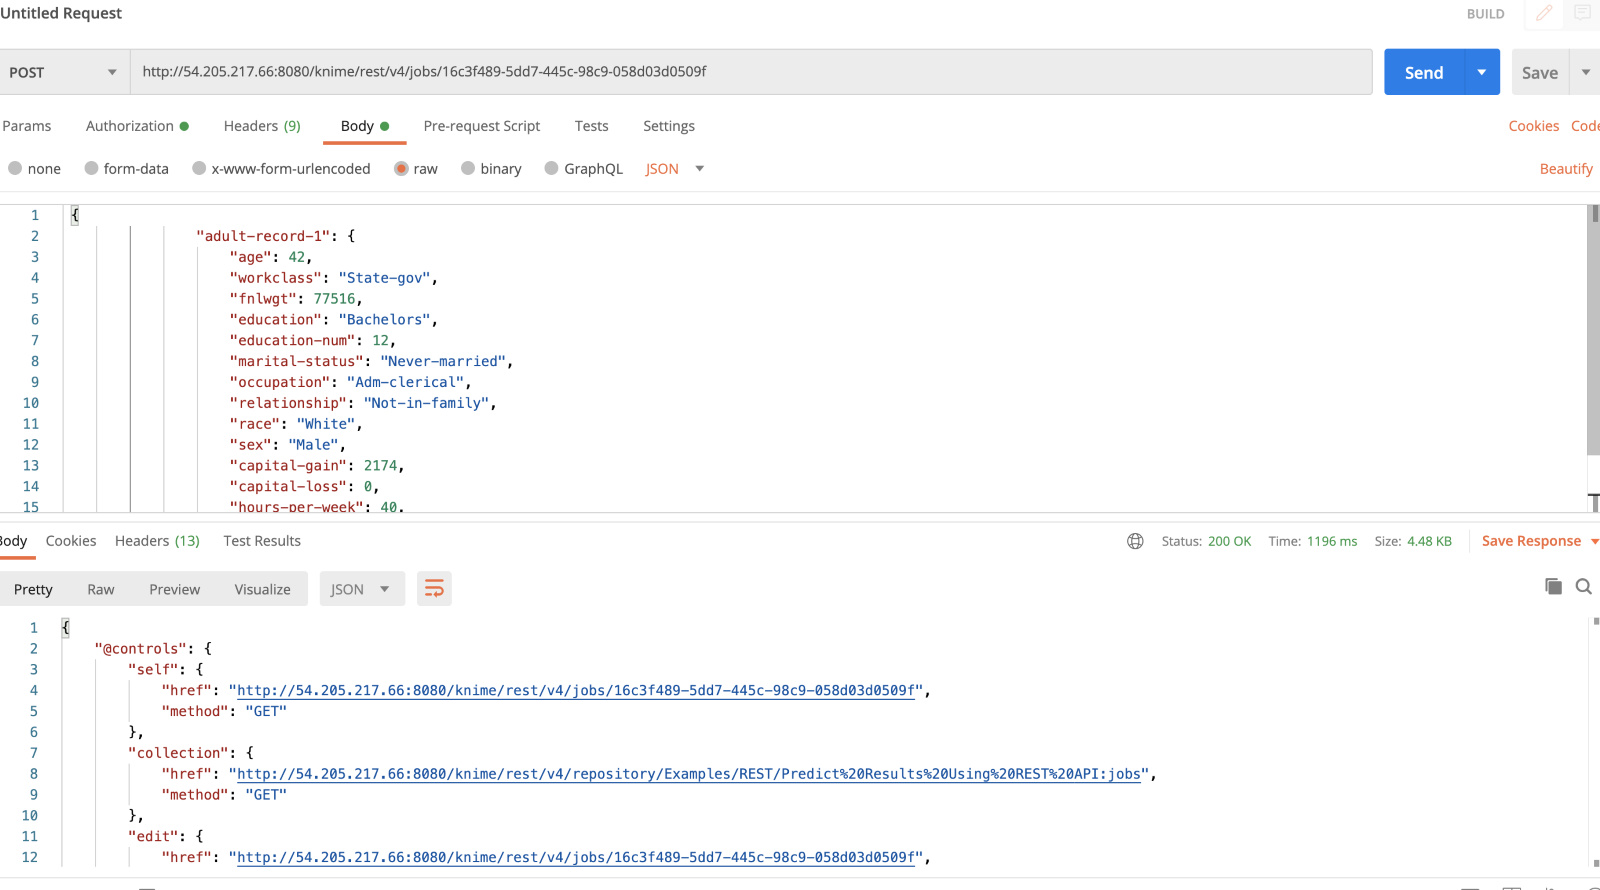
Fig. 13 Grab the link in the JSON response to ‘knime:execute-job', taking note of the method required by the link and request template.
KNIME Server Trial
We now know how to execute our workflows via a REST API. The KNIME Server REST API is available as part of KNIME Server. For more information or to arrange a trial, contact sales@knime.com.
