We’ve had a couple of posts in the past about creating RESTful services with the KNIME Analytics Platform and using the REST API provided by KNIME Business Hub (formerly KNIME Server). But since we keep adding functionality and making things easier, it’s worthwhile to occasionally come back and revisit the topic. This post will demonstrate a couple of changes since Jon’s last update.
Creating a service
We’ll start with this simple workflow, which finds the top N rows of a database by sorting on a particular column and then taking the first N rows from the result:

We want to make this workflow available as a web service where the caller can select the column to use for sorting and the value of N. It’s easy to change the sort column and N value in the KNIME Analytics Platform: we just configure those nodes and pick the values we want.
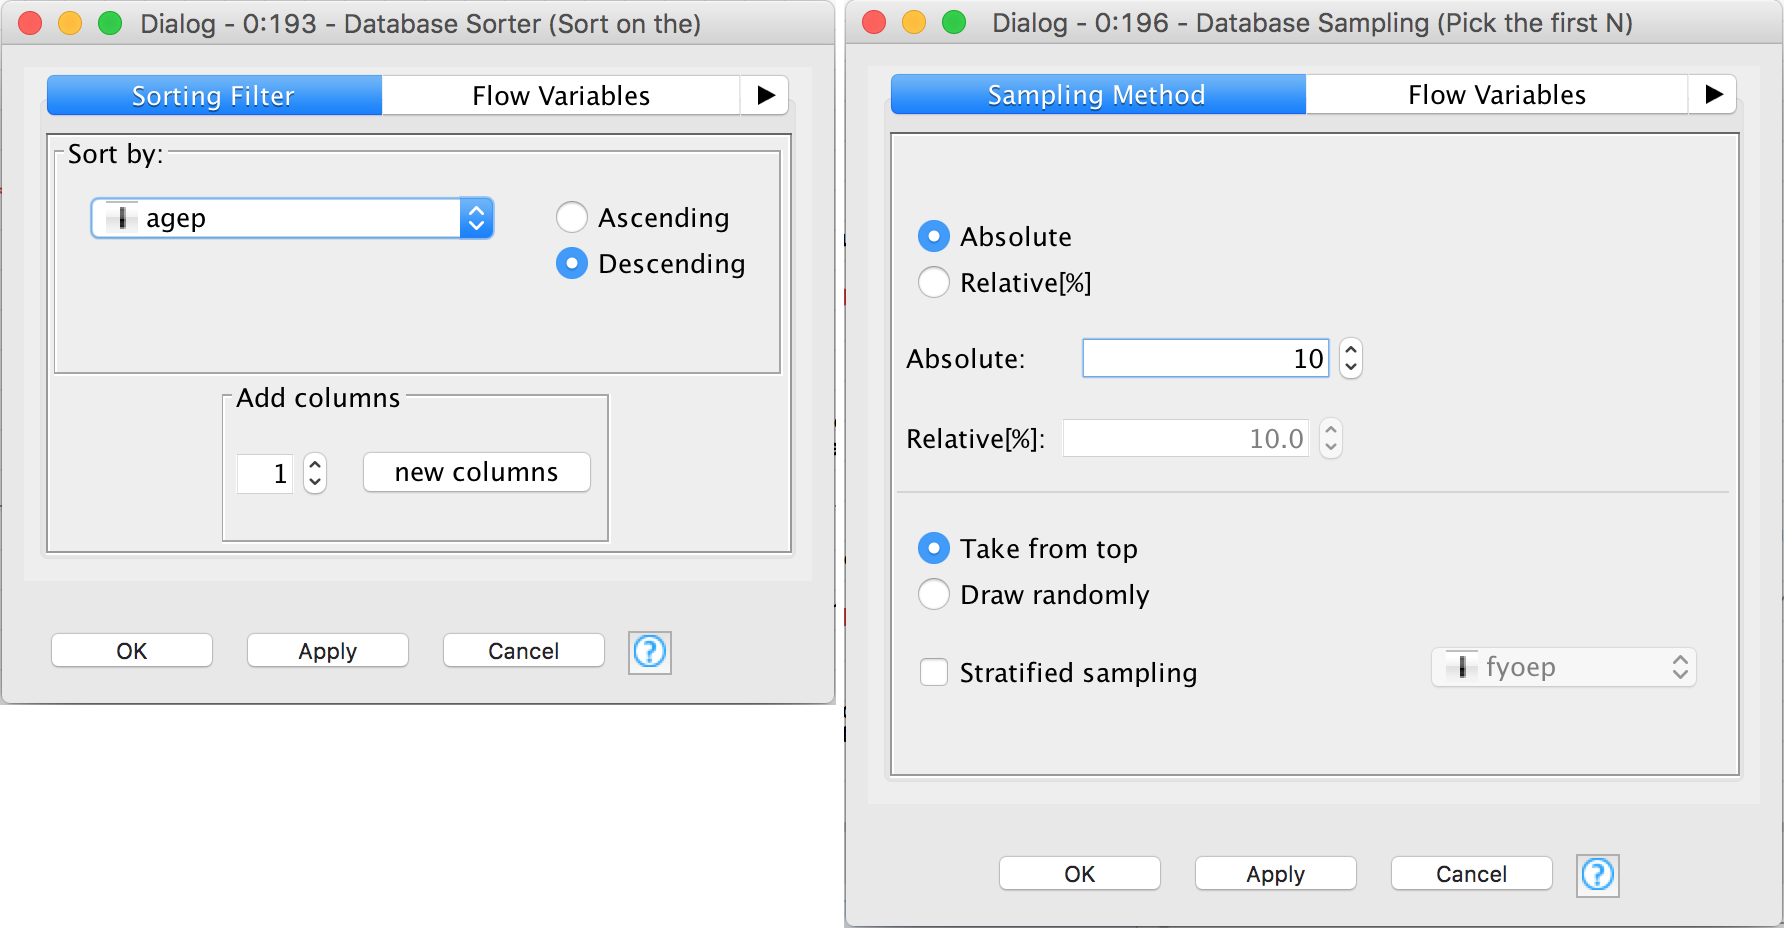
This option isn’t available for web services, so we need to take another approach.
The trick, as you might have expected, is to use flow variables to set the configuration and to have the user provide those as part of the web services call. We will also need to return the output table as JSON. Here’s an updated form of the workflow showing what this looks like:

I’ve encapsulated the new complexity in those two wrapped metanodes. We’ll come to those in a moment, but let’s start with the basics. Here are the new configurations for the Database Sorter and Database Sampling nodes:
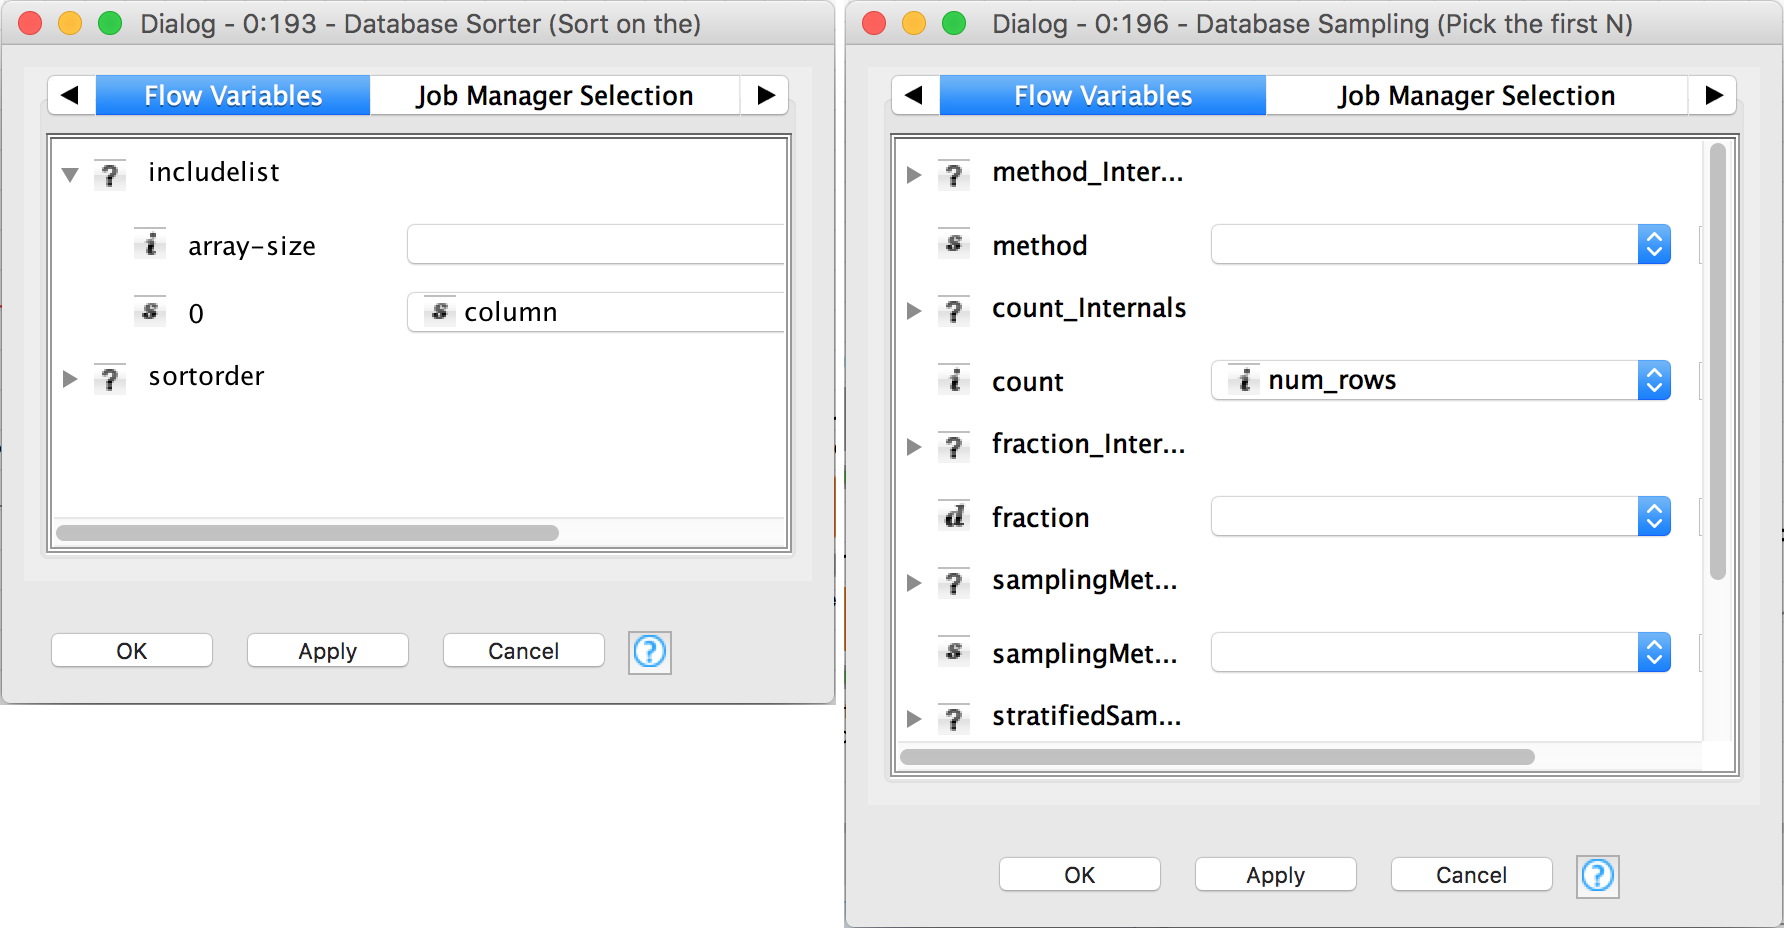
These use the flow variables “column” and “num_rows” provided by the Construct Input wrapped node. Let’s take a look inside that wrapped metanode:

We’ve used two quickform nodes to read in the name of the column (variable name column) and the number of rows (variable name num_rows) desired.
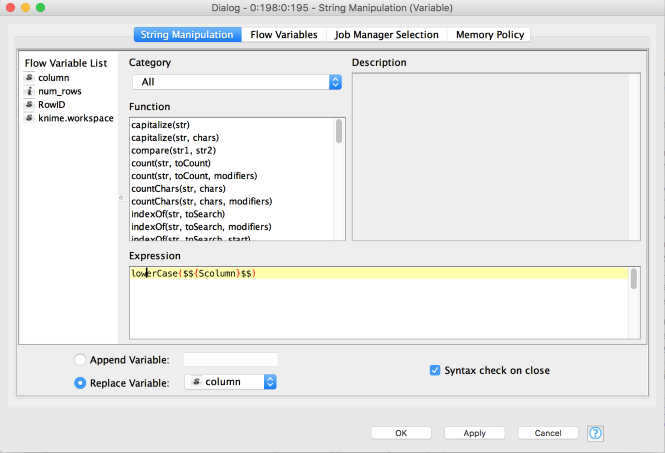
The String Manipulation node is there to convert the column name to lower case. In fact, the database we are using expects that column names are in lower case, but there’s no need to force clients calling our service to remember that:
We also need to be sure that the WrappedNode Output node actually passes our flow variables out (by default wrapped metanodes do not make variables defined inside them available to the rest of the workflow):
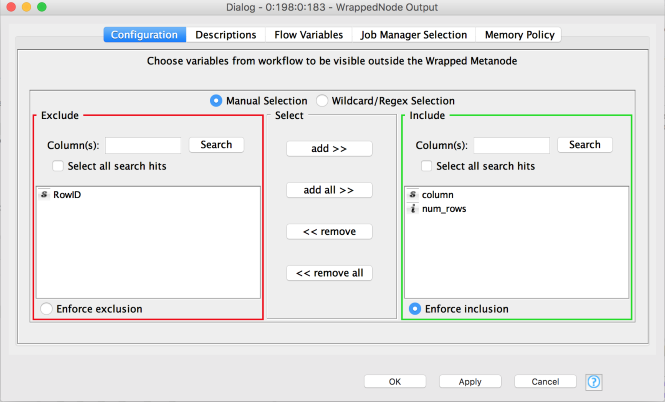
And that’s that. We now have a table with the parameters from the caller.
The other wrapped metanode we added converts the final table into a JSON that is returned to the caller. Here’s what’s inside that, it’s pretty simple:

We can execute the JSON Output node and open its view in order to see what the JSON we’re sending back to callers looks like:
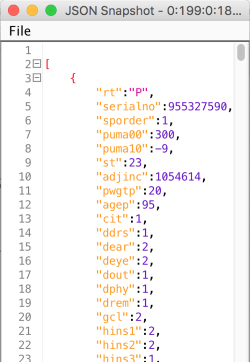
The table we’re returning has almost 300 columns, so I’m just showing part of one row here. You can see that the row is returned as one JSON object that’s part of a list.
Calling the service
Now let’s look at calling the service. Jon provided extensive detail about how to do this in his “KNIME Server REST API” post; I won’t repeat that here. I saved the workflow as 01_Create_basic_service and uploaded the service to a KNIME server and put it in the folder BlogPosts/SimpleServices, so the URL I’m going to POST to is:
http://<myserver>:8080/webportal/rest/v4/repository/BlogPosts/SimpleServices/01_Create_basic_service:job-pool
I POST this JSON (I’m using Postman to do this, just as Jon did):

Notice that “column” and “num_rows” are the parameter names in the configuration of the quickform nodes shown above. As long as those names aren’t ambiguous (i.e. there are no other inputs with the same names in the workflow), I can just use the name of the inputs and can skip the IDs of the nodes themself (this used to be required and finding the IDs is somewhat complicated when using wrapped metanodes). The output I get back looks like this:

Creating a service that expects data from the caller
The previous service converted the input provided by the user into flow variables and used those to parameterize a database query. We can also convert the input provided by the user into the rows of a table. This next example explores that.
Here’s the sample workflow:

We take the rows that come in from the caller (we’ll get to how they come in) and pass them to a parameterized database query that uses the input to query against the database’s naicsp column. Here’s the configuration dialog for the parameterized database query:

Notice that I selected the “Retain all columns” box, this will include the columns from the input table (those used for querying) in the output table as well as the two columns I included in the select statement. The output of the query for an input table that includes these two rows:

looks like this:

The big question is how we get that input table. The complexity is, as before, hidden in the wrapped metanode:

Instead of using quickform nodes like we did in the last example, here we are directly processing the JSON coming in from the caller. The input data (in the JSON Input node) look like this:

You can see that we’re providing a list of records. Each record corresponds to a row. The rest of the nodes deal with the mechanics of breaking the input JSON into table rows, the usual sort of data plumbing that KNIME is good at. Here’s the configuration of one of the JSON to Table nodes (they are identical):

At the end of the wrapped metanode we have the input table shown above. The Output->JSON wrapped metanode is the same as before: it just converts the output table into a JSON object and prepares that to be returned by the web service.
Once this workflow is uploaded to the KNIME server I can then query it with JSON structured like that shown above:

And get the results as JSON:

Easy enough!
Let’s quickly review: in this blog post I created two KNIME workflows that can be deployed as RESTful web services using the KNIME Server. The first web service expects the caller to provide two parameters - a column name and a number of rows, retrieves results from a database using those parameters, and returns the results as JSON. The second workflow expects the caller to provide a list of records that are converted into a KNIME table and used to parameterize a database query, the results are again returned as JSON. In each case the modifications relative to a standard KNIME workflow are pretty minimal: a few nodes need to be added to deal with the JSON input from the caller and to convert the output table to JSON which can be returned to the caller. Along the way I also showed examples of calling the services along with examples of what the JSON that a caller should provide looks like. I hope you’ll agree with me that the combination of the KNIME Analytics Platform and KNIME Server makes it pretty easy to create and deploy RESTful web services to your organization.
The workflows I created for this blog post are available on the KNIME public examples server as knime://EXAMPLES/09_Enterprise/01_Server/01_RESTful_Services/01_Create_basic_service* and knime://EXAMPLES/09_Enterprise/01_Server/01_RESTful_Services/02_Create_basic_service2*.
You can access them directly in your version of the KNIME Analytics Platform by logging into the EXAMPLES server (in your “KNIME Explorer” pane) and browsing to the folder 09_Enterprise/01_Server/01_RESTful_Services
An aside: using SQLite on the KNIME Server
These workflows use SQLite as the database. Due to limitations of either SQLite itself or the way it is used within KNIME, this isn’t as easy as it might be. This note explains how to work around this.
The usual approach to working with files in KNIME workflows that should work on both the KNIME Server and in the Analytics Platform is to use workspace-relative references using knime://knime.workflow URIs. For example, I like to have a Data folder at the same level as the folder containing my workflow in the KNIME Explorer. I can then reference files in that folder like this: knime://knime.workflow/../../Data/db.sqlite. Unfortunately this doesn’t work with SQLite (or with H2, another file-based database available in KNIME). Instead you need to create the data directory inside the same directory as your workflow and put the sqlite file there. For example, for the first example in this post, my KNIME workspace was located in the directory /Users/glandrum/KNIME workspaces/ (that’s a path on my laptop). The workflow itself was under that in the directory /Users/glandrum/KNIME workspaces/Examples/Web Services/2_Creating Web Services. Using my operating systems file explorer, I created a directory under that one called _data and put the SQLite file newCensus.sqlite there. I could then reference the file like this in the SQLite Connector node:

When I copy my workflow and upload it to the KNIME server, the _data directory and the database it contains will be automatically uploaded with it. This isn’t optimal since I end up with one copy of the SQLite file per workflow that uses it, but it’s much better than not being able to use SQLite at all!
Additional Resources
- The KNIME Server product page.
- Our blog post The KNIME Server REST API
- Our blog post Giving the KNIME Server (a) REST
- The workflows used in this blog post:
knime://EXAMPLES/09_Enterprise/01_Server/01_RESTful_Services/01_Create_basic_service*
knime://EXAMPLES/09_Enterprise/01_Server/01_RESTful_Services/02_Create_basic_service2*
* The link will open the workflow directly in KNIME Analytics Platform (requirements: Windows; KNIME Analytics Platform must be installed with the Installer version 3.2.0 or higher)
