Complex AI chatbots and autonomous agentic systems depend heavily on effective prompts and access to tools. These tools often perform specialized tasks and can be specialized agents themselves. Additionally, writing good prompts has become a distinct discipline in itself.
Until recently, finding and accessing these tools was challenging because each AI framework had its own way for browsing and using tools from its repositories. The Model Context Protocol (MCP) is a new standard, developed by the AI company, Anthropic, to solve this challenge.
This article explains what Model Context Protocol (MCP) is, how you can adopt it using KNIME, and walks you through setting up KNIME Business Hub as an MCP server. MCP support is a popular request from the KNIME community, and we're here to show you how to make it happen.
What is MCP?
MCP provides a standardized way to browse and call tools from a repository. It focuses on ease of accessing external data sources, which traditionally varied significantly across different AI frameworks. In many cases, accessing data can be regarded as a tool itself. A tool can be anything that does something, where the “to do” can be a retrieval task like “get this data”, or something more actionable like “send an email”, or “book a flight” — read more here.
MCP solves the issue of scalability by offering a universal, open standard for connecting AI to data sources and tools. Instead of patchwork integrations, it uses one consistent protocol — making access simpler, faster, and more reliable.
Anthropic describes MCP as:
MCP is an open protocol that standardizes how applications provide context to LLMs. Think of MCP like a USB-C port for AI applications. Just as USB-C provides a standardized way to connect your devices to various peripherals and accessories, MCP provides a standardized way to connect AI models to different data sources and tools.
The protocol also simplifies how agents — called “hosts” in MCP terminology — integrate with tools. It removes the overhead of instructing the agent on how to interact with a tool by using a consistent interface.
Technically, MCP is built on JSON-RPC 2.0, a remote procedure call (RPC) protocol using JSON for request and response formatting. In essence, structurally well-defined JSON Objects are sent around to give standard guardrails to the communication between agent and tool.This blog post is based on MCPs revision 2025-03-26, which introduces streamable HTTP transport instead of only HTTP and Server-sent Events, allowing us to use KNIME Business Hub’s service deployments.
Why use KNIME to adopt MCP
KNIME Analytics Platform, in combination with KNIME Business Hub, lets you not only build AI chatbots but also complete agentic systems.
KNIME workflows are a natural fit to model AI workflows as well as any type of tool. With strong data access and transformation capabilities, many existing KNIME workflows in an organization can be repurposed to act as MCP-compatible tools.
From a technology standpoint, adopting MCP using KNIME is straightforward. KNIME workflows can already be deployed as REST services on KNIME Business Hub, so turning them into MCP-compatible services mainly involves ensuring compliance with the MCP standard.
Tool discovery — browsing MCP-compatible, deployed KNIME workflows –– can also be implemented as a KNIME workflow, turning KNIME Business Hub into an MCP server. Since data access is a core KNIME strength, the integration between workflows and MCP is natural. Learn more about how good data makes better agents here.
Connect tools to AI agents with KNIME Business Hub and MCP
So we have this tool repository already there, sitting on KNIME Business Hub, waiting to be connected to agents. How can we do that?
JSON happens to be very well integrated with KNIME Analytics Platform in a variety of contexts, and you can format your data into a JSON object or multiple JSON objects via the nodes in the KNIME JSON-Processing Extension, and of course parse the data from JSON Objects just as well.
Because KNIME workflows can receive and send JSONs, you can build any piece of the protocol with a KNIME workflow. KNIME Business Hub’s service deployments provide the infrastructure to manage the communication between the MCP parts, implemented with KNIME workflows. Each of these parts can be used individually, or in combination, and the MCP ensures standardized communication along the way.
The following sections will explain how you can implement the pieces required by the MCP, use REST service deployments on KNIME Business Hub to provide context, tools, and prompts to other AI applications or agents (also known as MCP clients). You will also learn how these deployments can be configured to make the KNIME Business Hub act as a MCP Server, allowing you to dynamically add as many tools as you desire.
We will showcase the setup here on the same weather example that is used in the original MCP quickstart guide: two tools that return weather alerts for a given US state and the forecast of a location in the US.
Build MCP compatible tools with KNIME workflows
Let’s start with the basic building blocks in an agentic AI setup: the tools themselves. Before diving into the examples and workflows themselves, this is the plan: implement each tool via a KNIME workflow.
KNIME workflows let you access data from any data source with KNIME’s 300+ built-in connectors to provide AI agents a complete picture and sufficient context from your data sources. Even if the underlying data sources or tech stack change, the workflow can be adapted so that the tool keeps functioning as before.
Each such tool implemented via a KNIME workflow has a meaningful workflow description, which documents what the tool exactly does, so that any agent or LLM can figure what it might use it for.
Then, the workflow is deployed as a service on KNIME Business Hub, named in a way that makes tools easily discoverable. This way, we build a tool repository on KNIME Business Hub. We’ll eventually build a MCP Server to list and call these tools that come in the form of service deployments.
In general, the interfaces of tools are handled with KNIME’s Container Input (JSON) and Container Output (JSON) nodes. Once deployed as a service deployment, these nodes define the in- and output format. This readily divides a general tool workflow into three parts:
- Input processing: input validation and preparation of the arguments for the next step. MCP defines the `inputSchema` of tools such that each argument is a field in the input JSON. This can be represented by one Container Input (JSON) per argument, so that each argument can have its human (& LLM) readable description.
- The actual work: interacting with data sources or other endpoints, “doing something with the input”. Given valid input, errors may happen most likely in this state, and should be handled accordingly, for example with the Try-Catch-Motif.
- Output preparation: The results need to be put into a format LLMs can understand, and is as well defined by the MCP. Output types can be text, images, audio, or embedded resources, and the examples here focus on text output.
Practical walkthrough of building MCP compatible tools with KNIME
Enough of the theory, let’s build some workflows!
To start with, we will implement two tools, a “Weather Alerts”-tool that receives a US state and returns any weather alerts for that state, and a “Weather Forecast”-tool that receives latitude and longitude of a position in the US and returns the five day forecast of that position.
Example 1: MCP-compatible weather alerts tool
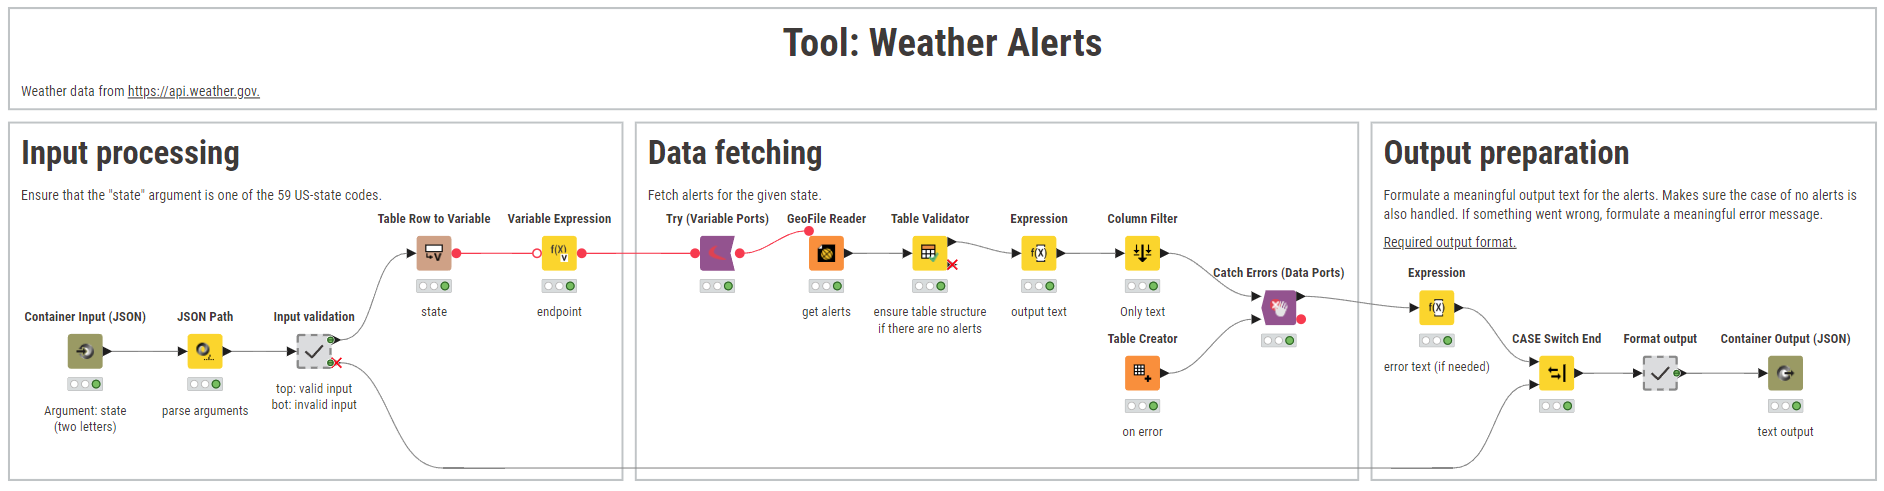
As the workflow description briefly puts: This tool gets “weather alerts for a US state.” Now, let’s define the in- and output format along with the actual work of interacting with data sources:
Step 1: MCP-compatible input processing
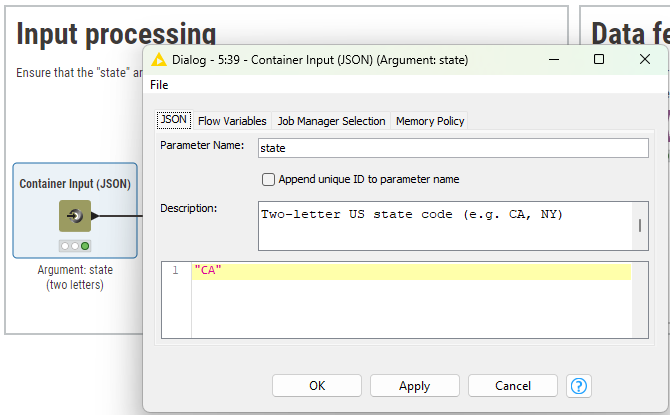
The most important node with respect to the MCP is the Container Input (JSON) node, since it shapes the input schema of the tool. In its configuration, the name of the input parameter, a human readable description, and an example are defined. The example will also act as the default value.
Note that you can expect a complex JSON object as input here — which is no problem, if you can describe it properly, so whoever or whatever is using the tool understands how this argument is supposed to look like.
In this case, we expect one of the 59 possible two-letter-encoded states of the US, which is validated in the input validation metanode — if it’s something else, data fetching is skipped and a meaningful error message is given according to MCP.
Step 2: Data fetching
The data fetching part is the usual workflow building, and independent of MCP. In this case, the GeoFile Reader Node is used to receive the alerts for the given state, and each output alert is formatted into a single string paragraph.
In case you are interested in learning more about the Geospatial Extension that lets you work with geo data in KNIME, take a look at:
- Thinking About Working with Geospatial Data? Start Here.
- A Hands-On Tutorial: Geospatial Analytics with KNIME
- How to fight fire with geospatial analysis in KNIME
In case something goes wrong (Server not available, network connection interrupted, …), the Try-Catch Motif is employed and a meaningful error message is returned.
Step 3: MCP-compatible output preparation
The received data (or errors) are then put in the format standardized by the MCP: an array `content`, that holds the output objects. Those are expected to be of type text, audio, image, or resource. In the case of the alerts, a single object of type text is returned by concatenating the alerts events with newlines.
Finally, the data is passed to the Container Output (JSON) Node, which acts as the interface to the MCP Server. In terms of configuration, all we need to do is to set the parameter name to `result`. A description is optional, as everything involved knows what to expect by the protocol.
Example 2: MCP-compatible weather forecast tool
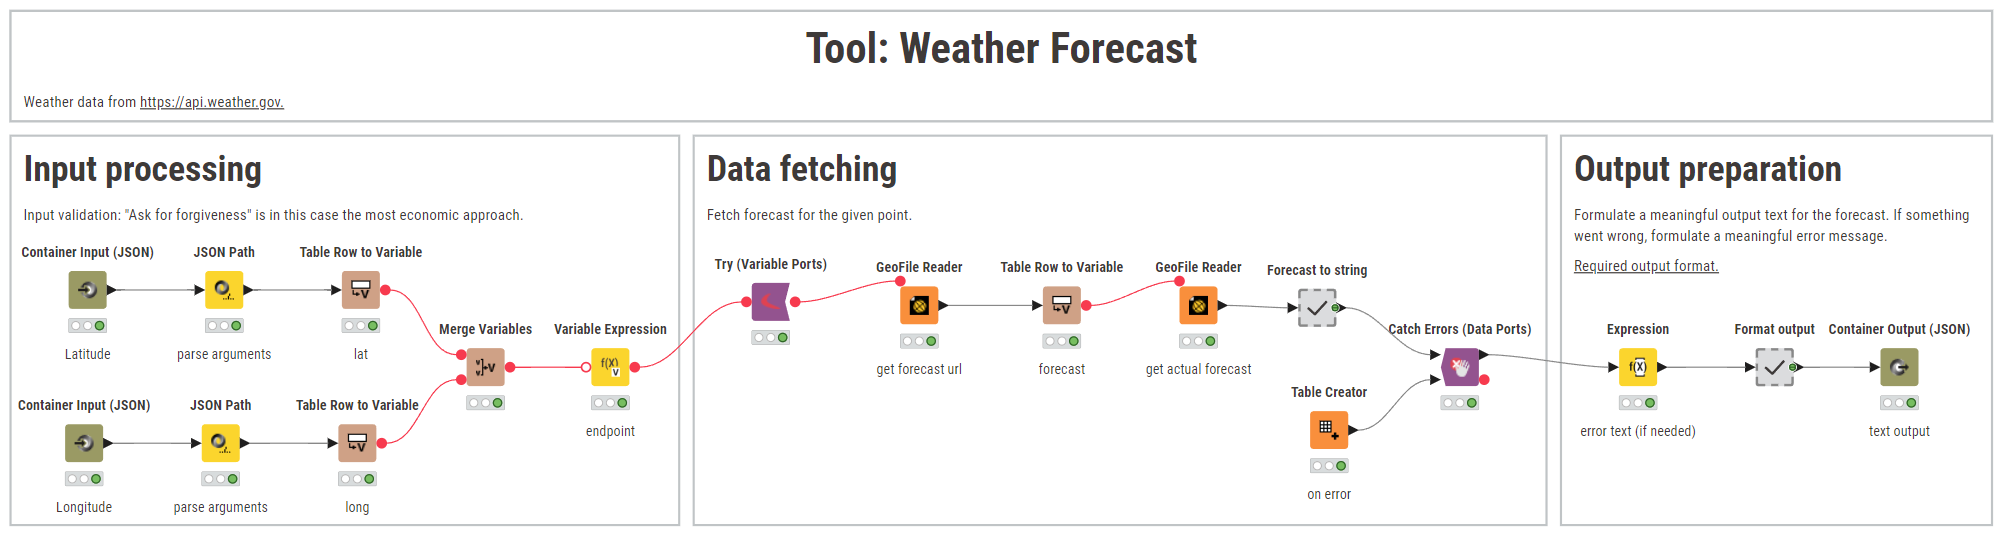
The same principle applies to the next tool: getting a forecast at a given location. To not sound repetitive, let’s focus only on the differences between the tools:
Step 1: Input processing
There are multiple arguments to the weather forecast tool, which are represented by two Container Input (JSON) nodes. This way, each argument readily receives its own description. True: to save complexity, you can group arguments together in a single input node, but for the sake of demonstration we are using two inputs here.
Step 2: Input validation
Input validation is handled “ask for forgiveness, not permission”-style, as the input validation would be much more complicated and resource intensive, instead of just trying it. Any errors when actually getting the data are then transformed into a meaningful error message in the data fetching and output preparation step.
Step 3: Output preparation
The output preparation prepares the result to a single text type content, which describes the weather forecast of the next five days.
Download both examples here.
KNIME Business Hub as a MCP Server
Now that we have a set of workflows that act as tools, how do we put them to action? We already deployed them as services in KNIME Business Hub — which makes them accessible via REST API, as documented in the openAPI spec of each deployment (POST and GET requests), according to the model context protocol.
Now we need something to list them all, to create awareness of what tools actually exist. And we want to be able to interact and call these tools. Which is where the MCP Server comes into play.
We will provide an MCP Server hosted on KNIME Business Hub. The MCP Server is lightweight and uses stateless connections without server-sent events. Like our other services, this MCP server is built using KNIME workflows and deployed as a service, making it externally accessible.
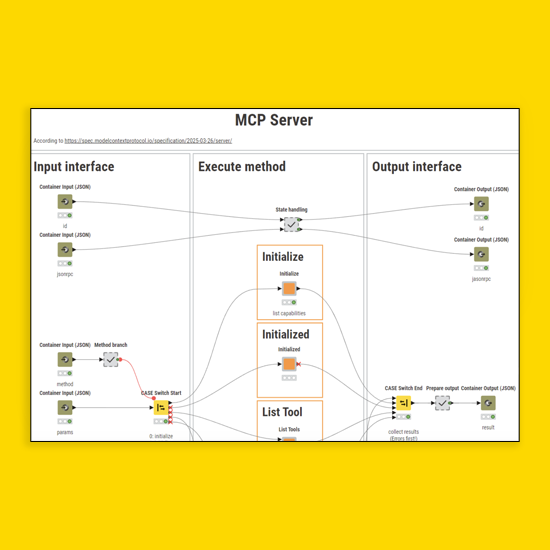
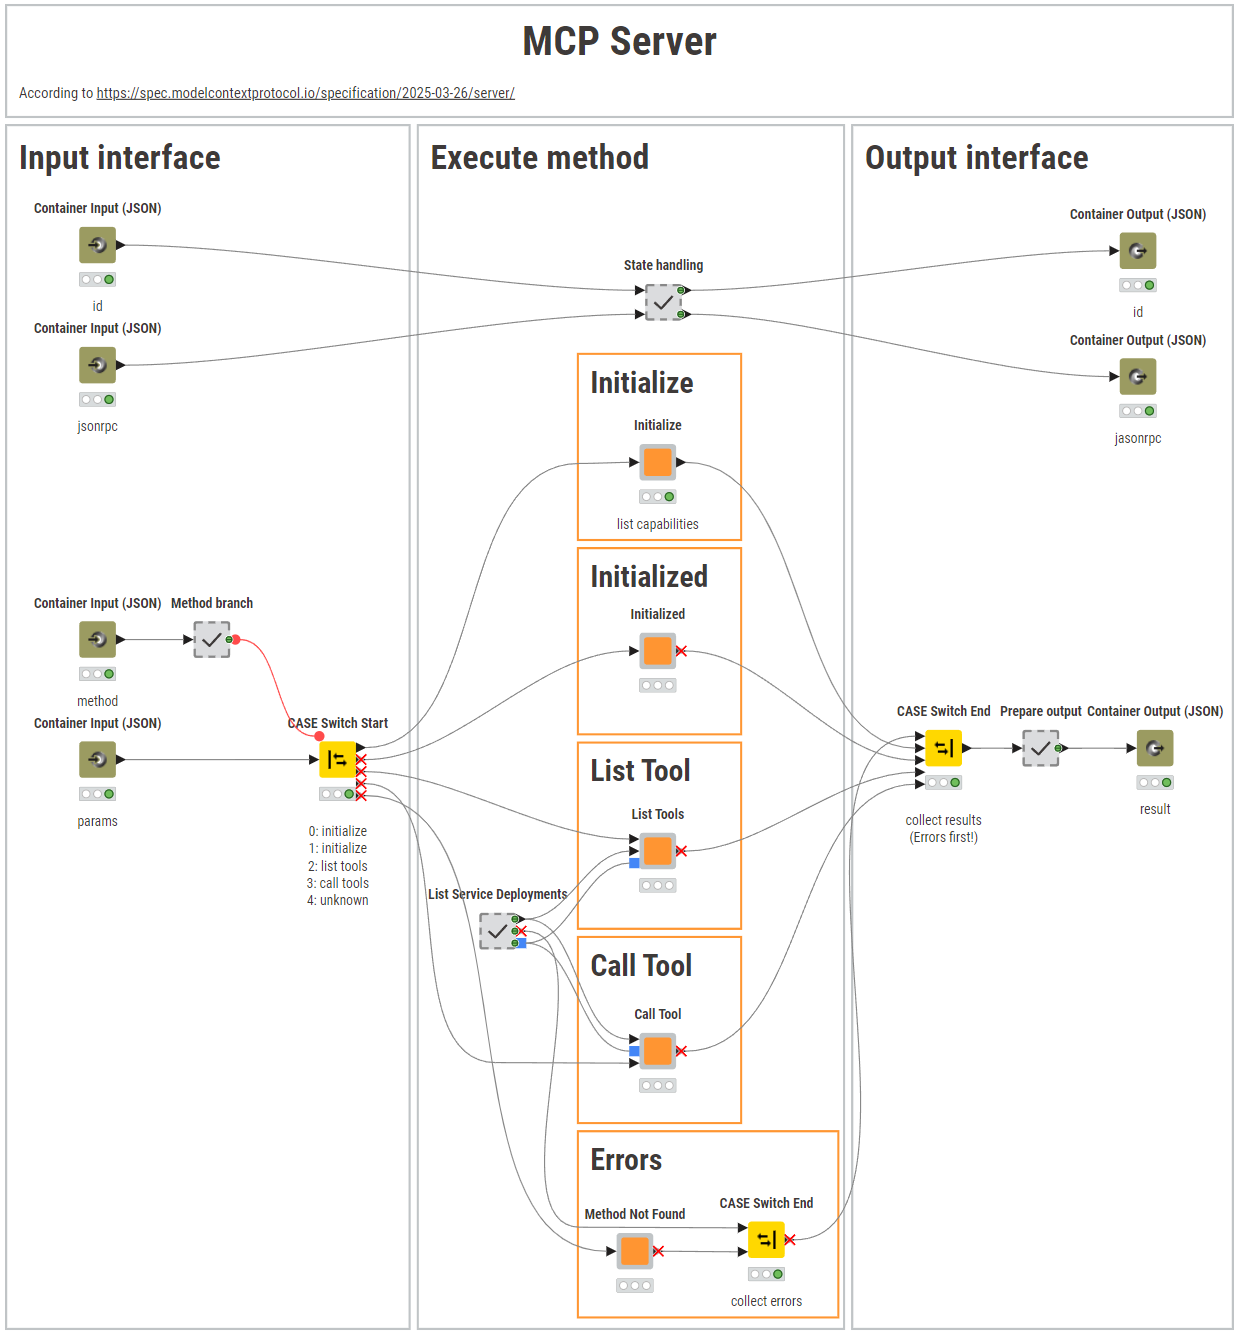
By now, the schema is clear: we define the in- and output of the deployments via Container Input (JSON) and Container Output (JSON) nodes so that we can focus on the logic within those interfaces.
In the case of an MCP server, input preparation consists of distinguishing the requested method by the server. Each method is then redirected to one branch:
- Initialize: Lists the capabilities of the server and a static JSON is returned. In case you add or change a capability, this method needs to be adapted accordingly, so that MCP clients can initialize appropriately.
- Initialized: Confirms that the initialization process initiated by the client has finished.
- Tools/list: Lists all available tools. To distinguish the service deployments of the tools from others, we prefix their name with “Tool: “. From the openAPI specification of each deployment (which is automatically generated from the Container Input (JSON) nodes in the tools workflow) and the workflow description, the inputSchema of each tool is created and returned as a list.
- Tools/call: Calls a specific tool. Here, we’ll do a POST request to the service deployment with the given parameters as the request body, and we’ll receive the output.
- Any other requested unknown method will result in an error message “Method Not Found”.
Finally, the output is created, which can be a “result” if everything went as expected, or an “error” if, for example, a tool was required that is not available or something in the tool call went wrong.
Download the example here.
MCP integration with KNIME: Browse more examples
What’s left to be done is an MCP Client that calls the MCP Server service deployment and maintains the connection. For demonstration purposes, a KNIME workflow can be used as the MCP Client, interacting with the MCP Server through simple POST requests. An example of this approach is shown in the "Client Calls" workflow, where each POST request includes the method call details in its request body.
In this article, you’ve seen how KNIME integrates well with MCP by allowing the implementation of individual pieces with KNIME workflows, with examples on how to do this. Sticking to the protocol, you can provide custom tools, built via KNIME workflows, to an agent in a standardized way. With KNIME’s selection of connectors and capabilities you can simply provide data, or do more complex tasks, lending that power to your AI Agents.
You can find the example workflows here.